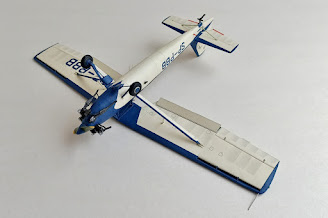
| Cześć! Wiem, że kazałem Wam długo czekać na końcową galerię modelu samolotu PZL S-4 Kania 3, ale lato to czas, w którym wolne chwile wypełniam nie tylko modelarstwem, ale np. jazdą na rowerze. W każdym razie, nadrobiłem zaległości i prezentuję Wam galerię zdjęć Kani na czystym tle. Sam model, bez dodatków. Nie jest to jeszcze koniec przygody z tym modelem, bo jak wiecie, powstaje diorama, na której stanie on razem z szybowcem typu Bocian. Temu zagadnieniu poświęcę jednak osobny post, bo jest to temat bardzo rozbudowany. Nie chciałbym tu wprowadzać elementów pobocznych, bo Kania sama w sobie jest tak piękna, że należy jej się osobna galeria zdjęć. Na dioramie uwaga oglądającego będzie rozproszona przez liczne dodatki, natomiast w tej galerii, bohater jest tylko jeden. Zapraszam! | Hi! I know that I made you wait a long time for the final gallery of the PZL S-4 Kania 3 model, but summer is the time when I fill my free time not only with modelling but also with cycling. Anyway, I caught up and I present you Kania's photo gallery on a clean background. The model itself, with no frills. This is not the end of the adventure with this model, because, as you know, a diorama is being created, on which it will stand together with the polish glider, known as Stork. However, I will devote a separate post to this issue, because it is a very complex topic. I would not like to introduce side elements here, because Kania itself is so beautiful that it deserves a separate photo gallery. On the diorama, the viewer's attention will be distracted by numerous things, while in this gallery there is only one character. Enjoy! |
Linki do relacji z budowy:
P.S. Być może jasne tło nie jest do końca trafione, bo sam model jest w połowie jasny. Starałem się jednak robić zdjęcia tak, żeby kremowy kolor kadłuba nie zlewał się za mocno z tłem.
| Here you can find links to the model build:
P.S. Perhaps the bright background is not completely right, because the model itself is half-bright. However, I tried to take pictures so that the cream colour of the fuselage did not blend too much with the background.
|


Oglądając zdjęcia mam wrażenie jakbym widział prawdziwy samolot, a nie model. Jest piękny.Kolejna perełka w Twojej kolekcji.Gratuluje. Pozdrawiam.
OdpowiedzUsuńŚwietny! Mam go w swojej kolekcji, ale jeszcze nie zdecydiwałem się zmintować. Bardzo porządna prezentacja.
OdpowiedzUsuń