
| Tak jak wspomniałem w galerii tego modelu, plany były wielkie - chciałem zrobić video-relację z jego budowy i zebrałem materiał filmowy z jego powstawania. Niestety jest tego tak dużo, że na obecną chwilę nie jestem w stanie poświęcić wystarczająco czasu na obróbkę. Może kiedyś do tego pomysłu wrócę. Tymczasem chciałbym się podzielić z Wami zdjęciami oraz wrażeniami z budowy tego modelu. | As I mentioned in the gallery of this model, the plans were great - I wanted to make a video model build report of its construction and collected a lot of footage. Unfortunately, there is so much of it that at the moment I am not able to devote enough time to process it. Maybe one day I will come back to this idea. Meanwhile, I would like to share with you the photos and impressions of the build of this model. |

| Na początek wycinanka. Za 29 zł otrzymujemy pięknie wydany zeszyt z prostym, ale w swej prostocie genialny modelem. Wydawnictwo ma w ofercie również dodatkowe akcesoria do modelu, skusiłem się na zestaw laserowo wyciętych wręg. Wydaje mi się, że były nieco za duże, ale po delikatnym oszlifowaniu wszystko pasowało idealnie. Uważam, że jednym z największych jego atutów tego wydania jest wspaniałe opracowanie graficzne - moim zdaniem kolorystyka i delikatna waloryzacja wyszły rewelacyjnie. Kolory są żywe, intensywne, nasycone i co najważniejsze - jednakowe na każdym arkuszu. Pod tym względem to chyba najlepiej wydany model w Kartonowej Kolekcji. Poza tym, spasowanie jest właściwie bezbłędne, konstrukcja jest dobrze przemyślana - to nie powinno dziwić, skoro autorem jest Paweł Mistewicz. To nie jest trudny model i z pewnością można polecić go dla początkujących. Z drugiej strony, myślę, że każdy bardziej zaawansowany modelarz będzie mógł wiele "wyciągnąć" z tego opracowania. Ja się świetnie bawiłem klejąc ten model - czułem przy nim po prostu czystą radość klejenia. | First about this publication. For 29 PLN (about 5-6 €), we get a beautifully printed issue with a simple, but in its simplicity, brilliant model. The publisher also offers additional accessories for the model, I bought a set of laser-cut frames. I guess they were a bit too big, but after being lightly sanded, everything fit perfectly. I believe that one of the greatest advantages of this release is the wonderful graphic design - in my opinion, the colors and delicate weathering are simply amazing. The colors are vivid, intense, saturated and most importantly - the same on every sheet. I think it is probably the best-released model in the Kartonowa Kolekcja. In addition, the fit is virtually flawless, the design is well thought out - it should not be surprising because the author is Paweł Mistewicz. It is not a difficult model and can certainly be recommended for beginners. On the other hand, I think that any more advanced modeller will be able to get a lot more out of this model. I had a great time glueing this kit - I just felt the sheer joy of building it. |


| Wyszedłem z założenia, że nie będę wprowadzał żadnych większych zmian w projekcie i będę się starał skleić ten model w standardzie. Oczywiście jak zawsze nie udało się zrealizować tego planu i trochę ulepszyłem projekt. Ograniczyłem się do wprowadzenia czterech zmian czy też ulepszeń. Po pierwsze - zastąpiłem kartonową kratownicę w kabinie na konstrukcję z drutu. Kartonowe elementy posłużyły mi po prostu jako szablony, jest to drobna zmiana, ale dzięki niej wnętrze kokpitu wiele zyskuje. Tutaj oczywiście można by było się pokusić o wykonanie kompletnej kratownicy i bogatą waloryzację kabiny. Na podstawie tego opracowania można przy odrobinie wysiłku i własnej inwencji wiele wyciągnąć, ale tak jak wspomniałem - nie tak sobie założyłem. | I assumed that I would not introduce any major changes to the design and that I would try to build this model as standard. Of course, as always, this plan failed, and I improved it a bit. I limited myself to making four changes or improvements. First of all - I replaced the cardboard grating in the cockpit with a wire structure. The cardboard elements just served as templates, it is a minor change, but the interior of the cockpit gains a lot thanks to it. Here, of course, one could be tempted to make a complete truss and rich cockpit valorisation. On the basis of this issue, you can do a lot with a little effort and your own invention, but as I mentioned - not what I assumed. |


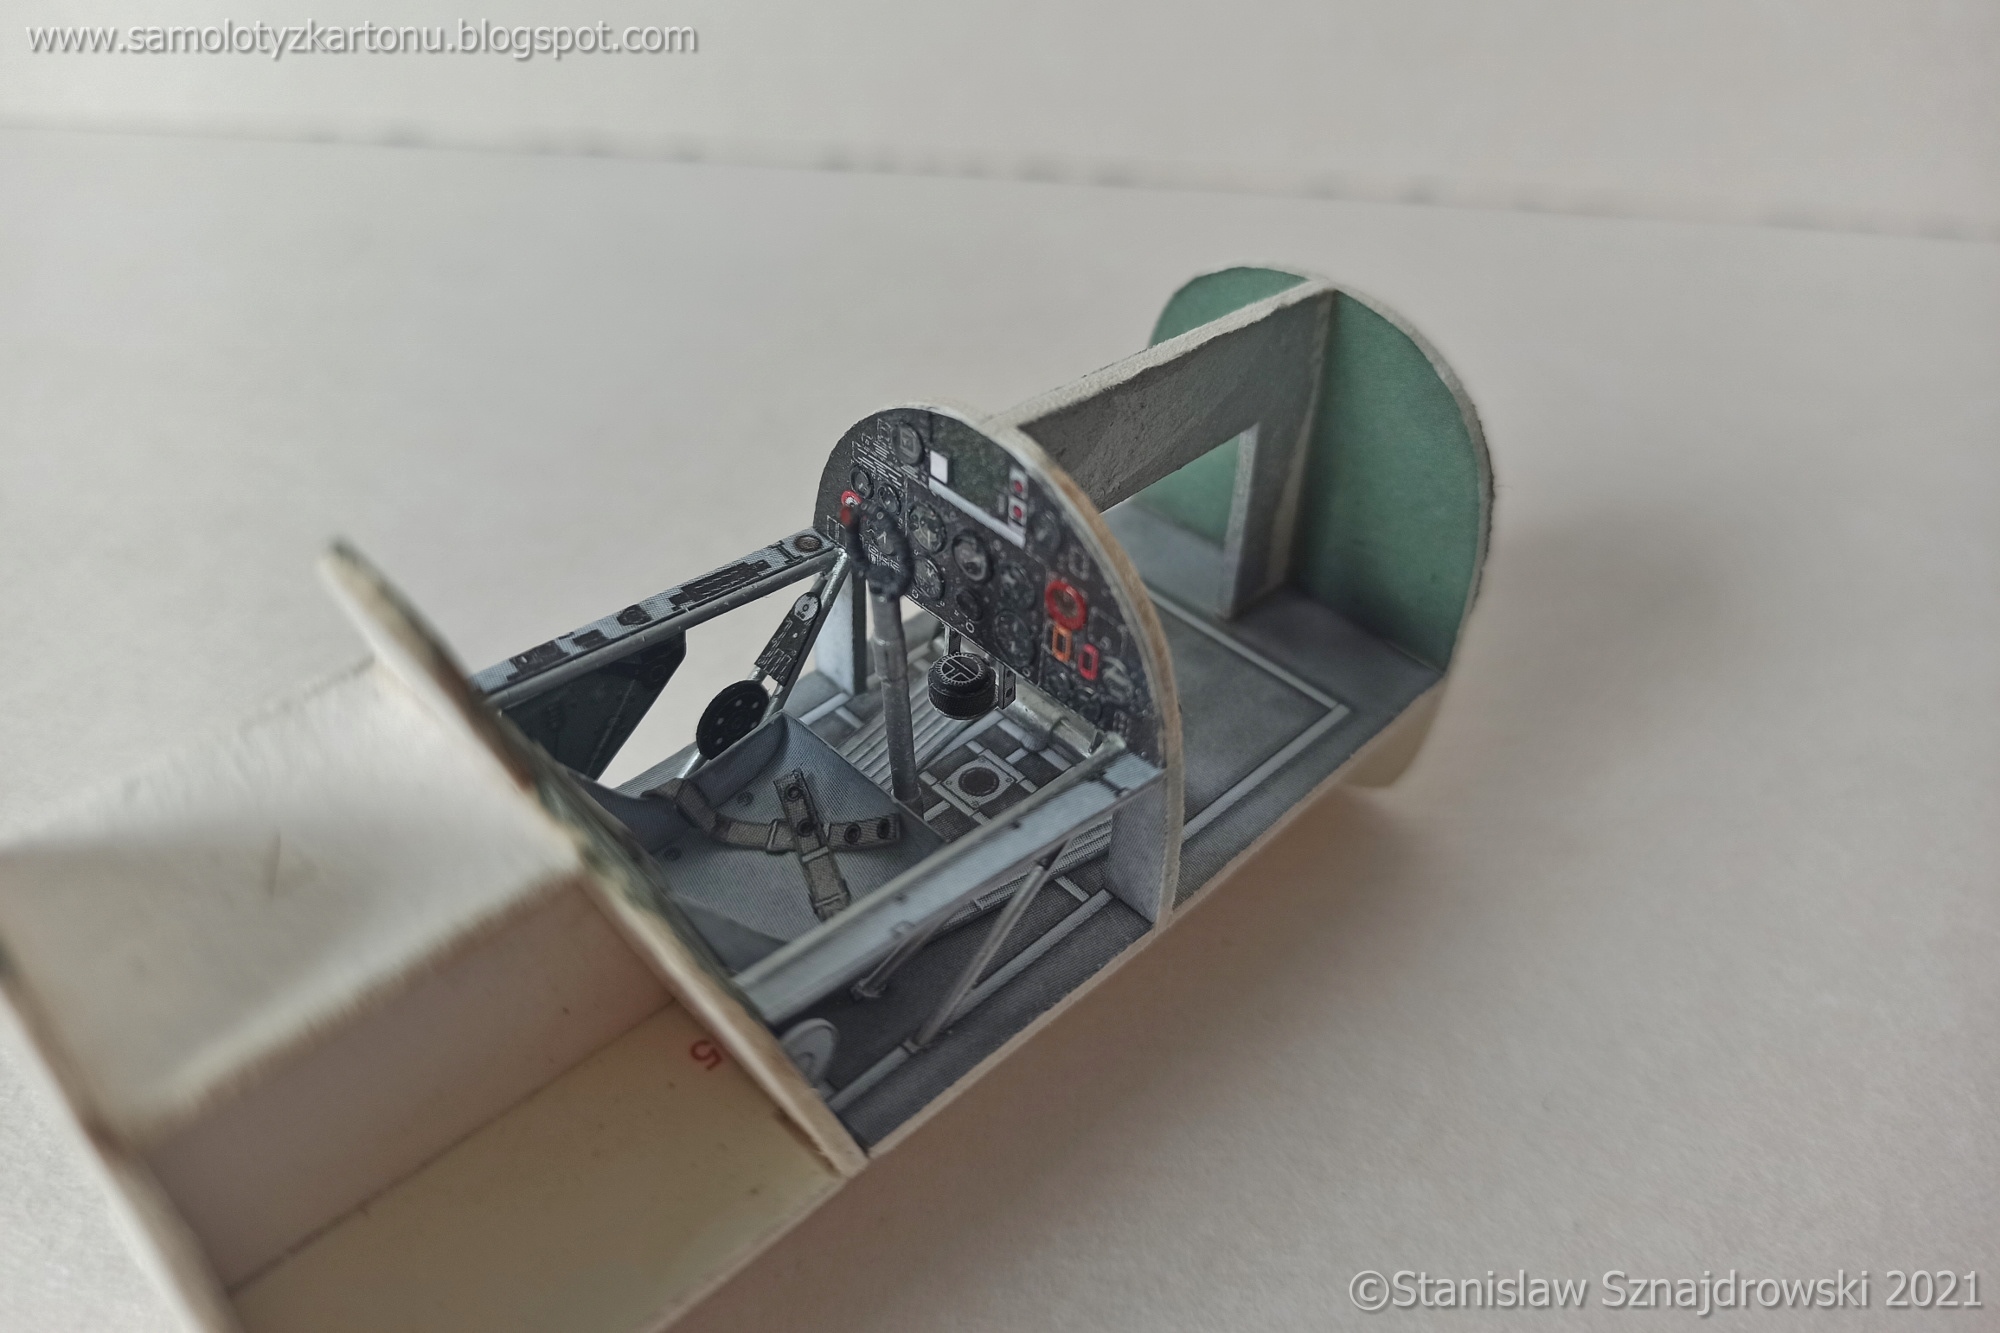

| Po drugie, zmieniłem sposób montażu kolektorów spalin. Według projektu były one mocowane bezpośrednio do kadłuba (czarne pola na poszyciu). Rozwiązanie to było dla mnie nie do przyjęcia, a korekta była bardzo łatwa do wykonania. Po sklejeniu skorupy przedniej części kadłuba wyciąłem czarne pola, do środka wkleiłem wnęki, pomalowałem na czarno, a na dalszym etapie budowy zamontowałem w nich kolektory wylotowe spalin. Uważam, że dzięki temu model zyskuje więcej realizmu. | Secondly, I changed the way of mounting the exhaust manifolds. According to the design, they were attached directly to the fuselage (black areas on the plating). This solution was unacceptable to me and the correction was very easy to do. After gluing the shell of the front part of the fuselage, I cut out black fields, glued the recesses inside, painted them black, and at a later stage of construction I installed exhaust manifolds in them. I believe that this gives the model more realism. |


| Po trzecie - wykonałem mozolną pracę polegającą na wykonaniu odciśniętej drucianej konstrukcji na płóciennej części poszycia kadłuba. Co prawda grafika w modelu ładnie uwydatnia te żeberka, ale chciałem je odcisnąć. Przeniosłem więc wszystkie linie na lewą stronę, następnie przy pomocy igiełki i metalowej linijki odcisnąłem te linie. Konieczne było zastosowanie podklejenia wewnętrznej warstwy poszycia wklejonego na butapren w celu usztywnienia właściwego poszycia. Po czwarte - nieplanowane - golenie podwozia głównego okazały się dla mnie niemożliwe do zwinięcia. Karton nie chciał poddać się intensywnemu formowaniu i pozałamywał się podczas zwijania. Zeskanowałem sobie golenie z drugiego posiadanego przeze mnie egzemplarza i wydrukowałem na cieńszym papierze, po sklejeniu pomalowałem przy pomocy aerografu na odpowiedni kolor. Podposzycie zastosowałem na całej powierzchni kadłuba, skrzydeł i usterzenia. Zrobiłem tak, ponieważ zamierzałem na koniec polakierować model lakierami Vallejo. Są one cięzkie i wilgotne, dlatego podposzycie jest niezbędne. Tym razem udało mi się uniknąć problemów opisanych przy modelu Spitfire XVIe, powłoka lakiernicza wyszła dużo lepiej, ale i tak lakiery te mnie nie przekonują. | Third, I did the arduous work of making an imprinted wire structure on the canvas part of the fuselage plating. It is true that the graphics in the model nicely show off these ribs, but I wanted to imprint them. So I moved all the lines to the left side, then I made these lines with the help of a needle and a metal ruler. It was necessary to stick the inner layer of the sheathing glued to the butaprene in order to stiffen the proper sheathing. Fourth - unplanned - main landing gear legs turned out to be impossible for me to fold. The cardboard refused to intensive shaping and collapsed when rolled up. I scanned my shin from the second copy I had and printed it on thinner paper, after gluing it, I painted it with the appropriate color using an airbrush. I used the undercoat on the entire surface of the fuselage, wings and tail. I did it because I was going to finish the model with Vallejo varnishes. They are heavy and wet, therefore sub-irrigation is essential. This time I managed to avoid the problems described with the Spitfire XVIe model, the paint coating came out much better, but I am still not convinced by these varnishes. |


| Jak widać na zdjęciach, poszycie kadłuba wykonałem metodą "na skarpetę", która moim zdaniem najlepiej się sprawdza. Skleiłem osobno przednią i tylną część, osobno powstał również szkielet centralnej i przedniej części kadłuba wraz z kabiną. Tylna część kadłuba, a właściwie to segment za kabiną pilota otrzymał dodatkową pionową wręgę przebiegającą wzdłuż osi symetrii. Osadziłem w niej gniazdo masztu antenowego. Dzięki temu nie wygnie się do tyłu po rozpięciu anteny pomiędzy nim, a statecznikiem pionowym. Gdy wszystkie elementy były gotowe, połączyłem je ze sobą i uzyskałem kadłub. Następnie skleiłem usterzenie, skrzydła, śmigło, podwozie oraz pozostałe elementy. Model powstawał około półtorej miesiąca. | As you can see in the photos, I made the fuselage sheathing using the method which I call "the sock". In my opinion, it works very well. I glued the front and rear parts of the fuselage separately. I also built separately the framework of the central and front parts of the fuselage with the cockpit. The rear part of the fuselage, or rather the segment behind the pilot's seat, received an additional vertical frame running along the axis of symmetry. I put the socket of the antenna mast in it. Thanks to this, it will not bend backwards after spreading the antenna between it and the vertical stabilizer. When all the elements were ready, I put them together and got the fuselage. Then I made the tail, wings, propeller, landing gear and other elements. The model was built for about a month and a half. |


| Winietka pod model powstała spontanicznie, idea pojawiła się podczas urlopu, gdy przypadkiem odwiedziłem Muzeum Dywizjonu 303 im. ppłk J. Zumbacha. Nabyłem tam pamiątkową naszywkę i pomyślałem, że wkomponuję ją w podstawkę. Po powrocie do domu przyciąłem sobie odpowiedniego rozmiaru płytę, naniosłem na nią trawnik - resztki gotowej maty (sztukowałem z tego, co zostało mi po dioramie z PZL S-4 Kania 3). Na tę matę położyłem trochę kępek i pojedynczych źdźbeł trawy (mieszanka Fallera, jesienne kolory). Trawnik przetarłem w paru miejscach gąbką ścierną (takie wydeptane miejsca). Następnie całość pocieniowałem brązami, żółtymi i zgnito-zielonymi kolorami przy pomocy aerografu. To była bardzo spontaniczna akcja, od wycięcia płyty do postawienia modelu na gotowej winietce minęło może 3-3,5 godziny. W międzyczasie skoczyłem wywołać zdjęcie pilotów, które stoi na półce obok modelu. Zdjęcia gotowego Hurricane'a oraz podstawki znajdują się w galerii -> KLIK. | The vignette for the model was created spontaneously, the idea appeared during my vacation when I accidentally visited the 303 Squadron Museum. I bought a commemorative patch there and thought that I would include it in the base. After returning home, I cut a wooden slab of the right size, placed the lawn on it - the remnants of the ready grass mat (I cut up from what was left of the PZL S-4 Kania 3 diorama). On this mat, I put some tufts and single blades of grass (Faller mix, autumn colours). I rubbed the lawn in a few places with an abrasive sponge (such well-worn spots). Then I shaded the whole with browns, yellows and rotten-green colours using an airbrush. It was a very spontaneous action, maybe 3-3.5 hours passed from cutting the disc to placing the model on the finished vignette. Meanwhile, I went to the copyshop to develop a photo of the pilots that stays on the shelf next to the model. Photos of the finished Hurricane and the stands can be found in the gallery -> CLICK. |

Co by nie było że nie zaglądam do relacji na stronie :) Gratuluję jeszcze raz. Powtórzę to co napisałem na FB. Wyciągnąłeś z tego modelu wszystko co jest możliwe w standardzie. I mam pytania, jeżeli można. Czy pokrywałeś czymś karton przed wycinaniem ? W jaki sposób pocieniasz wręgi żeby zastosować podposzycie, czy może stosujesz depron lub wypełniasz tylko przestrzenie pomiędzy wręgami ?
OdpowiedzUsuńCześć! Dzięki raz jeszcze za miłe słowa!
UsuńPytania zawsze mile widziane :)
1. Arkusze pokryte były przed klejeniem jednostronnie (od zadrukowanej strony) jedną warstwą caponu nałożonego wałkiem
2. Pocieniam wręgi w najprostszy możliwy sposób - runda papierem ściernym po obwodzie - następnie przymiarka, jeśli nadal za duża - jeszcze jedna runda, do skutku.
Pozdrawiam!
Przy remoncie dachu dobrze jest porównać różne dachówki i materiały — trafiłem na ciekawe propozycje na https://hanbud-dachy.pl/
OdpowiedzUsuń.