| Kilka
miesięcy temu, spontanicznie i niespodziewanie, pojawiła się wizja. Myślę, że
wielu modelarzy zna to uczucie kiedy pojawi się inspiracja, często znikąd,
przypadkiem. Czasem jest to zdjęcie zobaczone w Internecie, scena z filmu lub
fragment książki. Potrafi ona zawładnąć umysłem i obudzić wielkie pokłady
zapału do pracy nad realizacją idei. I tak było w tym przypadku. Zaczęło się od
budowy modelu samolotu PZL S-4 Kania 3, potem pojawił się pomysł ustawienia
modelu na dioramie razem z szybowcem, więc na warsztat trafił model Bociana.
Teraz, kiedy oba modele są już gotowe, nadszedł moment urzeczywistnienia wizji,
która wpadła mi do głowy i zdominowała mój modelarski świat na prawie pół roku.
W niniejszym poście zaprezentuję zarówno galerię zdjęć gotowego projektu, jak i
jego realizację. To bardzo duża ilość materiału, ale nie chciałem tego
rozdzielać. | A few months ago, spontaneously and unexpectedly a vision appeared in my mind. I think many modellers know this feeling when inspiration comes, often out of nowhere, by accident. Sometimes it is a photo seen on the Internet, a scene from a movie, an excerpt from a book. It can take over your mind and awaken a great amount of enthusiasm to work on the implementation of the idea. And so it was in this case, it started with the construction of the PZL S-4 Kania 3 model, the idea of placing the model on a diorama together with a glider appeared. Then I started to build the SZD-9 Bocian model. Now when both models are done, the moment has come to realize the vision that came to my mind and dominated my modelling world for almost half a year. In this post, I will present the photo gallery of the finished project together with its building process. |
Mówiąc o
dioramie z szybowcem i samolotem do holowania szybowców nasuwa się
automatycznie wniosek, że przedstawiana scena powinna ukazywać przygotowania do
wyniesienia szybowca w powietrze. Brałem taką opcję pod uwagę, jednakże było to
dla mnie zbyt oczywiste. Nie znaczy to rzecz jasna, że nie byłby to atrakcyjny
sposób przedstawienia obu maszyn. W mojej wyobraźni pojawił się jednak inny, mniej
oczywisty pomysł, któremu nie byłem w stanie się oprzeć. Zanim jednak
przejdę do opisu mojej sceny, należy ją umieścić w ramach czasowych. Samolot
PZL S-4 Kania 3 wzbił się po raz pierwszy w powietrze w 1957 roku, a został
wycofany z użytku na początku lat 70-tych. Jeżeli chodzi o szybowiec SZD-9
Bocian, to jak się dowiedziałem, mój model przedstawia trzecią wersję seryjna
oznaczoną jako "1C". Ten egzemplarz wzbił się po raz pierwszy w
powietrze w lutym 1954 roku (przypis).
Warto wspomnieć, że Bociany na przestrzeni lat były poddawane różnym
modyfikacjom i używane są po dziś dzień. Biorąc pod uwagę powyższe,
przyjąłem, że moja diorama pokazuje scenę, która mogłaby się wydarzyć w latach
60-tych XX wieku w Polsce. Mogłaby, bo jest wymyślona. Postanowiłem, że
postawię obie maszyny obok siebie na trawniku, przypuszczalnie na terenie
aeroklubu. Jest to letni, pogodny, ale nie upalny, spokojny dzień. W aeroklubie
odbywa się piknik lotniczy lub dzień otwartych drzwi, być może z okazji
jakiegoś święta. Możliwość interpretacji jest dowolna. Moim celem było
uzyskanie efektu spokojnej, radosnej i sielankowej atmosfery.
| Speaking of the diorama with the glider and the plane for towing gliders, the conclusion is automatically drawn that the presented scene should show the preparations for launching the glider into the air. I considered this option, but it was too obvious for me. Of course it does not mean, that it would not be an attractive way of presenting both machines. But there was another, less obvious idea in my mind that I couldn't resist. However, before I describe the scene, it needs to be put in a timeframe. The PZL S-4 Kania 3 took off for the first time in 1957 and was decommissioned in the early 1970s. As I found out, the model of SZD-9 Bocian glider that I built, is the third production version, marked as "1C". This type took to the air first in February 1954. It is worth mentioning that Bocians have undergone various modifications over the years and are used to this day. Taking the above mentioned fact into account, I assumed that my diorama shows a scene that could have happened in the 1960s, of course in Poland. It could because it's imagined. I figured I'd put the two machines next to each other on the lawn, possibly in an undefined aero club field. It is summer, a clear, but not hot, calm day. There is an air picnic or an open door day at the aero club, perhaps on the occasion of a holiday. Interpretation is free. My goal was to achieve the effect of a calm, joyful and idyllic atmosphere. |

| Do
wykonania podstawki użyłem płyty wiórowej (odpad po jakimś meblu), którą
przyciąłem do rozmiarów 40x70cm. Jak widać będzie to spora diorama, której
rozmiar w dużej mierze determinuje rozpiętość skrzydeł Bociana. Płytę
wyposażyłem w ramę z sosnowych listewek z zaokrąglonymi jednostronnie
krawędziami i pomalowałem mahoniową lakierobejcą - robię tak w przypadku
wszystkich moich podstawek. Na tak przygotowaną podstawkę położyłem trawnik -
ze względu na jego dużą powierzchnię zdecydowałem się użyć gotowej maty marki
Noch dedykowanej dla makieciarzy i budowniczych dioram kolejowych. Nigdy
wcześniej nie stosowałem takiego rozwiązania. Jakość trawnika nie jest ani
zachwycająca, ani zła. Całość podłoża wzbogaciłem miejscami w gotowe kępki
trawy - użyłem dwóch zestawów marki Green Line oraz jednego AK Interactive. | As the base, I used chipboard (waste of some furniture), which I cut to size 40x70cm. As you can see, it will be a large diorama, the size of which largely determines the Bocian's wingspan. I equipped the chipboard with wooden boards with rounded edges on one side and painted it with mahogany varnish - I do this for all my dioramas. I put the lawn on the prepared base - due to its large surface, I decided to use a ready-made Noch grass mat dedicated to railway dioramas. I have never used such a solution before. The quality of the lawn is neither amazing nor bad. I enriched the entire substrate in places with ready-made tufts of grass - I used two Green Line sets and one AK Interactive. |


| Przejdźmy
do figurek. Z samego założenia, że ma to być piknik lotniczy wynika, że na
dioramie musi znajdować się trochę ludzi. Przyjąłem, że rozsądnie będzie gdy
ustawię od 10 do 15 figurek. Nie może być zbyt tłoczno, w końcu to modele mają
grać tu pierwsze skrzypce. Reszta ma być tylko gustownym dodatkiem. Sporym
problemem okazało się znalezienie odpowiednich figurek. Gdybym robił scenę
przygotowania do załadunku szybowców transportowych przed operacją "Market
Garden", mógłbym przebierać w zestawach figurek. Postacie cywilne nie są
jednak tak popularnym towarem. W końcu znalazłem na e-Bay-u odpowiedni dla mnie
zestaw 14 figurek w kolejowej skali "Spur1" (1:32). Znajdują się w
nim postaci siedzące i stojące, kobiety, mężczyźni i dzieci. Jakość tych
plastikowych figurek określam jako dramatyczną. Głównym zarzutem pod ich
adresem jest kompletne zaburzenie proporcji i rozmiarów. Figurki mają
nienaturalnie długie i smukłe nogi, wyglądają jak patyki. Dysproporcje widać
wyraźnie w porównaniu z figurką pilota RAF z zestawu MB Model (MB3206).
Oczywistym okazało się, że będę musiał w nich sporo przerobić. Mój warsztat
zamienił się tymczasowo w klinikę przeszczepów kończyn. Każdej stojącej figurce
skróciłem nogi poprzez wycięcie kilku fragmentów ze środka. W kilku
przypadkach musiałem ucinać też ramiona, żeby zmienić ich położenie. Przy pracy
nad figurkami używałem Modelling Grey Putty firmy AK Interactive, bez tego
specyfiku nie uzyskałbym takiego efektu, jakiego bym sobie życzył. Muszę tutaj
zaznaczyć, że praca nad figurkami była bardzo mozolna i pracochłonna. O ile
malowanie było frajdą, to przeróbki trochę mnie wymęczyły. | Let's move on to the figures. The very assumption that it is supposed to be an air picnic or air show says that there must be some people on the diorama. I assumed it would be wise to place 10 to 15 figures. It cannot be too crowded, after all, the models are to play the first fiddle here. The rest is just a tasteful addition. Finding the right figures turned out to be a big problem. If I had been doing the scene showing the loading of transport gliders before Operation Market Garden, I would have been able to choose from figure sets. However, civilian figures are not such a popular commodity. Finally, on e-Bay, I found a suitable set of 14 figures in the "Spur1" scale (1:32). There are sitting and standing figures, women, men and children. I describe the quality of these plastic figures as dramatic. The main accusation against them is a complete disturbance of proportions and sizes. The figures have unnaturally long and slender legs, they look like sticks. The disproportions are clearly visible in comparison with the RAF pilot figure from the MB Model set (MB3206). It turned out that I had to rework a lot in them. My workshop turned temporarily into a limb transplant clinic. I shortened the legs of each standing figure by cutting out a few pieces from the inside. In some cases, I also had to cut off their arms to reposition them. When working on the figures, I used Modeling Gray Putty by AK Interactive. Without this specificity, I would not get the effect that I wanted. I must point out here that the work on the figures was very laborious and arduous. While painting was fun, the modifications tired me a bit. |

| Poniżej - przeszczepy kończyn, operacje plastyczne... | Below - limb transplants, plastic surgery ... |


| Na
bieżąco przymierzałem figurki do podstawki, rozważałem różne warianty ich
rozstawienia. Większość z nich na etapie prac dostała imiona lub przydomki.
Wymyśliłem sobie, że rozstawię je tak, żeby podzielić akcję na kilka scenek.
Główną rolę grają figurki przy modelu Kani - pilot, kobieta i mężczyzna
pozujący do zdjęcia oraz pani z aparatem fotograficznym (w oryginale trzymała
torebkę!). Być może koło pilota stoi prezes aeroklubu wraz ze swoją partnerką,
a kobieta z aparatem robi zdjęcie do lokalnej prasy? Interpretacja dowolna.
Inspiracją do tej sceny było zdjęcie z lat 60 lub 70 na tle podobnej maszyny, znalezione
w sieci, niestety nie mam linka. Kolejną postacią jest "pan
ciekawski" stojący przy szybowcu. Zawsze się taki znajdzie, nikt go nie
zna, przyszedł sam, zerka w każdy kąt, zagaduje. Na poniższym zdjęciu jeszcze
stoi wyprostowany, w ostatecznej wersji jest pochylony i badawczo zagląda do
kabiny. Początkowa koncepcja zakładała, że z przodu, na pierwszym planie będzie
stał ojciec z synem machający do przelatującego samolotu, a gdzieś niedaleko
ulokuję matkę z córką idące w ich stronę. Później przesunąłem te figurki
bardziej na tył, żeby nie odciągały uwagi od modeli. Na drugim albo nawet
trzecim planie miała znaleźć się para na ławeczce, ale o tym za chwilę. | While working on the figures I was considering various options for placing them. Most of them were given names or nicknames when working on them. I figured I would arrange them in such a way as to divide the action into several scenes. The main role is played by the figures next to Kania's model - a pilot, a woman and a man posing for a photo, and a lady with a camera (in the original she was holding a handbag!). Perhaps next to the pilot, there is the president of the flying club with his wife. Maybe the woman with the camera is taking a photo for the local press? Fell free to interpret. The inspiration for this scene was a photo from the 1960s or 1970s with a similar machine in the background, found on the Internet, unfortunately, I have no link. Another character is a "curious guy" standing next to the glider. You can always meet someone like him on the shows or exhibitions. No one knows him, he came alone, looks into every corner, hangs around the exhibition. In the photo below, he is not bending down yet, in the final version I bent him a bit and he is looking into the cockpit. The initial concept was that a father and son would be standing in the foreground, waving to a plane passing over their heads, and somewhere nearby, a mother and daughter walking towards them. Later, I moved these figures more to the rear so as not to distract from the models. |


| Po
wprowadzeniu wszystkich niezbędnych poprawek i odpowiednim oszlifowaniu
przyszedł czas na malowanie figurek. Na początek naniosłem aerografem szary
podkład marki Vallejo (74.601), następnie bazowe kolory. Postanowiłem, że
figurki nie będą miały zbyt krzykliwych kolorów, zdecydowałem się na stonowane,
pastelowe barwy, dużo odcieni kremowych, błękitów i szarości. Bazowe kolory
również nałożyłem aerografem, potem do ręki chwyciłem pędzelki, a na samym
końcu użyłem twardych ołówków i mocno zaostrzonych kredek. Ostatnim etapem było
polakierowanie figurek matowym lakierem. Kilka z nich wymagało uzupełnienia o
specjalne dodatki. Pilot otrzymał wykonaną z pasków cienkiego papieru uprząż
spadochronową wraz ze spadochronem. Wzorowałem się na fotografiach z epoki oraz
zdjęciach figurek znalezionych w Internecie. | After making all the necessary corrections, sanding and polishing them it's time to paint the figures. First I applied a grey Vallejo surface primer (74.601) with an airbrush, then the base colours. I decided that the figures would not have too flashy colours, so I used subdued, pastel colours, a lot of shades of cream, blue and grey. I also applied the base colours with an airbrush, then grabbed the brushes in my hand, and at the end, I used hard pencils and strongly sharpened crayons. The last step was to paint the figures with matte varnish. Several of them needed to be supplemented with special additions. The pilot received a parachute harness with a parachute made of thin paper strips. I was inspired by the period photos and pictures of figures found on the Internet. |


| Na
poniższych zdjęciach widać końcowy efekt prac nad figurkami przedstawiającymi
dzieci. Chłopiec, który początkowo miał stać z ojcem i wypatrywać samolotów na
niebie otrzymał ode mnie model szybowca i biega z nim dookoła
"prawdziwych" maszyn marząc o tym, że kiedyś zasiądzie za sterami
jednej z nich. Uważam, że to był strzał w dziesiątkę, dodaje to całej scenie
dynamiki, radości i życia. Dziewczynka z kolei dostała do ręki kolorowy
wiatraczek, tak po prostu. | The photos below show the final effect of figures representing children. The boy, who was initially supposed to stand next to his father and look for planes in the sky, has now a model of a glider in the hand and he is running with it around the "real" objects, dreaming that he would be sitting one day as a pilot in the cockpit of one of them. I think it was a bull's eye, it adds dynamics and life to the whole scene. The girl is holding the hand a colourful toy-fan, just like that. |
Poniżej
pani fotoreporterka. Jedna z moich ulubionych postaci na dioramie, stoi z
resztą w centralnym miejscu. Figurka w oryginale miała inną głowę i oczywiście
nieproporcjonalnie długie nogi. Nogi skróciłem, głowę wziąłem z innej
figurki, ta oryginalna była dramatyczna. W dłoniach trzymała torebkę, którą
poprzez doklejenie obiektywu i paska przerobiłem na aparat fotograficzny.
Obiektyw to zwinięta z papieru rurka zalana klejem introligatorskim, pasek
zrobiłem z drutu cynowego. | Below there is a photojournalist. One of my favourite characters on the diorama, which is standing in the central position. The figure in the original had a different head and, of course, disproportionately long legs. I shortened them and took the head from another figure. The original one was really bad. In her hands, she was holding a handbag, which I converted into a camera by glueing the lens and the strap. The lens is a rolled paper tube covered with bookbinding glue, the strip is made of tin wire. |


| Poniżej
skończony "pan ciekawski" zaglądający do wnętrza Bociana. Ta figurka
przeszła naprawdę długą drogę do tego, żeby wyglądać tak jak wygląda. Za
szybowcem z kolei postawiłem figurkę, która moim zdaniem wypada najgorzej.
Początkowo miał być to ojciec stojący z chłopcem z przodu, ale gość jest tak
nieproporcjonalny, że za mocno rzuca się w oczy. Twarz też nie wyszła
najlepiej, więc lepiej żeby się nie wychylał. Wpadłem na pomysł, że dam mu do
ręki lornetkę i z tego rozwiązania jestem bardzo zadowolony. Wykonałem ją tak
samo jak aparat pani fotoreporterki. Dla towarzystwa postawiłem mu psa z
zestawu MB Model (MB3206). | Below there is a "curious guy" looking inside the Bocian's cockpit. This figure has come a really long way to look at what it looks like. Behind the glider, I put a figure that I think is the worst. Initially, it was supposed to be standing with the boy in the foreground, but this guy is so disproportionate that it stands out too much. The face didn't come out well either, so he'd better not lean out. I came up with the idea that I would put binoculars in his hand and I am very happy with this solution. I made it the same way as the photographer's camera. For company, I put him a dog from the MB Model set (MB3206). |


| Poniżej
dwie figurki, które razem z pilotem pozują do zdjęcia na tle samolotu PZL S-4
Kania. Oczywiście obie po wielu przeróbkach. | Below there are two figures, which together with the pilot are posing for a photo with the PZL S-4 Kania plane in the background. Of course, both of them underwent many modifications. |

Kolejnym
istotnym elementem dioramy, na który się uparłem, jest wskaźnik wiatru zwany
także rękawem. Pomijając to, że czerwony kolor wprowadza kontrast, urozmaicenie
kolorystyczne, jest to także element, który nieodzownie kojarzy się z
lotniskiem. Pełni on tu jeszcze jedną istotną rolę - leniwie zwisający rękaw
nietargany podmuchami wiatru podkreśla sielankową atmosferę tego dnia.
Informacje o tym jak powinien wyglądać wiatrowskaz znalazłem na stronie producenta
takich urządzeń. Wzorowałem się także na tym zdjęciu (https://pxhere.com/pl/photo/799443):
| Another essential element of the diorama that I insisted on is the windsock, also known as the wind cone. Apart from the fact that the red colour introduces a contrast, it is an element that is indispensably associated with an airfield. It plays another important role here - a lazy windsock, not tugged by gusts of wind, emphasizes the idyllic atmosphere of this day. I found information on what the wind cone should look like on the website of the manufacturer of such devices. I also followed this photo (https://pxhere.com/pl/photo/799443): |
| Na
podstawie znalezionych danych ustaliłem wysokość masztu, długość i średnicę
rękawa. Maszt został wykonany z drewnianego patyczka, na szczycie umieściłem
bloczek, mocowanie rękawa znajduje sie nieco poniżej. Powyżej podstawy
znajduje sie knaga. Pomiędzy nią a bloczkiem na szczycie rozpiąłem gumonitkę,
ale nie jest ona połączona z mocowaniem rękawa. Być może maszt służył wcześniej
do wywieszania flagi. Podstawę w której został osadzony słup zrobiłem z kartonu,
pomalowałem ją metaliczną farbą i dodałem rdzawe zacieki. Dookoła podstawy
przykleiłem kępki trawy. Zdaje się, że gospodarz obiektu nie wykosił dokładnie
w okolicach masztu. Sam rękaw wykonałem z białej bibułki, na którą
naniosłem czerwone pasy. W środek wkleiłem druciane obręcze i uformowałem rękaw
tak, aby zwisał jak na zdjęciu przywołanym powyżej. | Based on the data found there, I determined the height of the mast, the length and the diameter of the windsock. The mast is made of a wooden stick, a pulley is placed on the top, and the wind cone is mounted slightly below. There is a cleat above the base. Between it and the pulley at the top, I unfastened the rubber thread, but it is not connected to the windsock. Perhaps the mast was previously used to display the flag. I made the base of the mast from cardboard, painted it with metallic paint and added some rusty stains. I glued tufts of grass around the base. It looks like the host of the object did not mow exactly near the mast. The windsock itself was made of white tissue paper with red stripes painted on it. In the middle, I pasted wire hoops and shaped the sleeve so that it hangs down as in the photo mentioned above. |


Kolejną
rzeczą, o której chciałbym napisać jest ławeczka. Wiem, że to może
niekoniecznie najbardziej pasujący element, ale nie jest powiedziane, w którym
miejscu lotniska dokładnie odgrywa się ta scena. Na pewno nie na pasie
startowym, może gdzieś przed hangarami albo na płycie postojowej. W każdym
razie, miałem dwie siedzące figurki, które postanowiłem posadzić na drewnianej
ławce. Wykonałem ją z kawałków sosnowych listewek i drutu, a następnie
pomalowałem na biało. Dookoła ławeczki, podobnie jak przy maszcie, wsadziłem
kępki trawy. Koncepcja scenki na ławce początkowo zakładała, że kobieta
będzie siedziała z twarzą odwróconą od mężczyzny. Miała być obrażona i
wypatrywać w kierunku bramy wyjściowej, podczas gdy partner z zaciekawieniem
obserwuje to, co dzieje się na niebie i ziemi. W końcu ustawiłem ich twarzami
do siebie, by pozostać przy sielankowej i przyjaznej atmosferze.
| Another thing I would like to write about is the bench. I know this may not be the most fitting element, but it is unclear where exactly in the airfield this scene is played out. Certainly not on the runway, maybe somewhere in front of the hangars or on the apron. Anyway, I had two sitting figures, a lady and a gentleman, I decided to put them on a wooden bench. I made it from pieces of pine slats and wire and then painted it white. Around the bench, as at the mast, I put tufts of grass. The concept of a scene on a bench initially assumed that the woman would be sitting with her face turned away from the man. She was to be offended and looking towards the exit gate, while the partner is watching with interest what is happening in heaven and earth. In the end, I put them facing each other, let's stay in the idyllic and friendly atmosphere. |
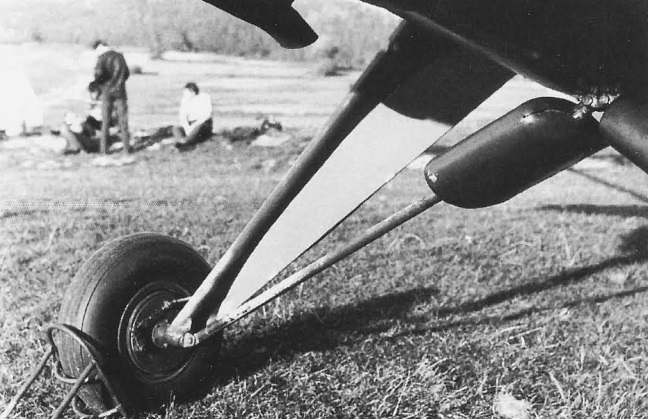
| W
monografii samolotu PZL S-4 Kania (Z. Luranc, Skrzydła w
miniaturze, nr 13) wypatrzyłem dwie rzeczy, które postanowiłem
wykorzystać na swojej dioramie. Pierwsza to podkładki pod koła używane podczas
postoju samolotu na płycie. Wykonałem je z mosiężnego drutu na wzór tych
widocznych na zdjęciu. Dodałem dookoła pojedyncze źdźbła trawki. Druga rzecz to
mocowanie samolotu do podłoża, będące zabezpieczeniem przed silnymi podmuchami
wiatru. Sposób mocowania wypatrzyłem na dwóch zdjęciach, niestety niezbyt
wyraźnych. Trochę na wyczucie przeniosłem to na dioramę. Liny mocujące splotłem
z drutu cynowego. Przypięte są do miejsca, w którym dźwigary mocowane są do
skrzydeł. Nie wiem dokładnie, w którym miejscu lub o co taka lina mogła być
zaczepiona. Dodałem krótki kawałek drutu przy mocowaniu zastrzału do płata tak,
abym miał ją o co zahaczyć. Początkowo drugi koniec liny był zaczepiony do
"śledzia" wbitego w podłoże, ale później, po konsultacjach ze
znajomymi zrobiłem imitację metalowych kotew osadzonych w betonie. | In the monograph of the PZL S-4 Kania plane (Z. Luranc, Skrzydła w miniaturze, no. 13) I found two things that I decided to use on my diorama. The first is the wheel chocks used when the plane stands on the apron. I made them of wire similar to those shown in the photo. I added a single blade of grass around it. The second thing is fixing the plane to the ground, which protects it from strong gusts of wind. I noticed the mounting method in two photos, unfortunately not very clear. I put it a bit on the diorama. The fastening ropes are made of tin wire and are attached to the place where the struts are mounted to the wings. I don't know exactly where or what such a rope could be attached to. I added a short piece of wire in the place where the strut is attached to the wing so that I could hook it on. Initially, the other end of the rope was attached to a "peg" driven into the ground, but later, after consulting my friends, I made an imitation of metal anchors embedded in concrete. |

Fot.: Skrzydła w miniaturze, nr 13
Fot.: Skrzydła w miniaturze, nr 13
Fot.: Skrzydła w miniaturze, nr 13
| Jednym z
moich ulubionych detali, dodanych spontanicznie na samym końcu, są tabliczki
znamionowe przed modelami. Skoro to piknik lotniczy nie każdy odwiedzający musi
być specjalistą w dziedzinie lotnictwa. Widywałem podobne tabliczki na takich
imprezach. Pomysł podsunął mi Wojtek, autor modelu Kani. Tabliczki wykonałem z
drutu i papieru, pomalowałem na czarno i nakleiłem na nie odpowiednio
pomniejszone i wydrukowane strony z monografii samolotu Kania. | One of my favourite details, added spontaneously at the very end are the nameplates in front of the models. Since it's an air picnic, not every visitor has to be an aviation specialist. I have seen similar signs at such events. The idea came from Wojtek, the author of the Kania model. I made the plates of wire and paper, painted them black and glued on them the printed and downscaled pages of the Kania plane monograph. |


| Na koniec
kilka słów o powstaniu galerii końcowej. Nie było łatwo zrobić takie zdjęcia,
jakich bym sobie życzył. Były trzy podejścia - pierwsza sesja poszła prawie w
całości do kosza, głównym problemem okazały się brązowe listwy na krawędziach
podstawki. Psuły cały efekt i zakłócały odbiór (patrz cztery ostatnie zdjęcia,
na samym dole). Postanowiłem zasłonić listwy paskami pozostałej trawy
przyklejając je taśmą dwustronną. Druga sesja była kompletnym niewypałem.
Wyjechałem dość daleko za miasto i szukałem odpowiedniego miejsca. Początkowo
było pogodnie, ale zanim znalazłem plener i dobrze się rozłożyłem niebo
zaciągnęło się chmurami i zaczęło kropić. Ostatecznie, zdjęcia, które możecie
obejrzeć, powstały dość spontanicznie w parku nieopodal miejsca, w którym
mieszkam. Miałem już trochę „nóż na gardle” i wiedziałem, że muszę się
pośpieszyć, żeby nie mieć w tle kolorowych jesiennych drzew. W końcu to
piknik lotniczy, który jak założyłem, odbywa się latem. Zdjęć jest sporo i
wiele się powtarza, ale mimo podobnego ujęcia ostrość złapana jest celowo w
innym miejscu, które ma przyciągnąć uwagę oglądających. Zapraszam do obejrzenia
galerii! | Finally, a few words about making of the final gallery. It wasn't easy to take the photos I wanted. There were three approaches - the first session went almost entirely to the waste bin, the main problem was the brown boards on the edges of the diorama. They spoiled the whole effect and interfered with the reception (see the last four photos, bottom). I decided to cover the boards with strips of the remaining grass by glueing them with double-sided tape. The second session was a complete flop. I went quite far out of town and looked for a suitable place. The weather was clear at first, but by the time I found the place, the sky was clouded and sprinkled. In the end, the photos you can see were taken quite spontaneously in the park near the place where I live. I was already pinned into a tight corner, as I knew I had to hurry in order not to have any colourful autumn trees in the background. After all, this is an air picnic which I assumed takes place in the summer. There are many photos and many are repeated, but despite a similar shot, the focus is deliberately caught elsewhere in order to attract the viewers' attention. Enjoy the gallery!
|


To jest genialne! Mistrzowskie rozdanie! Można wiele słów wypowiedzieć, by opisać piękno, ale po co? Lepiej pooglądać i niech każdy przeniesie się wyobraźnią w ten piękny świat . Zachęcam do wędrówki. Jest wyśmienicie. Gratuluję!
OdpowiedzUsuńWspaniała praca! Gratulacje.
OdpowiedzUsuń