| Kiedy skończyłem budować już MiG-a-23 a diorama z Lim-em-2 (MiG-15 bis) była już na ukończeniu zacząłem zastanawiać się nad kolejnym modelem. Jednym z częściej przeglądanych przeze mnie w ostatnim czasie był Ił-2 z Bumażnojego Modelirowania. W pewnym sensie podobał mi się od dawna ten model i kusił mnie, ale wszystkie przeczucia i analiza wycinanki wskazywały na to, żeby się za niego nie brać. Już po kilku godzinach klejenia wiedziałem dlaczego i przeklinałem, że z całej wielkiej sterty modeli do sklejenia musiało paść akurat na tego. Natomiast teraz, po ponad trzech tygodniach od rozpoczęcia klejenia siedzę i piszę tekst do relacji, która jak już wiem - nie będzie miała happy endu. | When I finished building the MiG-23 and the diorama with Lim-2 (MiG-15 bis) was about to be finished, I started to think about the next model. One of the most frequently viewed by me issue recently was Il-2 from бумажное моделирование. In a way, I had liked this model for a long time and it was tempting, but all the intuition and analysis of the issue indicated that it should not be taken. After a few hours of building, I knew why and cursed that from the whole huge collection of models that I have, it was just this one. But now, more than three weeks after starting, I am sitting and writing a model build report that, as I already know - will not have a happy ending. |

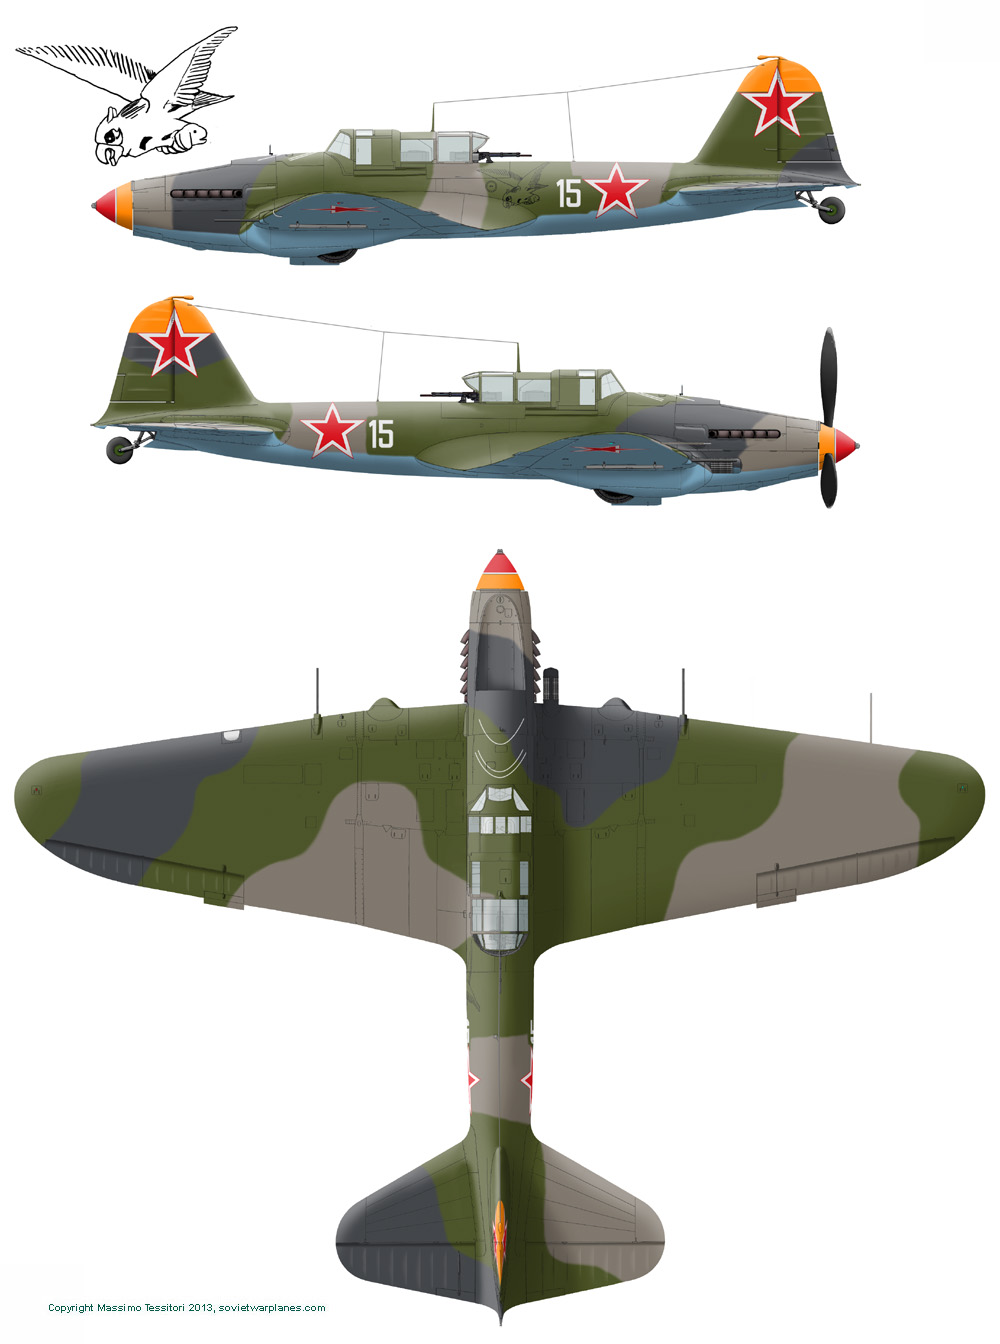
| Samolot szturmowy Ił-2 zwany "szturmowikiem" można śmiało zaliczyć do grona legendarnych maszyn. Chociażby dlatego, że był najliczniej wyprodukowanym samolotem w historii lotnictwa (36154 egzemplarzy w różnych wersjach) albo dlatego jaki wkład wniósł w pokonanie III Rzeszy. Jak dla mnie, jest jednym z symboli radzieckiej machiny wojennej, na równi z czołgiem T-34 czy wyrzutnią rakiet "Katiusza". Mimo jego wielkiej sławy do tej pory nie zagłębiałem się za bardzo w jego temat. Klejenie modelu będzie zatem okazją do zapoznania się z konstrukcją i historią maszyny. Zacząłem od ustalenia tego, co tak naprawdę będę budował. Na okładce widnieje napis "Ił-2, ZSRR, 1941r.". I tutaj pojawia się pierwszy znak zapytania - jak przeczytałem dwumiejscowa wersja została użyta w boju pierwszy raz 30 października 1942 pod Stalingradem. Wikipedia podaje, że wiele egzemplarzy pierwszej serii produkcyjnej (maszyny jednomiejscowe, bez tylnego strzelca) zostały przerobione na wersję dwumiejscową. Straty były zbyt duże i uznano, że tylny strzelec jest niezbędny. To może sugerować, że mam do czynienia ze zmodyfikowanym samolotem Ił-2 pierwszej serii produkcyjnej (CKB-57P). Może być też tak, że autor się pomylił przypisując do modelu datę 1941 i jest to wersja dwumiejscowa będąca w służbie od jesieni 1942, albo jest to wersja znana jako Ił-2 M produkowana od 1943, będącą dwumiejscowym Ił-em-2 po wprowadzeniu kolejnych modyfikacji (min. nowy silnik). Szukając w Internecie informacji na ten temat trafiłem na tę stronę. Można tam znaleźć plansze z malowaniem tej maszyny oraz informację, że należała do 617 ShAP (pułk lotnictwa szturmowego). Jest to zatem Ił-2 M i pochodzi prawdopodobnie z okresu walk o Charków (1943). | The Ił-2 attack aircraft, known as the "Sturmovik", can be boldly classified as one of the legendary machines. If only because it was the most produced aircraft in the history of aviation (36,154 examples in various versions) or because it contributed to the defeat of the Third Reich. For me, it is one of the symbols of the Soviet War Machine, on a par with the T-34 tank or the "Katyusha" rocket launcher. Despite his great fame, I have not delved too much into its subject so far. Building the model will therefore be an opportunity to learn about the design and history of the machine. I started by figuring out what I was actually going to build. The cover says "Il-2, USSR, 1941". And here comes the first question mark - as I read, the two-seater version was used for the first time on October 30, 1942, at Stalingrad. Wikipedia reports that many of the first production series (single-seater, no rear gunner) were converted to a two-seater. The losses were too great and a rear gunner was deemed necessary. This may suggest that I am dealing with a modified Il-2 of the first production series (CKB-57P). It may also be that the author made a mistake in assigning the date 1941 to the model and it is a two-seater version that has been in service since the fall of 1942, or it is a version known as the Il-2 M produced since 1943, being a two-seater Il-2 after the introduction of the next modifications (including the new engine). While searching the Internet for information on this subject, I found this page. There you can find images with the painting schemes of this machine and information that it belonged to 617 ShAP (assault aviation regiment). It probably comes from the period of the fighting for Kharkiv (1943). |
https://massimotessitori.altervista.org/sovietwarplanes/pages/il-2/il2-camo/il-2m/il2m-early--fl-al-3view-eagle15.jpg

| Autor modelu, Wiaczesław Zajcew, proponuje zacząć model od zewnętrznej części skrzydeł - bo są najłatwiejsze. Ja zaś postanowiłem zacząć od centropłata, bo jest dość mocno skomplikowany i spodziewałem się problemów na tym etapie. Kwestia podejścia, moim zdaniem sensowniej było zacząć w tym miejscu. Pierwszy błąd w modelu - źle oznaczona grubość kartonu, którym należy podkleić elementy szkieletu. To odkryłem już dawno temu i wiedziałem, że tam gdzie jest * musi być tektura 1mm, a tam gdzie ** - 0,5 mm. Czyli odwrotnie niż to jest normalnie przyjęte, myślę, że to tzw. "czeski błąd" w instrukcji. Po wycięciu elementów szkieletu centropłata wyszło na jaw sporo niedokładności w pasowaniu ze sobą żeberek i dźwigarów. Wpusty są dużo za szerokie - tak jakby szkielet był zaprojektowany na grubość 1,5 mm a nie 1 mm. Przystające elementy różnią się nieco wysokością, nie jakoś dużo, ale brak tu precyzji. Po pierwszym wieczorze pracy nad Iłem mój entuzjazm
został mocno ostudzony, ale po przemyśleniu problemów usiadłem do niego jeszcze
raz i spróbowałem dostroić się do fal, na których nadaje autor. Skleiłem szkielet centropłata i wkleiłem do niego
komory bombowe oraz komory podwozia.
| The author of the model, Vyacheslav Zaitsev, suggests starting the model from the outside parts of the wings - because they are the easiest. I decided to start with the centre wing because it is quite complicated and I expected problems at this stage. The question of approach, in my opinion, made more sense to start here. The first error in the model - the wrongly marked thickness of the cardboard, which should be used to stick the framework elements. I discovered it a long time ago and knew that where it is * there must be 1mm cardboard, and where ** - 0.5mm. So contrary to what is normally accepted. I think it is a typographical error. After cutting out the framework parts of the centre wing, many inaccuracies in the fit of the ribs and spars became apparent. The inlets are much too wide - as if the frame was designed to be 1.5 mm thick, not 1 mm thick. The congruent elements differ slightly in height, not much, but there is a lack of precision here. After the first evening of work on Il, my enthusiasm was greatly cooled, but after thinking about the problems, I sat down to it again and tried to tune in to the waves on which the author is broadcasting. I glued the framework of the centre wing, the bomb bays and the undercarriage hatches to it. |


| Rysunki montażowe nie ułatwiają zadania - brzydkie i nieczytelne ciemne plamy, co w połączeniu z dziwną i skomplikowaną numeracją elementów czyni je ciężkie do rozkodowania. W dodatku są na nich błędy, np. część 3.2 L występuje dwukrotnie, na jednym rysunku jako wnętrze klapy w skrzydle, na drugim jako wnętrze klapy w centropłacie (całość wnęki na klapę składa się z elementów 3.1 (L/P) oraz 3.2 (L/P)). Kolejnym błędem jest odwrotne oznaczenie części szkieletu centropłata K37 i K38. Niektóre elementy nie występują/nie są oznaczone na rysunkach, np. 10.2, 10.13. Numeracja elementów mnie irytuje, wydaje mi się, że nie ma w niej większej logiki. Niby zespoły elementów są pogrupowane, np wnętrze komór bombowych to elementy oznaczone nr 10.1,10.2,10.3 i tak dalej. Autor stara się trzymać tej zasady, ale np. komory podwozia składają się z numerów 8.1, 8.2 (...) oraz 27. Całość jest mocno chaotyczna. | Assembly drawings do not make the task easy - ugly and unreadable dark spots, which, combined with the strange and complicated numbering of elements, makes them difficult to decode. In addition, there are errors in them, e.g. part 3.2 L appears twice, in one drawing as the inside of the wing flap, on the other as the inside of the hatch in the centre wing (the entire recess for the flap consists of elements 3.1 (L / R) and 3.2 (L / P)). Another mistake is the reverse marking of the framework parts of the centre wing. K37 and K38. Some elements are not present / are not marked in the drawings, eg 10.2, 10.13. The numbering of the elements irritates me, I don't think there is much logic in it. Apparently, sets of elements are grouped, e.g. the inside of the bomb bays are elements marked with no. 10.1,10.2,10.3 and so on. The author tries to stick to this rule, but for example, the landing gear chambers consist of numbers 8.1, 8.2 (...) and 27. The whole thing is very chaotic. |

| Po wielu przymiarkach i próbach składania centropłata na sucho przy użyciu taśmy maskującej zdecydowałem się okleić szkielet poszyciem. W miejscach narażonych na zapadnięcie się zastosowałem podposzycie z papieru. Sufit komory podwozia i komory bombowej stanowi podposzycie samo w sobie więc te miejsca pominąłem. Ku mojej radości udało się całkiem ładnie nakleić poszycie. Następnie zabrałem się za zewnętrzne części skrzydeł. Ich szkielety poddałem kilku modyfikacjom - dźwigary podkleiłem dodatkowo tekturą 0,5 mm tak aby pasowały do wpustów, które wyciąłem w żeberkach. Puste przestrzenie pomiędzy dźwigarami i żeberkami wypełniłem dopasowanymi kawałkami tektury 1 mm tworząc tym samym solidne podposzycie dla dolnego poszycia skrzydeł. Szkielety zewnętrznych części skrzydeł postanowiłem dokleić do centropłata i dopiero później okleić je poszyciem. Moim zdaniem tak jest wygodniej i można lepiej dopasować poszycie. Przymiarka poszycia do szkieletu ujawniła poważny błąd w projekcie i pogłębia moje rozczarowanie tym modelem. Kamuflaż lewego skrzydła nie pasuje do kamuflażu na centropłacie. Mowa o przesunięciu o 3 mm. Miałem zamiar to skorygować aerografem na koniec budowy. Po prawej stronie wszystko się zgadza. Na dole też, ale to chyba zasługa tego, że dół jest jednolity. Prawie jednolity, bo widzę delikatną różnicę w odcieniu błękitu. Nie jest ona jednak tak widoczna, jak różnice w kolorach na górnych powierzchniach. Zielony na zewnętrznych częściach skrzydeł jest jaśniejszy, wpada bardziej w żółty. Szary jest na zewnętrznej części nie bardzo zgrywa się z szarym na centropłacie, który jest idzie tam mocno w kierunku szaro-fioletowego. | After many try-on's and dry fitting of the centre wing with masking tape, I decided to cover the framework with the skin. In places prone to collapsing, I used paper under-skin. The ceiling of the landing gear and bomb bay is a sub-structure in itself, so I omitted these places. To my joy, the skin was glued quite nicely. Then I started working on the outer parts of the wings. I subjected their frameworks to a few modifications - the girders were additionally glued with 0.5 mm cardboard so that they fit the grooves that I cut in the ribs. I filled the empty spaces between the girders and ribs with matching pieces of 1 mm cardboard, thus creating a solid undercoat for the lower skin of the wings. I decided to glue the frameworks of the outer wing parts to the centre wing and only then cover them with the skin. In my opinion, it is more comfortable and you can adjust the cover better. The fitting of the cover to the frame has revealed a serious design flaw and it deepens my disappointment with this model. The camouflage of the left-wing does not match the camouflage on the centre wing. I am talking about a shift of 3 mm. I was going to correct it with an airbrush at the end of construction. On the right, everything is correct. Also at the bottom, but it is probably due to the fact that the bottom is uniform. Almost uniform, because I can see a slight difference in the shade of blue. However, it is not as visible as the differences in colour on the upper surfaces. The green on the outer parts of the wings is lighter and more yellow. The grey on the outside does not match the grey on the centre wing, which goes strongly towards the grey-purple. |


| Wnęki na lotki są dziwnymi elementami, które nie za bardzo pasują do reszty. W pewnym miejscu powstaje dość długa luka. Nie potrafiłem ich uformować tak, żeby lepiej pasowały. Męczyłem te elementy potwornie zanim udało mi się je ostatecznie wkleić. Poza tym nie pasują te wystające elementy zawiasów (drugie zdjęcie) , nie pokrywają się z odpowiednikami na skrzydłach. Musiałem je poodcinać. Na tym etapie nie byłem przekonany co do tego czy chce mi się budować ten model dalej. Szkoda by było wyrzucić do śmietnika efekt dwóch tygodni klejenia. Mając liczne wątpliwości co do sensu dalszego klejenia tego modelu odłożyłem na bok niedokończone, choć mocno zaawansowane skrzydła i wziąłem się za kadłub. Jak nie wyjdzie, będę wiedział co z nim dalej zrobić. | The recess where ailerons should be placed are weird, they really fit well with the rest. A fairly long gap is created at some point. I couldn't shape them to fit better. I tormented these elements terribly before I could finally paste them. Besides, the protruding parts of the hinges (second picture) do not match the counterparts on the wings. I had to cut them off. At this stage, I was not convinced that I wanted to build this model further. It would be a pity to throw away the effect of two weeks of glueing to the trash. Having many doubts as to the point of further glueing this model, I put aside the unfinished, though highly advanced wings and took up the fuselage. If it doesn't work out, I'll know what to do with it. |


Kadłub jest intrygujący i dość nietypowo zaprojektowany. Okrętowy szkielet to rozwiązanie dość rzadko spotykane w modelach samolotów, sam nie jestem jego zwolennikiem. Nie on jest jednak tutaj najdziwniejszy - sposób podziału elementów poszycia w tylnej części kadłuba, na linii podziału kolorów jest rozwiązaniem co najmniej niespotykanym. Przeglądając ten model w czytelni, najbardziej zastanawiało mnie to, w jaki sposób to wyjdzie. Pominąłem na razie wyposażenie kabiny - skupiam się na wykonaniu poszycia kadłuba. Jeżeli się uda, wrócę do kokpitu. W pierwszej kolejności zabrałem się za zbudowanie szkieletu. Jak wspomniałem, nie cierpię okrętowych szkieletów, ale potrzebuję go do właściwego uformowania poszycia. Przy szkielecie wypłynęło na powierzchnię znowu masę drobnych błędów, podobnie jak przy szkielecie skrzydła. Wszystkie jednak do przeskoczenia. Poniżej, to, co zanotowałem sobie na tym etapie:
- Podłużnica część K13 P/L - za długie o
około 3 cm. Tak, dobrze czytacie, CENTYMETRY.
- Część K- 54 nie ma oznaczenia jakim
kartonem należy ją podkleić, wydedukowałem, że 1 mm. To samo dotyczy podłogi
przedziału strzelca - 35.1 - biorąc pod uwagę wpust wychodząccy z części K2 - także 1 mm. K 10 - grubość 1 mm
- K 54 - brakuje otworu na wpust z części
K2.
- Część K 31 powinna wchodzić prostopadle
w K4 L/P, ale te nie mają na nią wpustów, trzeba wyciąć.
| The fuselage is intriguing and quite atypically designed. The ship's framework is a solution that is quite rare in aircraft models, I am not its supporter myself. However, it is not the strangest thing here - the way of dividing the skin elements in the rear part of the fuselage, on the colour dividing line, is at least an unusual solution. Looking through this model before building, the most interesting thing for me was how it would turn out. I have omitted the cockpit equipment and focused on making the fuselage skin. If it works, I would go back to the cockpit. I started building the framework first. As mentioned, I hate ship frameworks, but I need them to properly shape the skin. A mass of minor bugs emerged by building the framework. Similar as did by the wing skeleton. However, all of them could be solved. Here is what I noticed at this stage:
- Elements K13 P / L - too long by about 3 cm. Yes, you read that right, CENTIMETERS.
- Part K-54 has no marking on which cardboard thickness it should be glued on, I deduced that it should be 1 mm. The same applies to the floor of the shooter's compartment - 35.1 - taking into account the groove coming out of part K2 - also 1 mm. K 10 - thickness 1 mm
- K 54 - the hole for the K2 part is missing.
- The K 31 part should go perpendicularly into K4 L / R, but these do not have inlets, you need to cut it.
|


| Przymiarki wykazały, że o ile łączenie na krawędzi kolorów ma szansę wyjść naprawdę pięknie. Za to pojawiło się inne miejsce, które może stworzyło poważne problemy. Element nr 12.10 jest kompletnym niewypałem. Już w 2D widać, że pomiędzy elementem 12.10 a 12.11 pojawi się uskok. Po uformowaniu go zgodnie z kształtem wręg tworzy się tam taki nienaturalny garb. Przejrzałem wiele zdjęć i wniosek jest jeden - nie powinno go tam być. Powinno być płasko jak na stole. Można docisnąć, ale pojawiają się duże naprężenia, jakbym próbował dopasować element z kawałka folii. Kombinowałem sporo jak to obejść - przycinanie nie wchodzi w grę - po prawej stronie jest narysowany cały ten orzeł, jak zacznę przycinać to go zniekształcę. Próbowałem zrobić nacięcie - wypłaszczyłem nieco garbik, ale za to pojawiły się naprężenia w innych miejcach. Nie wiem jak autor mógł tego nie zauważyć - nawet na renderze widać ten uskok. Wygląda to raczej jak karykatura sylwetki Ił-a-2. Dodam, że udało mi się dotrzeć do zdjęć sklejonego modelu i skanów wersji jednomiejscowej. Kolega, który ten model skleił nie miał problemów z kształtem kadłuba. Wygląda na to, że autor projektu pomylił się przeprojektowując model z wersji jednomiejscowej na dwumiejscową, bo w tym pierwszym wszystko pasuje. | Trying the parts to the framework showed that the joinings on the edge of colours have a chance to come out really beautiful. But another place that may have created serious problems emerged. Element number 12.10 is a complete misfire. Already in 2D, you can see that there will be a fault between elements 12.10 and 12.11. After forming it according to the shape of the frames, it forms an unnatural hump there. I looked through a lot of photos and there is one conclusion - it shouldn't be there. It should be flat like on a table. It could be pressed down, but there is a lot of tension. As if I were trying to fit a piece of springy foil. I've figured out a lot about how to get around this - trimming is not an option - on the right side, there is something like "nose art" (an eagle). If I start trimming it will distort it. I tried to make an incision - I flattened the hump a bit, but there was tension in other places. I do not know how the author could not notice it - even on the render, you can see this fault. It looks more like a caricature of Il-2. I would like to add that I managed to find photos of the finished model and scans of the single-seat version. A colleague who stuck this model together had no problems with the shape of the fuselage. It seems that the author of the design made a mistake in redesigning the model from a single-seater version to a two-seater. The single-seater has no mistake in this place. |


| Tym samym czara goryczy się przelała, nie miałem ochoty dalej się męczyć z tym modelem. Nie twierdzę, że nie można tego skleić. Po prostu to, jak to wychodzi mnie nie satysfakcjonuje. Jest po prostu mierne. Nie widziałem nigdzie w Internecie relacji z budowy tego modelu, dlatego mimo tego, że poniosłem porażkę postanowiłem opublikować ten post. Ku przestrodze. Może ktoś, kto podobnie jak ja, będzie chciał skleić ten model trafi na moją relację i dowie się z niej, że nie warto. Stanowczo odradzam ten model! | Thus, it was like adding insult to injury. I did not want to continue to bother with this model. I am not saying that it cannot be successfully built. I'm just not satisfied with the way it comes out. It's just poor. I have not seen any model builds of this model anywhere on the Internet, so despite the fact that I failed, I decided to publish this post. To warn you. Maybe someone who, like me, will want to build this model will find my report and learn from it that it is not worth it. I strongly advise against this model! |


Dziwna sprawa z tymi Iłami .Mnie ostatnio udało się jakoś sklecić tego z Answera.Nie jestem jakimś super fachowcem (to mój czwarty model)ale nic do siebie nie pasuje,było troche sztukaterii.Ogólnie jeden wielki rebus.Jednym słowem droga przez męke.Pozdrawiam Tomek.
OdpowiedzUsuńNie ma szczęścia ta konstrukcja do kartonu. Ponoć ten z GPM-u jest lepszy. Tego z Answera też kiedyś próbowałem z podobnym efektem jak powyżej - oba można skleić, ale tak jak to ładnie ująłeś - droga przez mękę. Pozdrawiam!
Usuń