
| Jeżeli ktoś powiedziałby mi jeszcze pół roku temu, że będę kleił szybowiec, powiedziałbym, że prędzej na moim warsztacie pojawi się latarnia morska albo jakiś kościół. Szybowce nigdy mnie nie interesowały. Tak było do momentu kiedy zacząłem kleić model samolotu PZL S-4 Kania 3. W luźnej rozmowie na jednym z forów modelarskich pojawił się komentarz dotyczący holowanych przez ten samolot szybowców. Tak narodził się pomysł na dioramę, na której postawię Kanię wraz z jakimś szybowcem. Jakimś, bo jeszcze niedawno nie miałem pojęcia jakie są modele szybowców. Koledzy z Konradusa i Papermodels doradzili mi jaki mógłby stanąć koło Kani i spośród kilku kandydatów wybór padł na Bociana. Jego sylwetka spodobała mi się najbardziej, poza tym model wydany przez GPM najlepiej pasuje mi kolorystycznie do Kani. Z drugiej strony między tymi dwoma modelami jest głęboka i szeroka technologiczna przepaść. Mimo to myślę, że stworzą ładną parę. | If someone told me six months ago that I would build a glider, I would say that sooner a lighthouse or some kind of church would appear on my desk. Gliders have never interested me. That was until I started to build the model of PZL S-4 Kania 3. In a small talk on one of the modelling forums, there was a comment about the gliders towed by this plane. That's how the idea was born. I will put Kania on the diorama with some kind of a glider. Some, because until now I had no idea what the models of gliders are. Some friends from the Konradus forum and Papermodels forum, who know the gliders topic better than me, advised me what could stand next to Kania and from several candidates, the choice was SZD-9 Bocian (Stork). I liked his silhouette the most, besides the model released by GPM fits well with Kania because of painting scheme. On the other hand, there is a deep and wide technological gap between these two models, but I think they will create a nice couple. |

| Autorem modelu jest Zbigniew Sałapa. W opisie na pierwszej stronie znajduje się krótka historia polskiego szybownictwa. Jak dla mnie, kogoś kto nie ma o tym zielonego pojęcia - świetna sprawa. Dowiedziałem się, mi.n, że w latach 1885-6 malarz, Czesław Tański zbudował pierwszy latający model, a potem prowadził próby z szybowcem własnej budowy. I jeszcze parę innych ciekawostek. Bo modelarstwo to nie tylko klejenie modeli, ale także poszerzanie horyzontów. | The model is designed by Zbigniew Sałapa. In the description on the first page, there is a short history of Polish gliding. For me, someone who has no idea about it - a great thing. I learned, among others, that in 1885-6 the painter Czesław Tański built the first flying model and then conducted tests with his own construction glider. Additionally, I found a few other curiosities. Because scale modelling is not only about building models but also broadening horizons. |

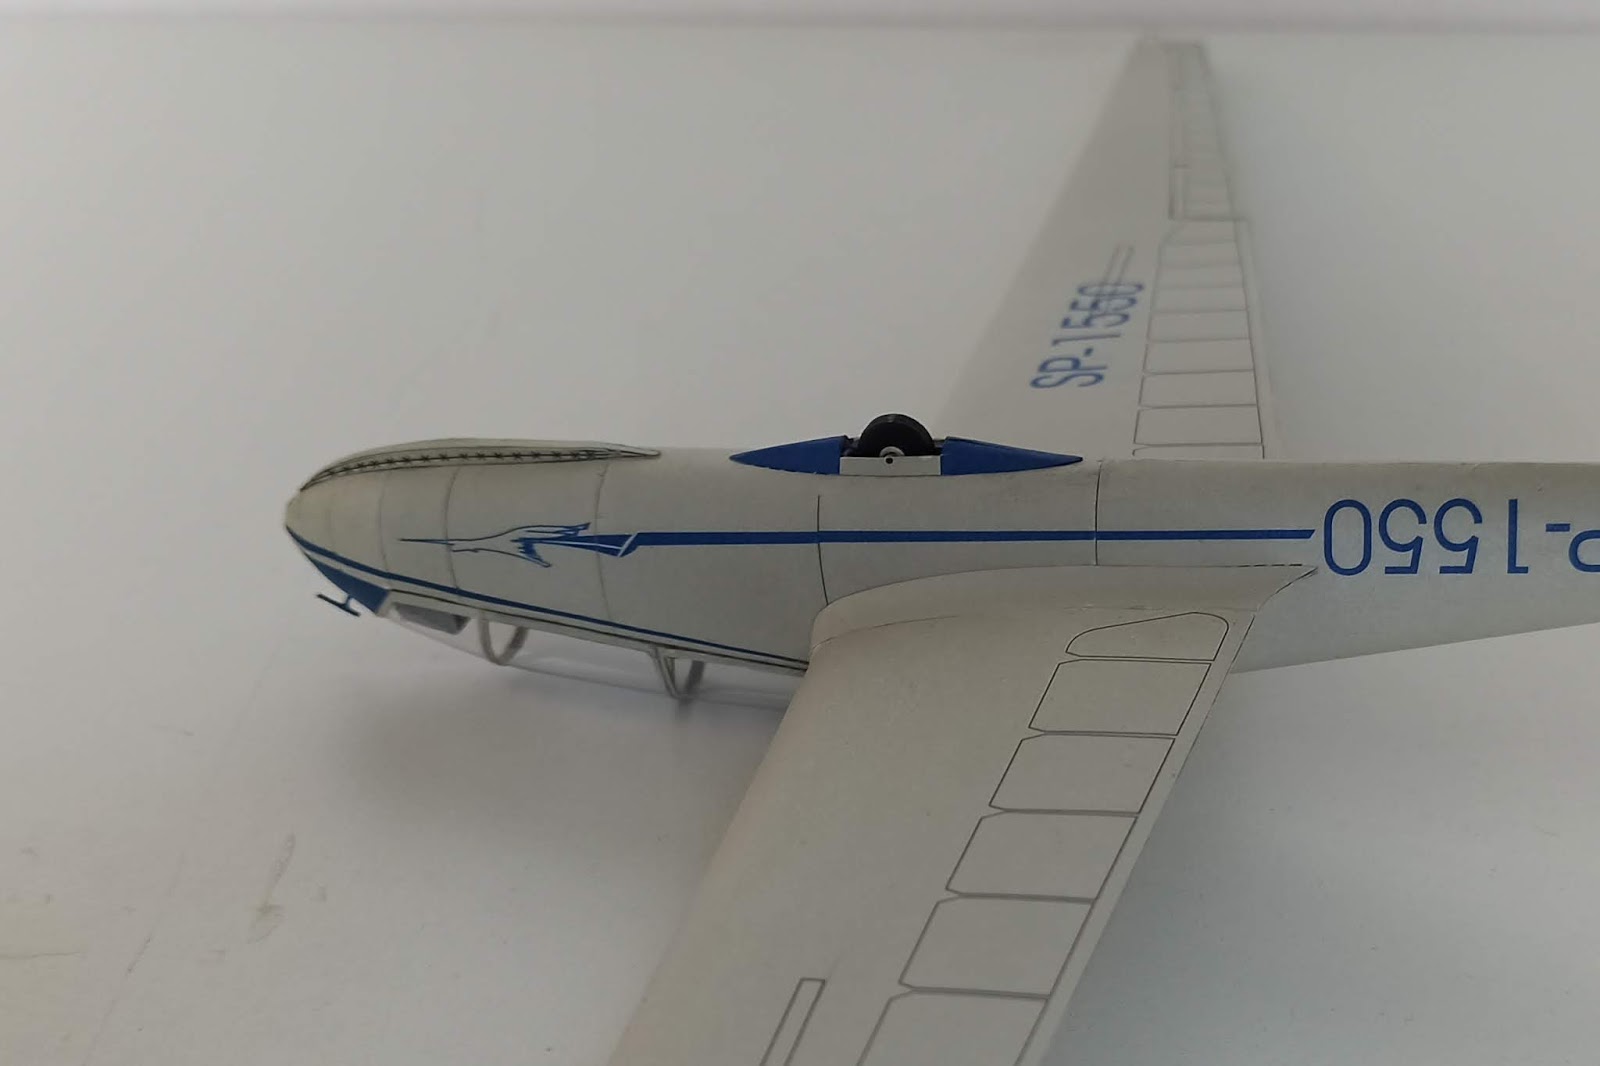
| Jak się dowiedziałem z relacji z budowy kolegi Ostoja, model ma kilka mankamentów. Największy z nich to niezgrywające się malowanie na dziobie, co widać nawet na okładce modelu. Brakuje też kawałka niebieskiego paska na lewej stronie kadłuba. Nie wiem w ogóle jak można wydać model z takim bublem mając świadomość jego istnienia. Przecież wydawca musiał o nim wiedzieć, wstawiając zdjęcie modelu (zapewne sklejonego testowo) na okładkę. Chyba, że polityka wydawnictwa jest taka, żeby od samego początku kupujący wiedział, że kupuje model z błędem. | I found out from the model build posted by one of the forum friends Ostoja, that the model has several bugs. The largest of them is that the painting on the nose doesn't fit. It can be seen even on the cover of the model. Also, the piece of the blue stripe on the left side of the fuselage is missing. I don't know at all how is possible to release a model with such a mistake being aware of its existence. After all, the publisher must have known about it - a photo of the model with this error is on the cover. (probably a test build model). Unless the publishing policy is to inform the modeller from the very beginning that he is buying a model with an error. |


| Jednym z moich głównych założeń przy budowie tego modelu jest osiągnięcie efektu lepszego niż ten, który możemy zobaczyć na okładce. W tym celu w jego konstrukcji wprowadziłem kilka modyfikacji. Zainspirowany metodą budowy kadłuba PZL S-4 Kania przerobiłem nieco kadłub Bociana dostosowując go do tej metody. Z wewnętrznego poszycia kabiny, które rozciąłem na kilka mniejszych elementów wypuściłem sobie ranty, na których mogłem oprzeć kolejne paski zewnętrznego poszycia. Wyszło całkiem przyzwoicie i sklejało się to bardzo wygodnie. | One of my main assumptions when building this model was to achieve a better effect than the one we can see on the cover. To do it, I made several modifications to its design. Inspired by the PZL S-4 Kania fuselage construction method, I slightly modified the Bocian's fuselage to adapt it to this method. I cut the big skin part into several smaller elements. I made a 1 mm long edge on one side (being the inner plating strip), and on the next part, there is 1 mm of space left under the outer plating strip from the next segment. The result is quite good and it fits together very well. |


| Nosek kadłuba ma wiele niedokładności. Nie zgrywają się nie tylko niebieskie linie, ale także te przerywane na spodzie. Jak widać na poniższym zdjęciu przylegające do siebie elementy poszycia nie miały takiego samego obwodu, element numer 3 musiałem nieco skrócić. Wręga oznaczona literą F (zamykająca kabinę z tyłu) jest znacznie za duża, trzeba było sporo szlifować. Karton, na którym wydano model opornie poddaje się formowaniu . Mimo tego, stosując BCG i metalowe kuleczki udało mi się uformować zgrabny nosek. Zabrakło mi nieco poszycia, bo ciąłem po wewnętrznych konturach, powstałe szpary wypełniłem klejem introligatorskim. | The nose has many inaccuracies. Not only the blue lines but also the dashed lines at the bottom do not fit together. As you can see in the photo below, adjacent plating elements did not have the same circumference. I had to shorten a bit element number 3. The frame marked with the letter F (closing the cabin at the back) is much too large, it took a lot of sanding. The cardboard on which the model was issued is hard to form. Nevertheless, I was able to form a shapely nose using BCG water glue and metal balls. There were a few gaps on the nose because I cut the skin elements on inner contours. I filled the gaps with bookbinding glue. |


Błędy
graficzne modelu postanowiłem wyeliminować w dość drastyczny sposób. Kałub
zabezpieczyłem dokładnie taśmą maskującą pozostawiając na wierzchu niebieskie
linie korygując przy okazji ich przebieg. Górna, niebieska część nosa także
pozostała odkryta. Następnie wziąłem aerograf i pokryłem wszystko warstwą
niebieskiej farby. Z pewnym dreszczykiem emocji zdjąłem kilka godzin później
maski i moim oczom ukazał się zadowalający efekt.
| I decided to eliminate model errors in a quite drastic way. I secured the fuselage with masking tape, leaving blue lines not covered, correcting only their course. The upper, blue part of the nose also remained uncovered. Then I took the airbrush and covered everything with a layer of deep blue paint. With a thrill, I took off my masks a few hours later and a satisfactory effect appeared to my eyes. |


| Następnie zabrałem się za wnętrze kabiny, zacząłem od wklejenia zmodyfikowanych nieco bocznych profili - są nieco większe, tak aby można było na nich bezpiecznie oprzeć plastikową osłonę kabiny. Na tym etapie wykonałem też wyposażenie znajdujące się wewnątrz, nie ma tego wiele, pedały, fotele z pasami, drążki, dwie dźwignie oraz tablica przyrządów. Ta ostatnia musiała być zmodyfikowana, bo w oryginalnym kształcie wystawała poza obrys osłony kabiny. Poniżej znajdują się dwa zdjęcia z zielonymi strzałkami, pierwsze pokazuje konsolę przed modyfikacją, drugie po. Jak widać ściąłem nieco górne krawędzie i wkleiłem trójkątne wypełnienia. Ponadto dodałem od siebie ramki zegarów. | Then I went inside the cockpit. I started by attaching slightly modified side profiles, they are a little bit larger so that you can safely rest on them the plastic canopy of the cockpit. At this stage, I also made the equipment inside, there is not much, pedals, seats with belts, rods, two levers and an instrument panel. The instrument panel had to be modified because in its original shape it protruded beyond the outline of the canopy and cockpit. Below are two photos with green arrows, the first shows the panel before modification, the second after. As you can see, I cut the upper edges a bit and pasted the triangular fillings. Besides, I added clock frames from scratch. |


| Gotową kabinkę od razu zamknąłem pod plastikową kopułką dedykowaną do tego modelu. Wydaje mi się, że jest za duża, dopasowałem ją do kadłuba i zabrałem sie za przyklejanie ramek. Chciałem, żeby wyszło bez schodków na łączeniu z kadłubem więc w pierwszej kolejności rozwarstwiłem karton, aby ramki nie były za grube. Jako że projekt nie przewiduje wewnętrznej ramki oszklenia, pomalowałem zewnętrzne od środka szarą farbą. Naklejenie ramek przebiegało podobnie jak sklejanie kadłuba. W paru miejscach musiałem przyciąć, w innych coś dosztukować ze ścinek. Koniec końców, efekt jest nawet zadowalający. | Next, I closed the cockpit under a plastic canopy dedicated to this model. It seemed to be too big, I fitted it to the fuselage and started sticking the frames. I wanted it to come out without steps at the joining with the fuselage, so in the first place, I stratified the cardboard so that the frames were not too thick. Since the design does not provide with an internal frame, I painted the reverse side with grey paint. The frames were glued in a similar way to the build of the fuselage. In some places I had to cut, in others, I had to add something from cuttings. In the end, the effect is even satisfactory. |


| Następnie zabrałem się za usterzenie. Projekt nie zakłada praktycznie żadnego szkieletu. Jest tylko wręga "g" i pudełkowegy dźwigar stateczników poziomych (cz. 36), który swoją drogą uważam za kiepskie rozwiązanie. Stateczniki poziome usztywniłem podklejając tekturą 0,5 mm częśći 38 i 40. We wnętrzu statecznika pionowego wstawiłem dodatkowe wzmocnienie odpowiadające jego kształtowi. Oparłem je na wrędze "g", która dzięki temu przestała być sterczącym i wiotkim kikutem wystającym z tyłu kadłuba. Model posiada rozdzielone powierzchnie sterowe, co niewątpliwie zaliczam na plus. Niestety są mocno uproszczone i stery wyglądają jakby były odcięte od stateczników przy pomocy siekiery. Formując krawędzie natarcia stateczników poziomych mocno dał mi się we znaki kiepskiej jakości karton. Jest twardy, niemiły w dotyku i ciężki w obróbce. Ma tendencję do łamania się przy mocniejszym zaginaniu. Trzeba go obficie nawilżać, ale wtedy się marszczy i wypacza. | Then I built the tail. Actually, the design does not involve any framework. There is only the "g" frame and the horizontal girder "framework box" (part 36), which I think it is a bad solution. I stiffened horizontal stabilizers with parts 38 and 40, sticking 0.5 mm cardboard. In the interior of the vertical stabilizer, I added an additional reinforcement corresponding to its shape. I leaned it on the g-frame. Thanks to that, the construction of the vertical stabilizer is stronger. The model has separated flight control surfaces, which I undoubtedly see as a plus. Unfortunately, they are very simplified and the rudders look as if they were cut off from the stabilizers with an axe. Forming the leading edges of the horizontal stabilizers made me experience the poor quality of cardboard. It is hard, not easy to form and heavy in processing. It tends to break with stronger bending. You need to moisten it abundantly, but then it wrinkles and warps. |

| Pudełkowy szkielet skrzydeł nie spotkał się z moją akceptacją. Przerobiłem konstrukcję na prostszą, opartą na dwóch długich dźwigarach z tektury 1,5 mm. Pudełka wykorzystałem jako podposzycie, które nakleiłem na dźwigary. Na początek rzut oka na rysunki montażowe i pudełkowy dźwigar: | The "box framework" of the wings did not meet my acceptance. I made the structure simpler, based on two long girders made of 1.5 mm cardboard. I used the boxes as an undercoat which I attached to the girders. First, a glance at the assembly drawings and the box girder: |


| Opisane wcześniej problemy z kiepskim kartonem nie nastrajały pozytywnie na oklejanie skrzydeł poszyciem. Formowanie dwóch długich na 23 cm poszyć było prawdziwym dramatem. Udało sie nasączając je mocno BCG i powoli, stopniowo zaginając. Niestety, efekt jest daleki od moich oczekiwań. W kilku miejscach krawędź natarcia się załamała, ja z kolei załamałem się jak zobaczyłem jak wspaniale do reszty pasują lotki. Ich konstrukcja jest dokładnie taka jak sterów, wyglądają jak odrąbane toporem od reszty. Niezbyt estetycznie wyglądają szpary pomiędzy końcówką skrzydła a lotką. Na tym etapie budowy zależało mi już tylko na tym, żeby doprowadzić ją do końca i przyznaję, że odpuściłem zniechęcony jakością tego modelu. | The problems with poor cardboard described earlier did not put me in a good mood before covering the wings with sheathing. Forming two 23 cm long skins was a real drama. I managed to do it by soaking them in BCG water glue and through slowly and gradually bending them. Unfortunately, the effect is far from my expectations. In a few places, the leading edge broke down. I broke down too when I saw that ailerons did not fit to the wings. Their design is exactly like rudders, they look like chopped from the rest by an axe. The gaps between the wingtips and the ailerons are not very aesthetically pleasing. At this stage of construction, I only wanted to bring it to an end. I admit that I gave up discouraged by the quality of this model. |


| Koniec końców, wkleiłem podwozie, czyli koło pod kadłbem wraz z jego oprofilowaniem. Pod nosem zamontowałem płozę będącą jak przypuszczam rodzajem amortyzatora. W górnej części dziobu wkleiłem rurkę Pitota, a pod końcówki skrzydeł trawiły uchwyty bądź podpórki (druty w kształcie spłaszczonej literki "U"). Tym samym budowa modelu dobiegła końca. | In the end, I build the chassis, i.e. the wheel under the fuselage with its profiling. I mounted a skid under the nose which I think is a kind of shock absorber. I attached a Pitot tube in the upper part of the nose and handles or supports (wires in the shape of a flattened letter "U") under the wingtips. Thus, the construction of the model came to an end. |


| Moja pierwsza przygoda z modelem szybowca zakończyła się zdecydowanie twardym lądowaniem, proporcjonalnie twardym do kartonu, z którego przyszło mi to latadło budować. Mimo tego, że lądowanie było twarde i pasażerowie nie klaskali, nikomu nic się nie stało. Maszyna tylko lekko sponiewierana. Efekt końcowy? Twierdzę, że lepszy niż to co możemy zobaczyć na okładce, a zatem cel został osiągnięty. Ładna, opływowa sylwetka Bociana odwraca nieco uwagę od niedociągnięć. Wiem, że sporo marudzę na jakość tego modelu, bo jestem przyzwyczajony do klejenia lepszych projektów. Nie znaczy to, że jego sklejenie nie sprawiło mi satysfakcji, wręcz przeciwnie. Dobrze się przy nim bawiłem, choć musiałem sporo kombinować, żeby doszybować do końca. Tak jak wspomniałem na wstępie, budowa tego modelu była też dla mnie zupełnie nowym doświadczeniem. Galeria zdjęć gotowego modelu jest tutaj (klik). | My first adventure with the glider model ended definitely with a hard landing, proportionally hard to the cardboard from which I had to build this "kite". Despite the fact that the landing was hard and the passengers did not clap the hands, nothing happened to anyone. The machine is only slightly battered. The final result? I would say that better than what we can see on the cover, and therefore the goal has been achieved. Bocian's nice, streamlined silhouette slightly diverts attention from errors. I know that I complain a lot about the quality of this model because I'm used to glueing better designs. This does not mean that its building did not give me satisfaction, quite the opposite. I had a good time with it, although I had to figure out a lot how to do it to the end. As I mentioned at the beginning, the construction of this model was also a completely new experience for me. You can find the photo gallery here (click). |
Brak komentarzy:
Prześlij komentarz