
| Udało się! Budowa Hellcata dobiegła do końca, zatem w dzisiejszym odcinku pokaże Wam wszystko to, co musiałem skleić, żeby ukończyć model. | I did it! The build of the Hellcat is finished, so in today's episode, I will show you everything I had to put together to bring it to an end. |
%20(2500x1731).jpg)
| Zacznę
od silnika, chociaż tak na prawdę był to ostatni duży zespół, który trafił na
warsztat. Serce Hellcata to Pratt & Whitney R-2800-10 Double Wasp uważany
za jeden z najlepszych silników gwiazdowych w historii. Oprócz Hellcata
napędzał także inne cuda, takie jak P-47 Thunderbolt czy F4U Corsair. Wychodzę
więc z założenia, że to nie jest nasze ostatnie spotkanie. Budowę silnika
odwlekałem do samego końca i skleiłem wcześniej wszystko co było możliwe do
sklejenia. Jeżeli ktoś zapyta dlaczego kleję samoloty, to dlatego, że szczytem
powtarzalności elementów jest dla mnie 18 cylindrowy silnik gwiazdowy. Gotowa
gwiazda zawsze daje sporą satysfakcję, ale droga osiągnięcia celu bywa nużąca. Pierwszą rzeczą, która wpadła mi w oko jest niewłaściwe rozmieszczenie cylindrów na głowicy. Przyjmując założenie, że szew ma być na dole, napis góra na górze i przód z przodu otrzymamy makietę silnika, w której przedni górny cylinder będzie stał pionowo, a za nim, w drugim rzędzie będą dwa rozchylone. Na dole będzie zatem odwrotnie, z przodu rozchylone, z tyłu pionowo. Powinno być jednak odwrotnie, potwierdzają to wszystkie zdjęcia i plany silnika. Obróciłem zatem głowicę szwem do góry. | I'll start with the engine, although it was actually the last big set of parts that I put together. The heart of the Hellcat is the Pratt & Whitney R-2800-10 Double Wasp considered one of the best radial engines ever. Beside the Hellcat, it also propelled other beauties such as the P-47 Thunderbolt and the F4U Corsair. So I am assuming that this is not our last meeting. I delayed the build of the engine until the very end and put together everything possible to build. If someone asks why I make plane models, it is because the highest level of repeatability of elements for me is the 18-cylinder radial engine. A ready "star" always gives a lot of satisfaction, but the way to achieve the goal can be tedious. The first thing that I noticed was the improper setup of the cylinders on the cylinder head. Assuming that the seam is at the bottom, the inscription "top" (góra) on top and front in front, we will get the engine in which the front upper cylinder will stand vertically, and behind it, in the second row, there will be two parted sideways. So at the bottom, it will be the other way around, parted at the front and vertical at the back. However, it should be the other way around, this is confirmed by all the photos and engine plans. So I turned the cylinder head with the seam up. |
%20(2500x1733).jpg)
%20(2500x1733).jpg)
| W zestawie dodatkowych elementów wyciętych laserowo dostajemy również elementy silnika, w tym cylindry z imitacją żebrowania. Zwinąłem sobie jeden na próbę i niestety okazało się, że podczas zwijania wszystko się rozwarstwia. Myślałem, że posmarowanie elementu BCG i pozostawienie go do wyschnięcia przed formowaniem wystarczy, żeby temu zapobiec, ale byłem w błędzie. Pozostałe elementy zaimpregnowałem porządnie, to znaczy caponem. Mimo to w kilku przypadkach problem z odchodzącymi żeberkami powrócił. Pierwszy raz korzystam z takiego rozwiązania jak laserowo wycięte cylindry i mam nieco mieszane uczucia, z jednej strony dobrze to wygląda i ułatwia pracę, z drugiej nie wiem jeszcze do końca jak się za to zabrać, żeby dobrze wykorzystać to udogodnienie. Użycie dodatkowych elementów oczywiście wymusiło malowanie całego silnika, więc pozwoliłem sobie na dodanie nitów, kilku innych dodatków jak np. elementu pomiędzy tymi dwoma grzybkami z przodu (niebieskie pudełeczko). | The set of additional laser-cut elements also includes engine components, including cylinders with imitation of ribs. I rolled one up for a trial and unfortunately, it turned out that everything was delaminated when folded. I thought impregnating with the BCG water glue will be enough to prevent this from happening, but I was wrong. I impregnated the other elements well, that is with a nitro varnish. Nevertheless, in a few cases, the problem with delaminating ribs has returned. This is the first time I use such a solution as laser cut cylinders and I am a little bit confused, on the one hand, it looks good and makes work easier, on the other hand, I do not really know how to use it to make this feature efficient. The use of additional elements forced the entire engine to be painted, so I allowed myself to add rivets and a few other accessories, such as an element between these two "mushrooms" at the front of the cylinder head (blue box). |
%20(2500x1733).jpg)
%20(2500x1736).jpg)
%20(2500x1734).jpg)
%20(2500x1732).jpg)
%20(2500x1733).jpg)
%20(2500x1733).jpg)
| Po sklejeniu wszystkich cylindrów wraz osłonami popychaczy dotarłem do momentu, w którym trzeba było to wszystko pomalować. Malowałem aerografem, blok silnika jest szary, cylindry to mieszanka aluminium i gunmetalu, miejscami zrobiłem nieco ciemniej dodając do mieszanki kroplę czarnego. Kiedy wszystko wyschło naniosłem poprawki pędzelkiem, trochę zacieków, na koniec przypudrowałem wszystko sproszkowanymi pastelami. Po tych zabiegach zacząłem uzupełniać brakujące elementy, to jest 36 popychaczy. Wykonałem je z drutu 0,8 mm i pomalowałem osobno przed zamontowaniem do silnika. Potem zamontowałem imitację przewodów wykonaną z drutu cynowego 0,2 mm. Model silnika nie posiada układu wydechowego, nie jest on przewidziany w projekcie. Jak widać na ostatnim zdjęciu, za silnikiem jest sporo pustej przestrzeni, tam oryginalnie mieścił się m.in. układ wydechowy. Zastanawiałem się nad jego wykonaniem, ba, nawet zacząłem, ale zaniechałem, jest bardzo skomplikowany i nie bardzo wiem jak się za niego zabrać. Zamierzam eksponować model z założoną osłoną silnika, w tej sytuacji z układu wydechowego nie będzie widać nic poza 10-cioma końcówkami kolektorów wydechowych, które dorobiłem, bo ich też projekt nie przewidywał. Gdybym chciał prezentować model z otwartym silnikiem, musiałbym na dużo wcześniejszym etapie budowy inaczej wykonać osłonę silnika, odwzorować pokrywy, które można było otwierać tak, jak otwierały się w rzeczywistości. Nie zrobiłem tego i na tym etapie budowy nie jestem już w stanie tego poprawić. | After assembling all the cylinders with the tappet covers, I got to the point where it all had to be painted. I did it with an airbrush, the engine block is grey, and the cylinders are a mixture of aluminium and gunmetal, I made them a little darker in some places by adding a drop of black to the mixture. When everything was dry, I grab a brush, and add some stains, and finally powdered everything with powdered pastels. After these procedures, I started to fill in the missing elements, i.e. 36 push rods. I made them from 0.8mm wire and painted them separately before mounting them to the engine. Then I installed an imitation of wires made of 0.2 mm tin wire. The engine model does not have an exhaust system, it is not provided for in the design. As you can see in the last photo, there is a lot of empty space behind the engine. Originally there was, among others, an exhaust system. I was thinking about making it. Actually, I even started it, but I gave it up, it is very complicated and I don't know how to go about it. I intend to present the model with the engine coating, in this situation nothing will be visible from the exhaust system except the 10 exhaust manifold tips that I added. The design did not include them. If I wanted to present a model with an open engine, I would have to make the engine cover differently, and reproduce covers that could be opened as they actually opened. I should do it at a much earlier stage of construction, but I did not do it and at this stage of the build, I am not able to correct it anymore. |
%20(2500x1733).jpg)
%20(2457x1705).jpg)
%20(2500x1734).jpg)
%20(2500x1732).jpg)
%20(2500x1732).jpg)
| Na początku budowy pominąłem sporo elementów wyposażenia kabiny, tak więc, żeby doprowadzić budowę do końca musiałem je wykonać. Dokończyłem fotel, wykonałem drążek sterowy, zagłówek, trochę dźwigienek, celownik sterownice nożne (na zdjęciu brakuje po prawej stronie takiego cylinderka, odpadł niepostrzeżenie przed zrobieniem zdjęcia). | At the beginning of the build, I omitted a lot of cockpit equipment, so to complete the model, I had to assemble them. I finished the seat and made the control stick, headrest, some levers, the sight, and pedals (in the photo there is no cylinder on the right side, it fell off imperceptibly before taking the photo). |
.jpg)
.jpg)
.jpg)
.jpg)
.jpg)
.jpg)
| Myślałem, że
szary kolor w tym modelu jest jednolity na wszystkich arkuszach, ale ironicznie
ujmując - nie doceniłem drukarni GPM - wypukłe elementy pokryw podwozia (G25a-c)
w wersji z czarnymi liniami konturów maja ten sam kolor co same pokrywy (G24),
ale jeżeli zdecydujemy się na wypukłe elementy bez linii konturów - te na
czerwonym tle - mamy je w innym odcieniu niż pokrywy. Podsumowując - albo
pokrywy w jednym kolorze z czarnymi liniami, albo pokrywy w dwóch kolorach, ale
bez ordynarnych czarnych kresek - pozostaje jedynie wybrać mniejsze zło. Wybrałem
te bez konturów. Kontrowersje związane z kolorystyką dotyczą również koloru pokryw
podwozia. Ich wewnętrzne strony są w kolorze interior green, twierdzę, że
powinny być jasnoszare, tu znowu odwołam się do czarno-białych zdjęć z epoki,
na których są one ewidentnie jasne. Może jakieś pojedyncze egzemplarze miały je
zielone, ale nie widziałem takich nigdzie. Co ciekawe, uchwyty mocujące pokrywy
do goleni (G29a-c)- są jasnoszare jak golenie, trochę niekonsekwentnie. Jako,
że i tak już pomalowałem wcześniej komory podwozia na kolor zbliżony do spodu
kadłuba, tak samo musiałem zrobić z wewnętrzną stroną pokryw. | I thought that the grey colour in this model was the same on all sheets, but ironically - I underestimated the GPM printing house - the convex parts of the landing gear covers (G25a-c) in the version with black contour lines have the same colour as the covers themselves (G24), but if we choose convex elements without contour lines - those on a red background - we have them in a different shade than the covers. To sum up - either covers in one colour with black lines, or covers in two colours, but without ugly black lines - it remains only to choose the lesser evil. I chose the ones without contours. The colour-related controversy also applies to the colour of the chassis covers. Their inner sides are in the interior green colour, I am sure they should be light grey. I will refer again to black-white photos from WWII, where they are clearly bright. Maybe some planes had them green, but I haven't seen them anywhere. Interestingly, the handles that attach the covers to the legs (G29a-c) - are light grey, like legs, it is a bit inconsistent. As I had already painted the landing gear chambers in a colour similar to the bottom of the fuselage, I had to do the same with the inside of the covers. |
.jpg)
.jpg)
.jpg)
.jpg)
.jpg)
.jpg)
.jpg)
| Nożyce na
goleniach podwozia są wg mnie ze złej strony. Elementy G20-G22 są pokazane na
rysunku tak, jakby miałyby być przyklejone z tyłu. Tymczasem na wszystkich
zdjęciach i planach Hellcata, a wierzcie mi, że widziałem ich ostatnio mnóstwo,
są z przodu. Poprawiłem. Poza tym dodałem do goleni imitację przewodów
hamulcowych z cynowego drucika 0,3 mm. | The "shears" on the undercarriage legs are, in my opinion, on the wrong side. The components of G20-G22 are shown in the drawing as if they would be assembled on the back. Meanwhile, all the photos and plans of Hellcat, and believe me, I have seen a lot of them recently, show that they are in the front. I corrected. In addition, I added an imitation of brake hoses made of 0.3 mm tin wire to the shin. |
.jpg)
| Uciekając od budowy silnika skleiłem min. zbiornik paliwa. Szkoda, że element H1 nie jest również w wersji bez czarnych konturów - nosek wyglądałby o wiele lepiej bez nich! Nie mam pewności co do koloru zbiornika - wydaje mi się, że powinien być jasnoszary, tak jak spód kadłuba, czy też w jednym z jego odcieni. Na czarno-białychzdjęciach z epoki jest jasny, większość modeli również ma go w kolorze spodu kadłuba. Nie mniej jednak widziałem kilka modeli z niebieskimi, więc kto wie. Na poniższych zdjęciac zbiornik mocno się błyszczy, robiłem je zaraz po lakierowaniu. | Running away from building the engine, I made also a drop tank. It is a pity that the H1 element is also not available without the black contours - the nose piece would look a lot better without them! I am not sure about the colour of the drop tank - I think it should be light grey, like the bottom of the fuselage. In black-white photos from WWII, it is bright, most models also have it in the colour of the underside of the fuselage. Nevertheless, I have seen a few models with blue, so who knows. In the photos below, the drop tank is shiny, I made them right after painting. |
.jpg)
.jpg)
.jpg)
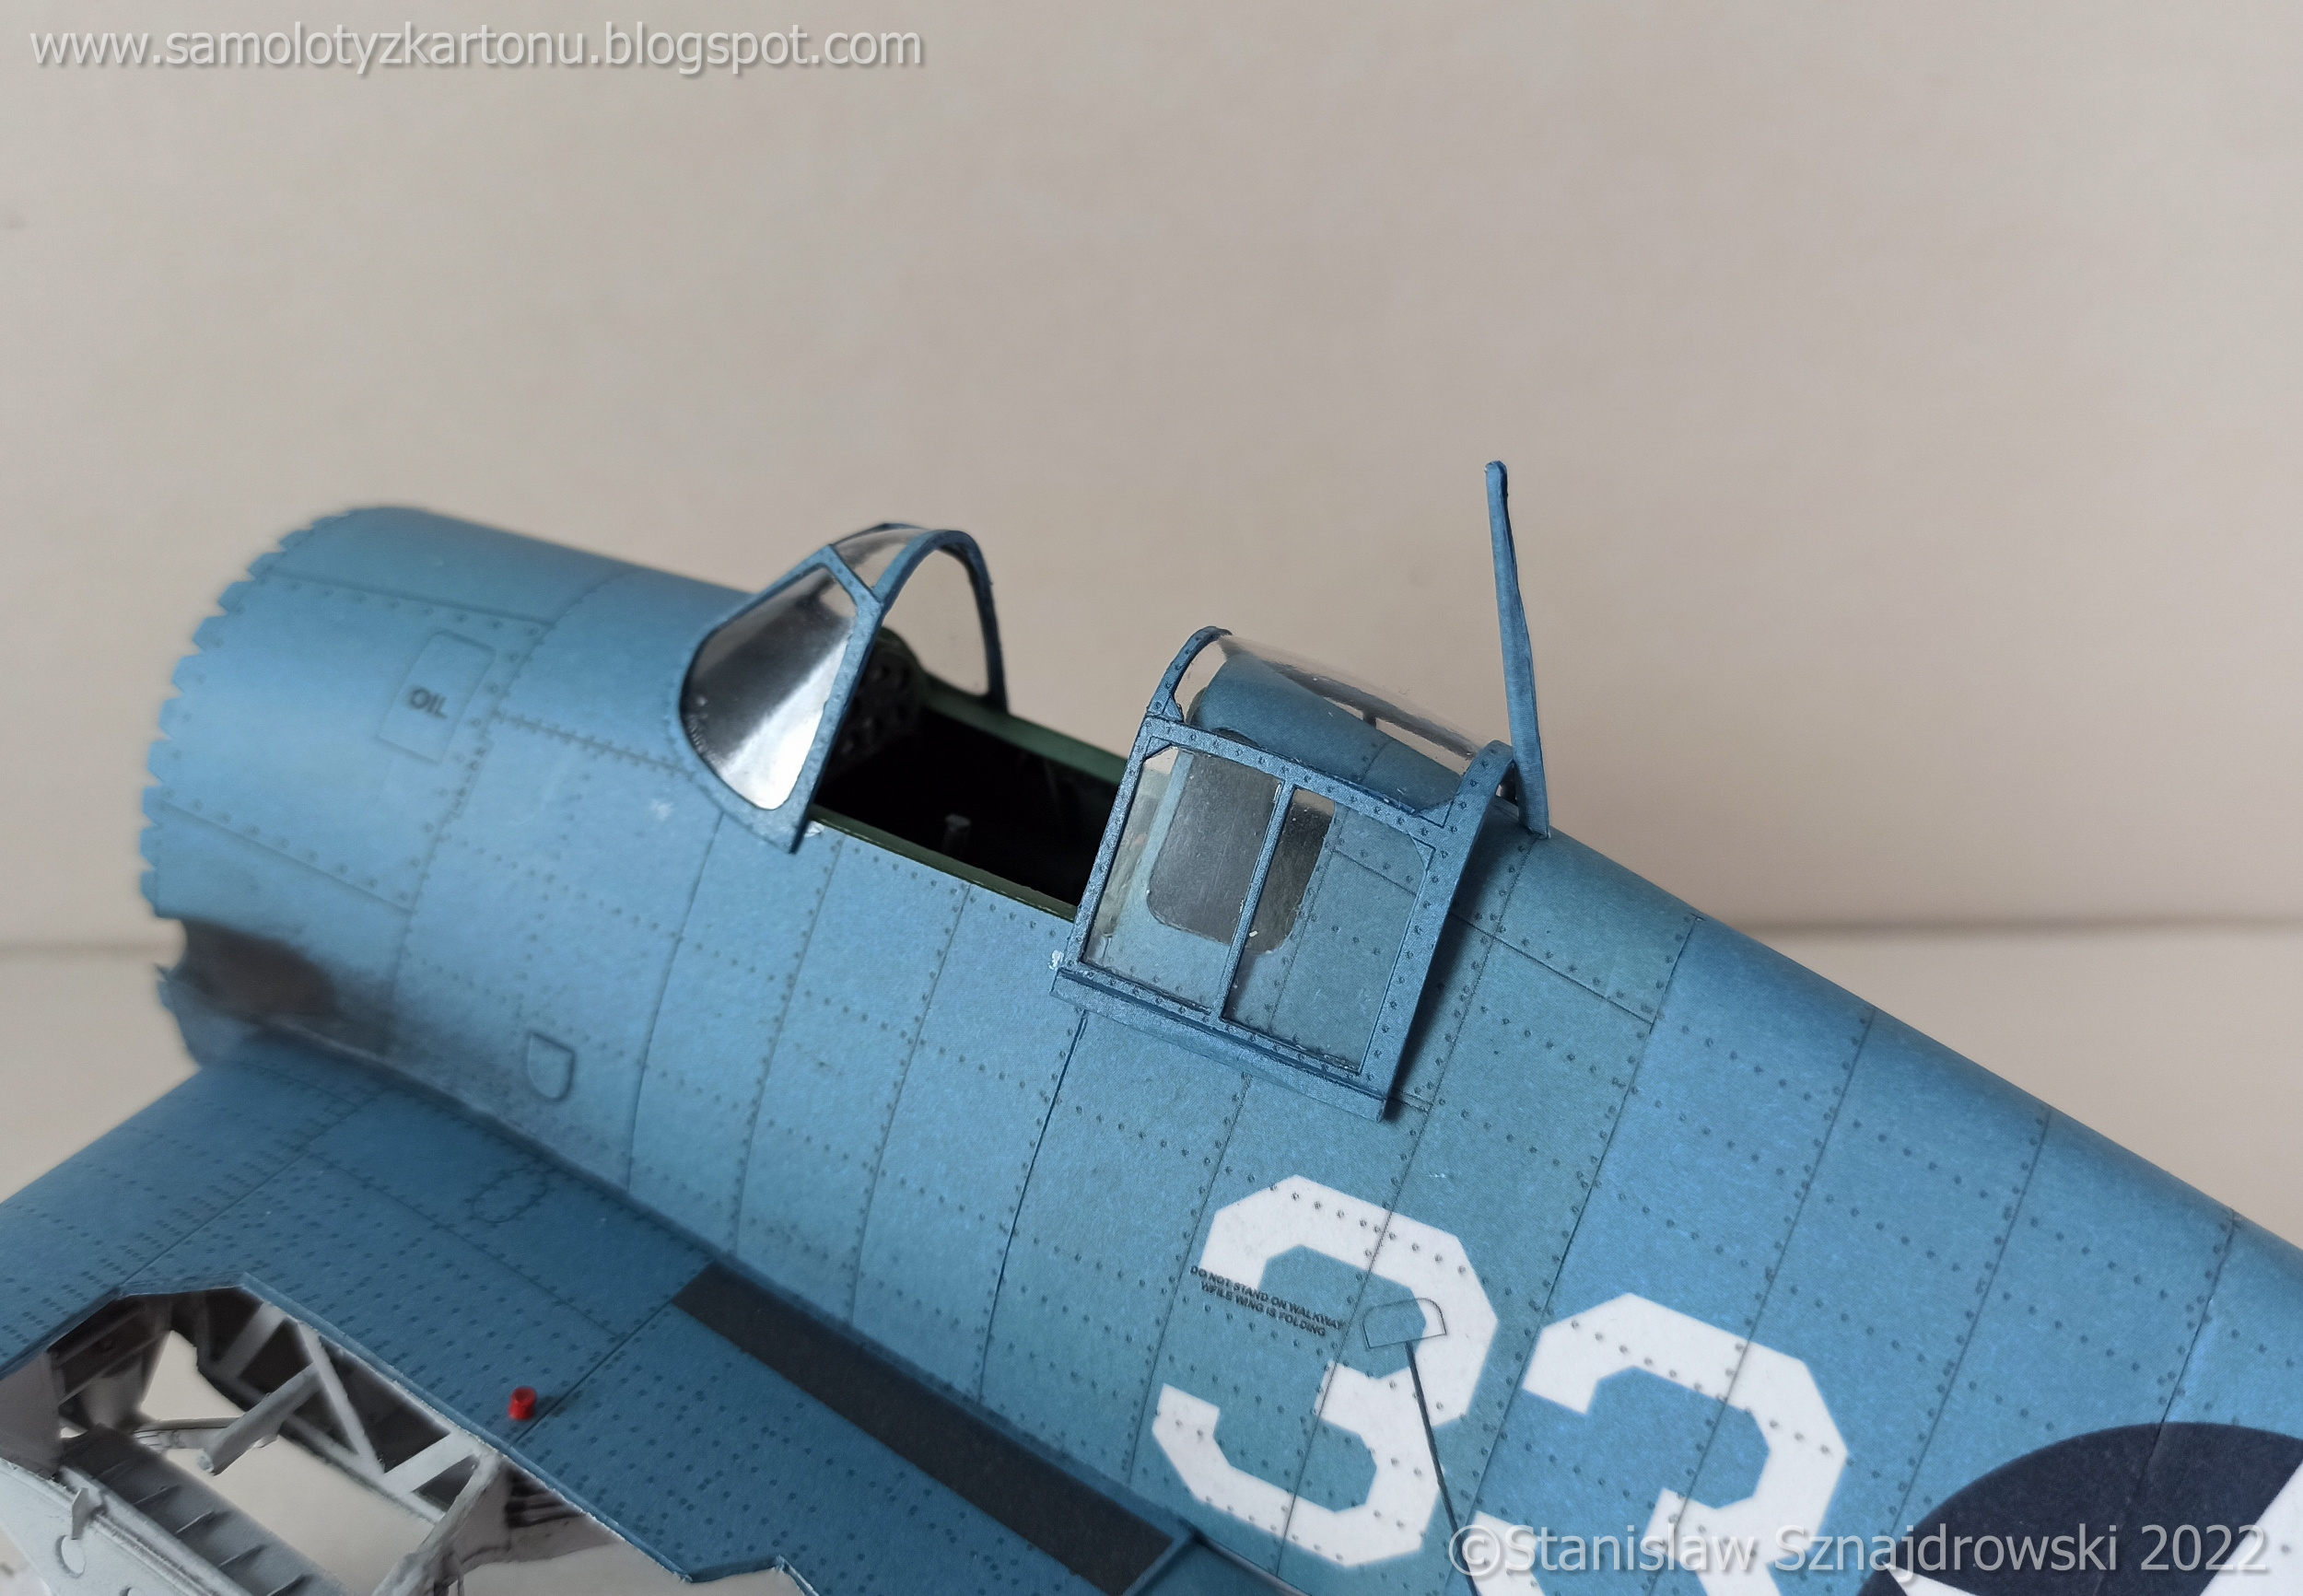
| Osłona kabiny kleiła się bardzo przyjemnie, użyłem gotowej kabinki z GPM. Ramki pasują prawie idealnie, wydaje mi się, że wiatrochron wytłoczki jest szerszy niż ramka z wycinanki, ale udało mi się to wszystko ładnie dopasować. Nie rozumiem tylko dlaczego wewnętrzne są ciemnoszare wpadające wręcz w czerń. Jest to zupełnie inny kolor niż zieleń z kokpitu. Ciekawe jest też to, że kadłub pod wiatrochronem ma kolor kadłuba - na wszystkich zdjęciach, które znalazłem był ciemnoszary lub czarny. Poprawiłem poprzez zamalowanie. Poprawcie mnie jeśli się mylę, ale malowano to farbą, która nie odbijała promieni słonecznych, żeby nie oślepiać pilota. Wahałem się chwilę w jakiej pozycji wkleić osłonę kabiny, w pozycji zamkniętej wygląda elegancko, ale otwarta bardziej pasuje do modelu ze złożonymi skrzydłami i ta opcja wygrała. | The canopy fits very nicely, I used a ready-made GPM canopy. The frames fit almost perfectly, I think the windscreen is wider than the frame, but I managed to fit it all nicely. I just don't understand why the internal frames are dark grey and even black. It is a completely different colour than the interior green in the cockpit. What's also interesting is that the fuselage under the windbreak is the colour of the fuselage - in all the photos I found it was dark grey or black. I painted it black. Correct me if I'm wrong, but it was painted with non-reflective paint so as not to blind the pilot. I hesitated a moment in which position to glue the canopy, in the closed position it looks elegant, but the open position is more suitable for the model with folded wings and this option won. |
.jpg)
.jpg)
.jpg)
.jpg)
.jpg)
.jpg)
| Zamalowałem też na ciemnoszary elementy A35, będące miejscem gdzie wylatują spaliny z silnika. Trochę tam jeszcze przybrudziłem w okolicy suchą pastelą nałożoną pędzlem. Za czysto tam było jak na wojenną maszynę, właściwie to nie widziałem zdjęcia Hellcata, na którym to miejsce byłoby czyste. To samo zrobiłem na spodzie kadłuba, gdzie również znajdowały się otwory wylotowe spalin. Te z kolei musiałem wyciąć we własnym zakresie, bo projekt ich nie przewiduje. Jak widać na zdjęciach dorobiłem też widoczne fragmenty kolektorów wydechowych. Pierwsze dwa zdjęcia pokazują stan przed brudzeniem. | I also painted dark grey elements of the A35, which is the place where the exhaust fumes from the engine come out. I got a little bit dirty in the area with a dry pastel applied with a brush. It was too clean for a warbird, I didn't actually see a picture of Hellcat where the place would be clean. I did the same on the bottom of the fuselage, where there were also exhaust vents. These, in turn, had to be cut on my own, because the design does not provide for them. As you can see in the pictures, I also added visible fragments of exhaust manifolds. The first two photos show the condition before w. |
.jpg)

.jpg)
.jpg)
.jpg)
.jpg)
.jpg)
.jpg)
| Podczas
dzielenia poszycia skrzydła pozostały mi fragmenty poszycia spodu, które w
pozycji złożonej "zwisają" spod przykadłubowej części skrzydła.
Elementy te otwierają się podobnie jak pokrywy podwozia i przypuszczam, choć
nie mam na to dowodów, że obsługa składając skrzydła zaczynała od otworzenia
tych właśnie pokryw uzyskując dostęp do mechanizmu składania (skrzydła były
składane ręcznie). Przypuszczam tak ze względu na położenie tych klap dokładnie
pod miejscem, gdzie w pozycji rozłożonej łączyły się i ryglowały dźwigary. W
każdym razie, do elementów poszycia musiałem dokleić dorobione we własnym
zakresie ich wewnętrzne strony i pomalować. Dorobiłem także zawiasy i dokleiłem
w odpowiednich miejscach. | As I divided the wing skin due to make them in the folded position, two small elements remain unused. In the folded position they "hang" from under the not foldable part of the wings. These elements open similarly to the undercarriage covers, and I suppose, although I do not have any evidence of that, the ground crew who folded the wings started by opening these covers, gaining access to the folding mechanism (the wings were folded by hand). I suppose so because of the position of these flaps exactly below the place where the girders joined and locked in the extended position. Anyway, I had to stick the inner sides and paint them on my own. I also made hinges and put them in the right places. |
.jpg)
.jpg)
.jpg)
| Śmigło Hellcata ma wredny element, nazwijmy go kołpakiem, choć nie jestem do tego przekonany w tym przypadku. Autor zaproponował ciekawy sposób wykonania tego elementu. Element F2 zwijamy ciasno w rulonik, następnie należy nadać mu odpowiedni kształt poprzez szlifowanie. Sklejony rulon osadziłem sobie na wkrętarce i przy pomocy różnych pilników i papierów ściernych uzyskałem odpowiedni kształt. Element F1 również nie był łatwy, jego uformowanie sprawiło mi sporo trudności. | The Hellcat propeller has a nasty element, let's call it a hubcap, although I'm not convinced of that in this case. The author proposed an exciting way of making this element. The F2 element should be wrapped tightly into a roll, and then it should be shaped by grinding. I put the glued roll on a screwdriver and with the help of various files and sandpaper I got the right shape. The F1 element was also not easy, its forming was difficult for me. I painted it aluminium. |
.jpg)
.jpg)
.jpg)
.jpg)
| Następnym krokiem było osadzenie łopat śmigła. Zwinięte z cienkiego papieru elementy F3 (pamiętacie, te które były też wycięte laserem na tekturze 1mm?) osadziłem na drucie a następnie przy pomocy prostego narzędzia ustawiłem je na wale śmigła. Narzędzie to jest kawałkiem przeźroczystej folii z dziurką w środku i naniesionymi liniami biegnącymi od środka. Kąty pomiędzy liniami wynoszą 120 stopni, co odpowiada rozmieszczeniu łopat w śmigle z trzema łopatami. Na koniec nasunąłem na elementy F3 poprawnie uformowane i sklejone łopaty śmigieł. Fajnie to wygląda. | The next step was to set up the propeller blades. The F3 elements rolled from thin paper (remember those that were also laser cut on 1mm cardboard?) were placed on a wire and then, using a simple tool, I placed them on the propeller shaft. This tool is a piece of transparent foil with a hole in the centre and lines drawn from the centre. The angles between the lines are 120 degrees, which corresponds to the arrangement of the blades in a three-blade propeller. Finally, I put correctly formed and glued propeller blades on the F3 elements. It looks cool. |
.jpg)
.jpg)
.jpg)
.jpg)
.jpg)
.jpg)
| Model
polakierowałem lakierami w sprayu marki Tamiya. Jest to sprawdzona i najlepsza
metoda jaką do tej pory poznałem. Wykorzystałem jeden z ostatnich słonecznych
dni, kiedy na balkonie było ciepło, w tym czasie jeszcze nie miałem sklejonego
silnika i śmigła, skrzydła były jeszcze osobno. Najpierw pokryłem model kilkoma
warstwami lakieru błyszczącego TS-13 (odstęp pomiędzy warstwami na
wyschnięcie). Kiedy już wszystko dobrze
wyschło nałożyłem dwie warstwy matowego TS-80. Na koniec rozpyliłem nad modelem
bardzo delikatnie jeszcze raz TS-13 co nadało modelowi delikatny, ale nie
nachalny połysk. Osłona kabiny była lakierowana osobno pędzlem. | I varnished the model with Tamiya sprays. It is a proven and the best method I have learned so far. I used one of the last sunny days when it was warm on the balcony. At that time I had not yet built the engine and propeller, the wings were still separate. First, I covered the model with several layers of TS-13 glossy varnish (distance between layers to dry). When everything was dry, I applied two layers of matte TS-80. Finally, I sprayed the TS-13 very gently over the model again, which gave the model a delicate but not intrusive shine. The canopy was varnished separately with a brush. |
.jpg)
| W skrzydła
wkleiłem metalowe lufy karabinów od Model Master. Warto w nie zainwestować, bo karabiny są całkiem nieźle wyeksponowane, przynajmniej 4 z nich. Do skrzydeł dokleiłem
jeszcze rurkę Pitot'a oraz zawiasy lotek, które pominąłem wcześniej. Do modelu założyłem żywiczne koła produkcji Model-Hobby. Na kilku zdjęciach widać, że na początku feli wyszły mi za ciemne. Później je zdjąłem i rozjaśniłem. Jak widać na niektórych zdjęciach, model stoi na podstawce imitującej pokład lotniskowca. Więcej na jej temat opowiem w galerii, ten post nie zmieści już ani jednego zdania i zdjęcia więcej! | I added metal barrels from Model Master into the wings. It is worth investing in them because the rifles are well exposed, at least 4 of them. I also stuck a Pitot tube and aileron hinges to the wings, which I omitted earlier. I put resin wheels produced by Model Hobby on the model. In a few photos, you can see that at the beginning the rims turned out to be too dark. Then I took them off and made them brighter. As you can see in some photos, the model stands on a base imitating the deck of an aircraft carrier. I will tell you more about it in the gallery, this post has not the capacity for a single sentence and photo more! |

.jpg)
.jpg)
.jpg)
.jpg)
.jpg)
.jpg)
.jpg)
Coś pięknego. Wspaniale wykonany model. Składane skrzydła normalny majstersztyk. Świetnie zrobiłeś silnik. Gratuluje kunsztu i mistrzostwa w modelarstwie.
OdpowiedzUsuńDziękuję!! :-)
UsuńSuper model, mega wykonanie! Szacunek!
OdpowiedzUsuń