
| Tak jak napisałem pod koniec poprzedniego wpisu, kolejnym etapem budowy jest montaż komór podwozia. Zmieniłem jednak nieco podejście do tego modelu i do kolejności budowy zaproponowanej przez autora - dlatego nie skleiłem całych komór, a jedynie tyle ile potrzebowałem, by umieścić je w kadłubie. | As I wrote at the end of the previous post, the next stage of the build is the assembling of the gear hatches. However, I changed a bit the approach to this model and to the order of construction proposed by the author - that is why I did not build the entire hatches, but only as many as I needed to put them in the fuselage. |
.jpg)
Podwozie tego samolotu to dość ciekawa konstrukcja - jest to tzw. podwozie jednotorowe (w języku angielskim to "podwozie rowerowe") - składa się na nie goleń podwozia przedniego z jednym kołem, za nią w osi symetrii znajduje się goleń podwozia głównego z dwoma kołami. Obie golenie chowają się do komór w kadłubie. Dodatkowo, na końcówkach skrzydeł znajdują się chowane małe kółka podpierające. Przednia komora podwozia jest stosunkowo prosta i nie wymaga komentarza (ten element na zdjęciu poniżej). | The chassis of this aircraft is quite an interesting construction - it is the so-called bicycle undercarriage - consists of the front undercarriage leg with one wheel, behind it, in the axis of symmetry, there is the main undercarriage leg with two wheels. Both legs retract into hatches in the fuselage. Additionally, there are small retractable supporting wheels on the wingtips. The front landing gear compartment is relatively simple and requires no comment (picture below). |
.jpg)
| Komora podwozia głównego jest nieco ciekawsza. We wnętrzu komory podwozia głównego należy wkleić elementy nr 20 L i P, które to stanowią wewnętrzne, wystające poza obrys prostokąta ściany komory. Styl projektowania niektórych elementów nie do końca mi podchodzi, ale jestem w stanie je przerobić tak, żeby mi to odpowiadało. Autor zaprojektował je, podobnie jak wcześniej tablice przyrządów, w formie pudełek. Nie rozumiem po co przy tym elemencie wszystkie boczne ściany. Jak dla mnie połowa z nich jest zbędna i nie będzie w ogóle widoczna - będą przylegać do ściany komory. Odciąłem je i zostawiłem tylko te dwie, które są potrzebne. | The main landing gear compartment is a bit more interesting, I don't quite like the design style of some of the elements, but I am able to remake them to suit me. Inside the main landing gear compartment, there are elements no. 20 L and P, which are internal, protruding beyond the outline of the rectangle of the hatch wall. The author designed them, similarly to the instrument panels, in the form of boxes. I do not understand what all the side walls are for with this element. As for me, half of them are redundant and will not be visible at all - they will be adjacent to the hatch wall. I cut them off and left only the two that are needed. |
.jpg)
.jpg)
.jpg)
.jpg)
| Tak jak wspomniałem, wkleiłem do komory tylko te elementy, które były niezbędne, bo nie widzę sensu sklejania wszystkich detali na tym etapie. Następnie zabrałem się za kadłub samolotu. Jego centralna część to bardzo długi walcowaty element. Jak-25 nie miał zbyt skomplikowanej bryły kadłuba, stąd nie było konieczne dzielenie tej sekcji na więcej segmentów. Długi na ponad 17 cm element nie był najłatwiejszy do uformowania i musiałem sobie poszukać do tej czynności odpowiedniego narzędzia. W modelarstwie znajdują zastosowanie różne przedmioty, tym razem pomocna okazała się rura od odkurzacza... | As I mentioned, I only built the necessary elements to the hatches, because I do not see any point in making all the details together at this stage. Then I started the fuselage of the plane. Its central part is a very long cylindrical element. The Yak-25 did not have a very complicated body shape, so it was not necessary to divide this section into more segments. The element, over 17 cm long, was not the easiest to form and I had to find a suitable tool for this task. Various items are used in modelling, this time a vacuum cleaner pipe was helpful ... |
.jpg)
.jpg)
| Element został wzmocniony podwójną warstwą podklejki z
cienkiego papieru wklejonego na butapren. Dzięki temu uzyskał sztywność i
wytrzymałość potrzebną chociażby do utrzymania dźwigarów skrzydeł. Poza tym
chwytając model nie będę się musiał obawiać, że poszycie się zapadnie. Na co warto zwrócić uwagę to hamulce aerodynamiczne - autor zaprojektował je tak, że właściwie trzeba je zrobić otwarte - elementy poszycia kadłuba nie uwzględniają poszycia hamulców. Od początku założyłem, że zrobię je zamknięte - to łatwe do przerobienia. Po pierwsze dlatego, że otwarte zaburzają piękną sylwetkę, po drugie dlatego, że ich wnętrze ma paskudny kolor. Prawie każdy element kadłuba usztywniam podposzyciem z cienkiego papieru naklejonego na butapren - wycięte pokrywy hamulców wystarczyło nakleić w odpowiednie miejsce. Jak widać na tym zdjęciu, kolor pokryw znacznie różni się od koloru kadłuba - i tutaj, wydaje mi się, że jest to celowe działanie! Na zdjęciach oryginału widać wyraźnie, że mają one znacznie ciemniejszy kolor. Wynika to zapewne z zastosowania innych materiałów. O ile różnice kolorów poszycia na kadłubie są typową drukarską wtopą GPM-u, to w przypadku hamulców aerodynamicznych zdaje się być to przemyślanym zabiegiem. Czapki z głów! | The element was reinforced with a double layer of thin paper underlay glued with butaprene glue. As a result, it obtained the stiffness and strength needed, for example, to maintain the wing girders. Besides, when grabbing the model, I won't have to worry that the skin will collapse. What is worth paying attention to are the aerodynamic brakes - the author designed them in such a way that they actually need to be made open - the elements of the fuselage plating do not take into account the brake plating. From the beginning, I assumed that I would make them closed - it's easy to remake. Firstly, because the open ones disturb a beautiful silhouette, and secondly because their interior has an ugly colour. I stiffen almost every part of the fuselage with a substructure of thin paper glued on butapren - the cut airbrake covers had only to be glued to the right place. As you can see in this photo, the colour of the covers is very different to that of the fuselage - and here, I think this is an intentional act! The photos of the original clearly show that they are much darker in colour. This is probably due to the use of other materials. While the differences in the colours of the plating on the fuselage are typical GPM misprints, it seems to be a deliberate procedure in the case of air brakes. Hats off! |
.jpg)
.jpg)
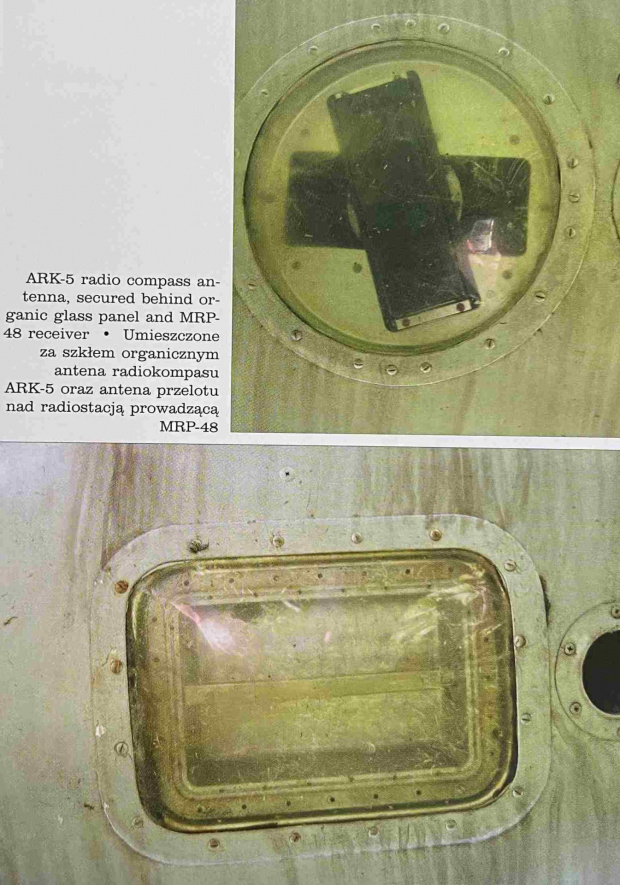
Zagadką jest otwór znajdujący się na spodzie kadłuba na elemencie nr 6. Z elementu wynika jasno, że należy go wyciąć, niestety nie mam pojęcia, co trzeba tam wkleić. Instrukcja nie wspomina niczego na jego temat, nie ma też nic na rysunkach montażowych. Na podstawie przeprowadzonych poszukiwań w Internecie śmiem twierdzić że jest to albo umieszczona za szkłem antena radiokompasu ARK-5, albo ukryte również za szybą wyposażenie fotograficzne - w końcu był to także samolot rozpoznawczy. Czymkolwiek by to nie było, wycinanka nie oferuje elementu, który można by było tam wkleić. Zdecydowałem się na antenę ARK-5, wykonałem jej uproszczoną imitację, którą wkleiłem do wnętrza kadłuba i przykryłem przeźroczystą osłoną z folii. Lepiej tak, niż gdyby miała by zostać pusta dziura. | The puzzle is the hole at the bottom of the fuselage on element 6. The element clearly shows that it should be cut, unfortunately, I have no idea what to put in there. The manual does not mention anything about it, and there is nothing on the assembly drawings. On the basis of Internet searches, I dare to say that it is either the ARK-5 radiocompass antenna placed behind the glass, or the photographic equipment hidden behind the glass - after all, it was also a reconnaissance aircraft. Whatever it is, the cutout does not offer an element to put there. I decided on the ARK-5 antenna and made a simplified imitation of it, which I glued inside the fuselage and covered with a transparent cover. Better than if there were to be an empty hole. |
.jpg)
.jpg)
Następnie zabrałem się za kolejne segmenty kadłuba. To była prosta i przyjemna faza budowy, czysta modelarska radość i satysfakcja z rosnącego w oczach modelu. Model, a przynajmniej jego kadłub, jest rewelacyjnie spasowany. Można powiedzieć, że sam się skleja. Elementy nie wymagają żadnej poważniejszej obróbki poza standardowymi czynnościami. Do tego laserowo wycięte wręgi pasują perfekcyjnie, nie trzeba heblować. Doszedłem do momentu, w którym cztery niepołączone ze sobą człony kadłuba oraz komory podwozia i kabinę trzeba połączyć w całość. W nosie zainstalowałem jeszcze trochę ołowiu w celu jego dociążenia - nie chcę, żeby gotowy model szorował ogonem po półce. Połączenie tego wszystkiego "do kupy" przebiegło bardzo sprawnie i wyniku tej operacji uzyskałem długą na 45 centymetrów "parówkę". Jakby dokleić do niej kiosk i stery ze śrubą na końcu to byłby z tego całkiem zgrabny okręt podwodny ;) Niestety, co wyraźnie widać na zdjęciach to różnice w kolorach na poszczególnych arkuszach. Wspominałem o tym już na początku relacji, teraz widać to jak na dłoni. Jak można było to tak....zepsuć. | Then I started working on the next fuselage segments. It was a simple and pleasant phase of construction, pure modelling joy and satisfaction from the model growing in the eyes of the model. The model, or at least its fuselage, is perfectly fitted. You could say that it sticks together by itself. The elements do not require any major processing apart from standard activities. In addition, the laser cut frames fit perfectly, no sanding is required. I have come to the point where four unconnected parts of the fuselage, as well as the landing gear hatches and the cockpit, need to be put together. I have installed a little bit of lead in the nose to weight it down - I don't want the finished model to scrub the shelf with its tail. It went very smoothly and as a result of this operation I obtained a 45 cm long "sausage". If the turret and rudders with a screw at the end were glued to it, it would be quite a nice submarine;) Unfortunately, what you can clearly see in the photos are the differences in colours on the plating. I mentioned it at the beginning of the model build report, and now you can see it clearly. How could it be so wrong? |
.jpg)
.jpg)
.jpg)
.jpg)
.jpg)
.jpg)
.jpg)
.jpg)
.jpg)
.jpg)
.jpg)
.jpg)
| Na koniec jeszcze ciekawostka: wydawca podaje na okładce modelu, że jego długość wynosi po sklejeniu 33 centymetry. Wyszło mi 45. Mierzę i liczę. Żona mówi - przykleiłeś o kilka elementów za dużo. Sprawdzam dane techniczne samolotu zamieszczone w wycinance. Długość kadłuba - 10,96 cm...podzielone przez 33...w przybliżeniu 33 centymetry czyli tak jak podaje okładka...chwila, to w jakiej skali jest właściwie ten model? Przez chwilę myślałem, że to 1:24, ale krok po kroku doszedłem do tego, że polska Wikipedia, z której to zapewne dane czerpał wydawca, podawała długość 10,96 metrów i rozpiętość 15,66 metrów. Dane te podane są na odwrót (angielska wersja i inne źródła podają poprawne, czyli na odwrót), wystarczy spojrzeć na rzuty samolotu, jest dłuższy niż szerszy. Dokonałem zmiany w artykule na Wikipedii, tak aby dane były takie, jakie być powinny. | One more thing, there is a funny curiosity: the publisher says on the cover of the model that its length after the building is 33 centimetres. I got 45. I measure and count. My wife says - you glued a few elements too many. I check the technical data of the plane in the technical description attached to the manual. Fuselage length - 10.96 cm ... divided by 33 (scale) ... approximately 33 centimetres or as stated on the cover ... wait, what scale is this model actually? For a moment I thought it was 1:24, but step by step I came to the point that the Polish Wikipedia, from which the publisher probably obtained the data, gave a length of 10.96 meters and a span of 15.66 meters. These data are given the other way around (the English version and other sources say correct, that is, the other way around), just look at the projections of the plane, it is longer than wider. I made a revision to the Polish Wikipedia article to get the data as it should be. |

Brak komentarzy:
Prześlij komentarz