
| Esencją tego modelu jest kabina, dlatego poświęcę jej najwięcej miejsca w tej relacji. Tylna część to temat tak złożony, że nie zmieści się w jednym poście. Zapraszam zatem do obejrzenia tego, co udało mi się do tej pory zbudować. | The essence of this model is the cockpit, so I will dedicate it the most space in this model build. The rear section of it is so complicated topic that it won't fit in one post. Today I'll show you what I have managed to build so far. |

| Jak już wspomniałem, podłoga jako jedna część nie istnieje. Żeby mieć na czym ustawić wyposażenie, należy skonstruować ramę ze szkieletem, na które to składają się części oznaczone numerami od 16 do 20, w sumie, kilkadziesiąt drobnych elementów. Rama (elementy 16, a,b,c...) to bardzo delikatny zespół, z nim miałem najwięcej trudności. Każdemu, kto ma w planach ten model, zalecam bardzo dokładne zapoznanie się z rysunkami i złożenie tych elementów kilka razy "na sucho". Wydaje mi się, że w jednym miejscu natknąłem się na niedopatrzenie ze strony autorów, elementy 20/20a wystawały nieznacznie poniżej część 19 co uniemożliwiało poprawne połączenie z ramami 16 L i P. Delikatna korekta skalpelem i było już ok. Jak się później okazało to nie były jedyne problemy z tymi elementami. Do szablonu oznaczonego literą T (2 szt.) nie został przypisany w instrukcji żaden kolor, intuicyjnie pomalowałem druty na kolor ciemnoszary, tak jak wnętrze kabiny. | As I mentioned, the floor as one part doesn't exist. You need to build a framework so that you can put on it whole equipment. The framework consists of many parts marked with numbers from 16 to 20, a total of several dozen small elements. It is a very fragile construction. I encountered many difficulties with elements 16, 16 a, b, c...). I recommend to anyone who wants to build this model to read the instruction and to study assembly drawings very carefully. I think I came across a mistake because the parts 20/20a stood out below the part 19 which made impossible to connect them with frames 16 L and 16 P. A little correction with a scalpel knife and it was already ok. As it turned out later, this is not the only problem concerning these parts. No colour was assigned to the template marked with the letter T (2 pcs.), I painted it intuitively dark grey just like the interior of the cockpit. |


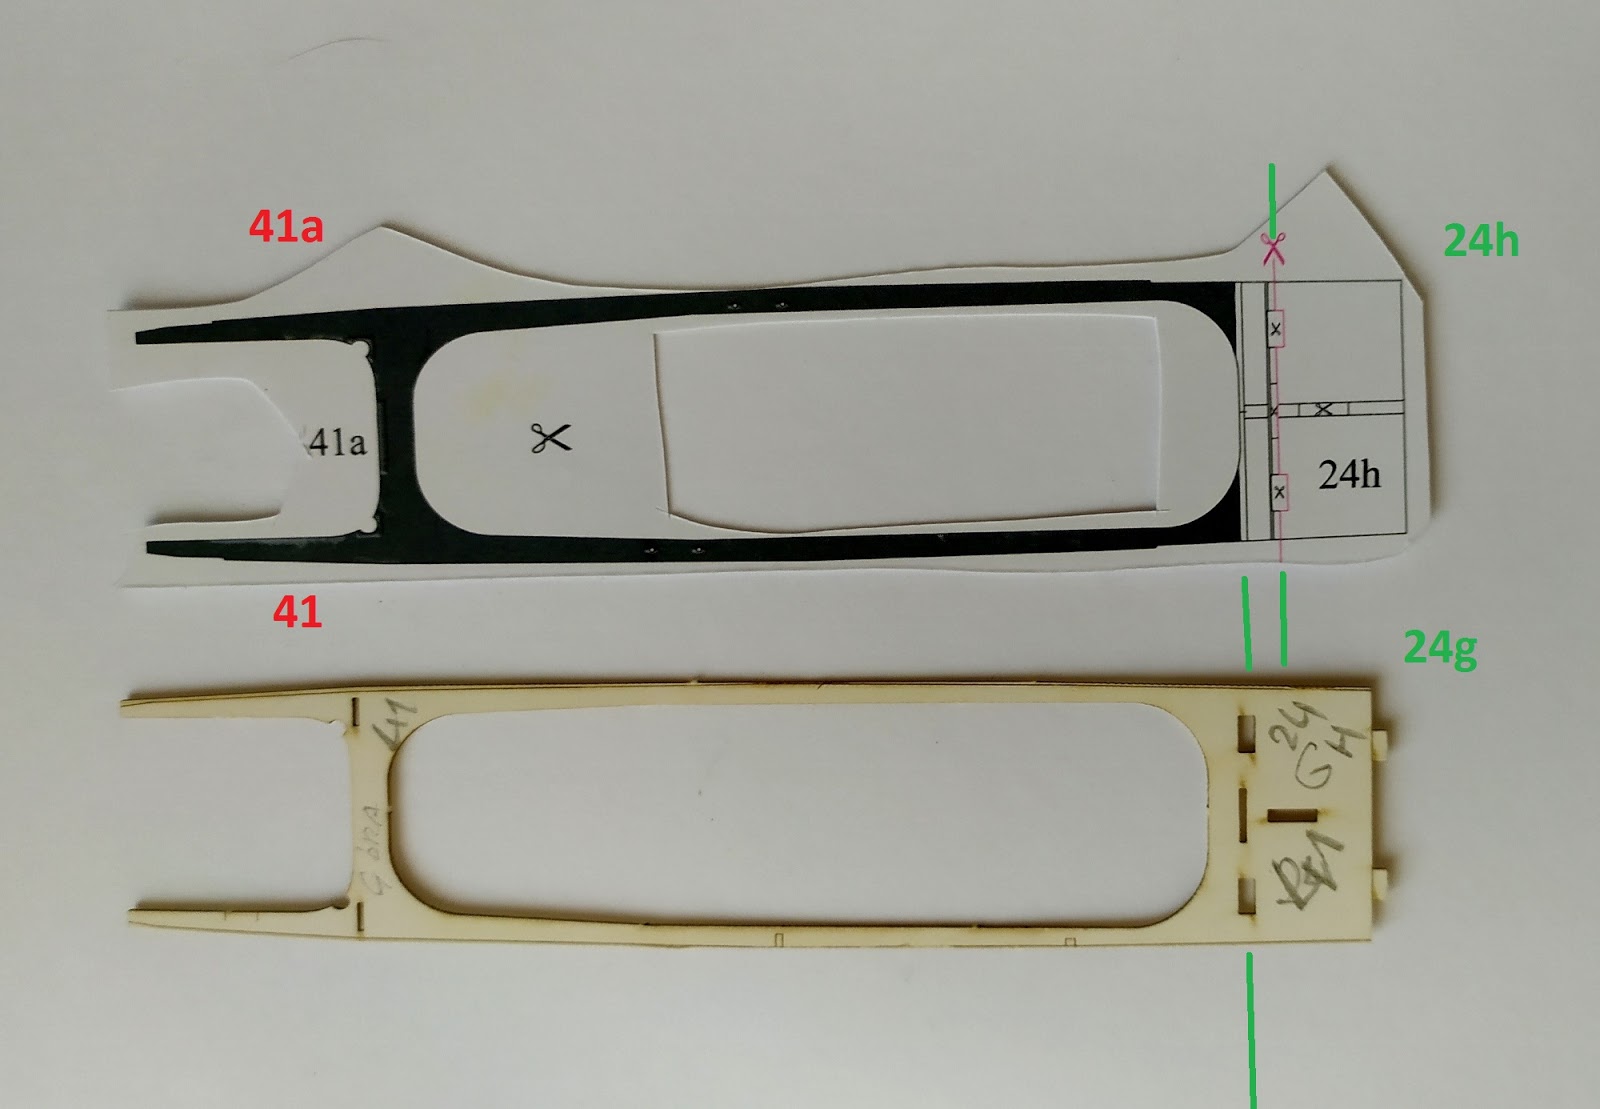
| Mając już za sobą ten etap, przygotowałem sobie kolejną grupę elementów, których budowę opisuje kolejny akapit instrukcji. Muszę przyznać, że na tym etapie się nieco pogubiłem, nie mogłem się doszukać dwóch elementów, jak się okazało, nie zrozumiałem intencji autora. Po głębszym zastanowieniu doszedłem do wniosku, że części 41 i 24g są jednym elementem (wręga), który trzeba nakleić element 41a/24h, a potem rozciąć uzyskując dwa osobne elementy. Oczywiste, prawda? | After having completed this stage of the build, I prepared another group of elements whose construction is described in the next paragraph of the instructions. I have to admit, that at this stage I got lost a bit, I couldn't find two parts, as it turned out, I didn't understand the author's intentions. After a deeper reflection, I came to the conclusion that parts 41 and 24g are actually one part (frame) that needs to be put together with part 41a/24h and then cut to obtain two separate parts. Obvious, isn't it? |

| Panele boczne są bardzo fajnie zaprojektowane - wewnętrzne wzmocnienie i wręgi nadające kształt. Dla niektórych może przekombinowane, ale takie wzmocnienia zapewniają stabilność konstrukcji. Zazwyczaj dorabiam takie wstawki we własnym zakresie. | The side panels are well designed. Internal frames give shape and inflexibility. For some, it may be recombined, but such solution ensures the stability of the construction. I usually make these parts myself. |


| Wrócę teraz do elementów 20/20a z pierwszego akapitu, wspomniałem już, że coś tu nie gra. Nie potrafię określić czy jest to mój błąd, czy może feler w opracowaniu. Jestem za to pewien, że tak wyjść nie powinno. Po przymierzeniu elementów 23 c-f będących wstawkami pomiędzy żeberkami okazało się, że znaczniki na elementach 20 i wrędze 23 są niżej niż te na wrędze 24 i żeberkach wychodzących z ramy (cz.16). Przymierzenie elementu 41/24 zamykającego kabinę od góry potwierdza, że 20/20a są za niskie około o 1 mm. Kolejnym potwierdzeniem było przymierzenie burty kabiny. Wszystkie wstawki 23 powinny tworzyć prostą linię na co wskazują panele 27/27a znajdujące się po obu stronach kabiny. Zacząłem od wklejenia tychże, a następnie wkleiłem w nie elementy 23. Wiem, że to skomplikowane. Poniżej kilka zdjęć dla rozjaśnienia tekstu...a na początek rysunek montażowy: | I'll now return to items 20/20a from the first paragraph. I have already mentioned that something is wrong here. I can't say if it is my mistake or maybe an error made by designers. But I'm sure that this shouldn't look like this. After fitting the parts 23 c-f designed as inserts (or struts, correct me please if it's wrong), it turned out that the markers on the parts 20 and the frame 23 are lower than those on the frame 24 and ribs coming out of the frame (part 16). Fitting the part 41/24 which closes the cockpit from above confirms that 20/20a are too low by about 1 mm. Another confirmation was fitting the cabin side. All inserts 23 should form a straight line as indicated by panels 27/27a on both sides of the cockpit. I started by mounting these parts, and then, I added the parts 23. I know, it's complicated. Below are some photos, and the assembly drawing: |


| Skleiłem jeszcze kilka elementów wyposażenia - zasobnik amunicji dla MG-81Z, akumulator, podstawy działek MG-FF oraz łoże działek MG 151/20. Do zasobnika przewidziane są jeszcze taśmy amunicyjne, ale na razie ich nie wklejam, te z wycinanki są płaskie, szukam innego rozwiązania. Może macie jakieś dobre patenty? Krawędź panelu cz. 27 wymaga jeszcze przypudrowania, poprawię to później. | I glued a few pieces of equipment together - the ammunition container for MG-81Z, the battery, MG-FF plot bases, and MG-151/20 mount. I have no idea how to make ammunition tapes, so I didn't put them to the container. Those from the model are so flat. I'm looking for another solution. Maybe you have some good patents? The edge of part 27 needs some paint retouch, I'll fix it later. |


| Na ten moment kabina wygląda tak, jest tam jeszcze bardzo dużo miejsca, które niebawem się zapełni. O tym opowiem w kolejnej części relacji. | At the moment, the cockpit looks like this, there is still a lot of space that will be filled up soon. I'll talk about this in the next part of the model build. |
Brak komentarzy:
Prześlij komentarz