
| Po sklejeniu skrzydeł zabrałem się za gondole silnikowe. Mając ten etap już za sobą mogę napisać, że niespodziewanie okazał się on dość karkołomny i w pewnym momencie zrobiło się dość nerwowo, ale ostatecznie poradziłem sobie z wyzwaniem, które rzucił mi model. | After assembling the wings, I started with the engine nacelles. With this stage behind me, I can write that unexpectedly it turned out to be quite complicated and at some point, it got quite nervous, but finally, I coped with the challenge that the model gave me. |
%20(2200x1520).jpg)
| Na początku nic nie zapowiadało problemów. Zacząłem od sklejenia centralnej i tylnej części prawej gondoli. Elementy poszycia gondoli pasowały do siebie idealnie. Nie było to zaskoczeniem, bo spasowanie elementów poszycia to największy atut tego modelu. Do środka wkleiłem dyszę wylotową i wykonaną w 2/3 gondolę zacząłem przymierzać do skrzydła. | At first, nothing seemed to be a problem. I started by making the central and rear parts of the right nacelle. The parts of the nacelle fit together perfectly. It was not a surprise, because the fitting of the plating elements is the greatest advantage of this model. I put the outlet nozzle inside and started to try on the 2/3 nacelle under the wing. |
%20(2200x1525).jpg)
%20(2200x1528).jpg)
%20(2200x1526).jpg)
| Tutaj pojawiły się pierwsze problemy. Tylna część pasuje niemal idealnie, ale z przodu zaobserwowałem dwie niepokojące rzeczy: od zewnętrznej strony pojawiła się szpara na około 1 mm, z kolei od wewnątrz nie miałem pojęcia jak ukształtować ten zaznaczony na zdjęciach poniżej fragment części nr 74 (L/P). Miałem pewne wyobrażenie jak powinno to wyglądać po sklejeniu i co mniej więcej autor miał na myśli - ten fragment stanowi jednocześnie miejsce połączenia (szew) tego elementu po jego uformowaniu oraz oprofilowanie pomiędzy gondolą, a skrzydłem. Należy go wygiąć w kilku płaszczyznach i wpasować w lukę pomiędzy burtą gondoli a dolną powierzchnią skrzydła. Siedziałem nad tym i kląłem jak szewc przez ładnych parę godzin i gdy element wyglądał już jak psu wiadomo skąd wyjęty postanowiłem zrobić to inaczej. Z zapasu koloru odzyskanego z pasków łączących wykonałem sobie oprofilowanie, którym zakryłem część swoich niepowodzeń. Wiedząc co mnie czeka, zabrałem się za drugą gondolę. Mimo wszystko chciałem spróbować to skleić tak jak narysował to autor. Tym razem jednak odpuściłem szybciej, bo widziałem, że znowu szykuje się gryzienie kartonu. Odciąłem ten dziwny twór i zrobiłem tak samo jak po prawej stronie. Nie rozumiem tutaj kompletnie dlaczego autor tak to skomplikował, być może rozwijając siatkę w programie graficznym wyglądało to sensownie, ale niestety w praktyce okazało się być rozwiązaniem do niczego. O wiele lepiej byłoby, gdyby to przejście pomiędzy gondolą, a skrzydłem było wykonane w formie dodatkowego elementu/elementów stanowiących oprofilowanie. | This is where the first problems appeared. The rear part fits almost perfectly, but from the front, I noticed two disturbing things: from the outside, there was a gap of about 1 mm, while from the inside I had no idea how to form the fragment of part 74 (L / R) marked in the photos below. I had a certain idea of what it should look like after assembling, and what the author meant more or less - this fragment is also the edge of connection (seam) of this element after its forming and the transition between the nacelle and the wing. It should be bent in several planes and fit into the gap between the nacelle's side and the lower surface of the wing. I sat on it and swore like a trooper for a good few hours and when the element looked like a piece of you know what, I decided to do it my way. I made a profile from the stock of colour recovered from the connecting strips, with which I covered some of my failures. Knowing what awaited me, I started the second nacelle. After all, I wanted to try to stick it together as the author drew it. This time, however, I let go faster, because I saw that I was getting ready to chew on the cardboard again. I cut off this strange creature and did the same as on the right side. I do not understand here why the author made it so complicated, perhaps developing it in a graphics program it looked sensible, but unfortunately in practice, it turned out to be a solution serving for nothing. It would have been much better if this transition between the nacelle and the wing was made in the form of an additional element/elements constituting a profile. |
%20(2200x1525).jpg)
%20(2200x1524).jpg)
%20(2200x1525).jpg)
%20(2200x1525).jpg)
%20(2200x1524).jpg)
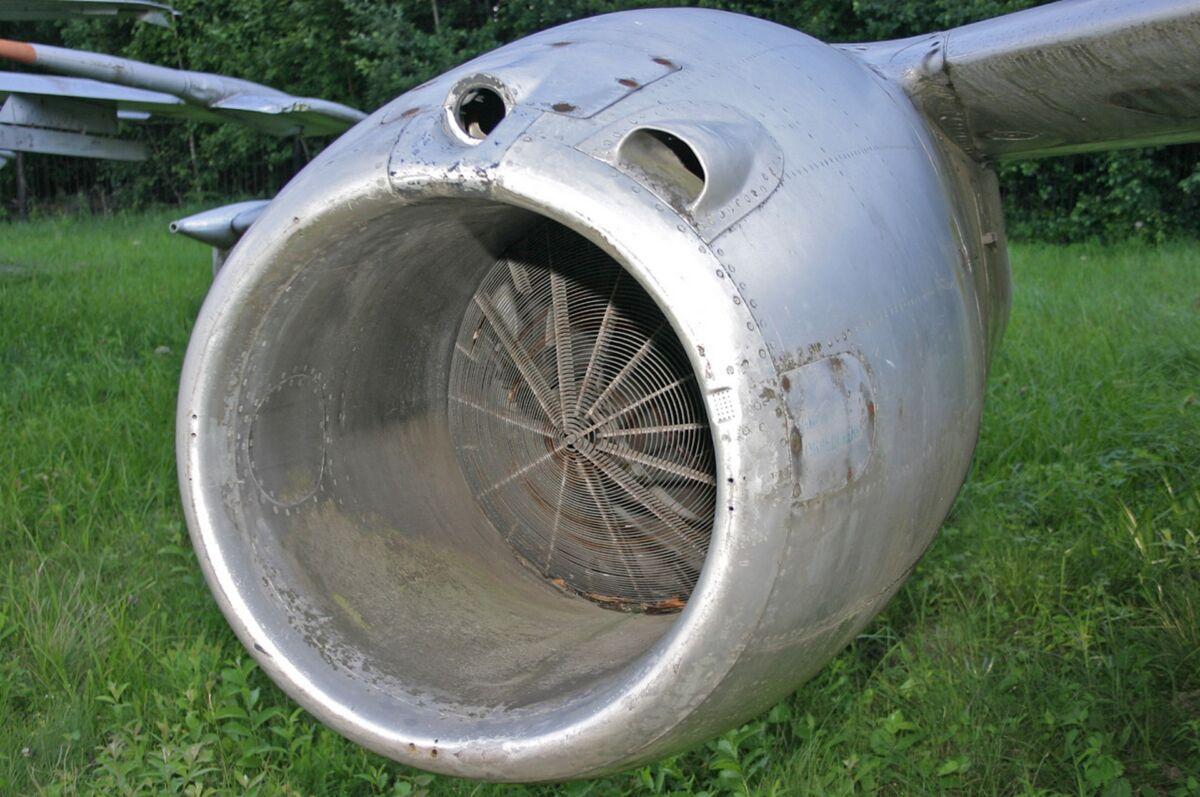
| Pozostałe elementy gondol silnikowych, ich przednie części skleiły się bezproblemo. Część 74 nL jest źle oznaczona - nie powinno być litery L, bo część jest przewidziana do prawej gondoli, powinno być 74n. W tej części znajduje się otwór, który odróżnia ją od lewej strony. Prawdopodobnie jest to miejsce na fotokarabin. Zasklepiłem go kroplą kleju introligatorskiego, tak, żeby imitował przeszklenie. Sam wlot powietrza do silnika jest dość prosty, w prawdziwym samolocie wewnątrz wlotu zamontowana była spiralna osłona zapobiegająca zassaniu do silnika przedmiotów takich jak np. kamienie leżące na pasie startowym. Doskonale widać ją na tym zdjęciu: https://www.net-maquettes.com/wp-content/uploads/photo-gallery/Yak-25_Flashlight/Yak-25-Flashlight-00004.jpg?bwg=1653547448. Zastanawiałem się nad wykonaniem imitacji tej drucianej spirali, ale nie miałem pomysłu z czego ją wykonać, więc wkleiłem to tak, jak zaprojektował to autor. | The rest of the engine nacelles and their front parts stuck together perfectly. The 74nL part is badly marked - there should not be an L (left side), because the part is for the right nacelle, it should be called 74n. There is a hole in this part to distinguish it from the left side. This is probably a place for a photogun. I sealed it with a drop of bookbinding glue to imitate the glazing. The air intake to the engine itself is quite simple, in a real plane a spiral shield was installed inside the intake to prevent objects such as stones lying on the runway from being sucked into the engine. You can see it perfectly in this photo: https://www.net-maquettes.com/wp-content/uploads/photo-gallery/Yak-25_Flashlight/Yak-25-Flashlight-00004.jpg?bwg=1653547448. I was thinking about making an imitation of this wire spiral but had no idea what to make it from, so I put it in as designed by the author. |
%20(2200x1524).jpg)
%20(2200x1526).jpg)
%20(2200x1525).jpg)
%20(2200x1525).jpg)
%20(2200x1528).jpg)
%20(2200x1526).jpg)
%20(2200x1528).jpg)
%20(2200x1525).jpg)
| Po uporaniu się z gondolami silnikowymi zabrałem się za znajdujące się na końcówkach skrzydeł "cygara" będące komorami w których chowały się boczne kółka. Te zespoły części kleiły się świetnie, miałem pewne obawy co do tego jak będą pasować do skrzydeł, ale okazało się, że niepotrzebnie. | After dealing with the engine nacelles, I started the "cigars" located on the tips of the wings, which were the hatches in which the side wheels were hidden. These sets of parts were great, I had some concerns about how they would fit the wings but found it unnecessary. |
%20(2200x1527).jpg)
%20(2200x1652).jpg)
%20(2200x1522).jpg)
%20(2200x1526).jpg)
| Elementy przed sklejeniem pomalowałem od wewnątrz farbą w kolorze gunmetal ponieważ autor nie przewidział ich wewnętrznego poszycia. Co prawda wnętrze nie będzie mocno widoczne po sklejeniu, ale białe niezadrukowane elementy mimo wszystko mogłyby się rzucić w oczy. W środku komór znajduje się również imitacja ożebrowania (projekt ją przewiduje). Trochę razi w oczy to, że widoczne są od wewnątrz paski łączące, ale tak jak wspomniałem - na modelu nie będzie to rzucało się w oczy. | Before cutting off the elements, I painted the rear side of the sheet with gunmetal paint, because the author did not provide for their internal sheathing. It is true that the interior will not be clearly visible after assembling, but the white unprinted elements could still be noticeable. In the centre of the hatches, there is also an imitation of ribs (the design provides for it). The fact that the connecting strips are visible from the inside is a bit offensive, but as I mentioned - it will not be noticeable on the model. |
%20(2200x1526).jpg)
%20(2200x1525).jpg)
| Z kolei czymś, co bystremu oku nie umknie, jest to, że autorowi pomyliły się strony i na lewym "cygarze" umieścił zieloną lampkę pozycyjną, a na prawym czerwoną. Powinno być odwrotnie. Poprawiłem ten błąd wycinając sobie z zapasu koloru (pozyskanego znowu z pasków łączących) nakładki w odpowiednim kształcie i zaklejając nimi nadrukowane lampki. Następnie z kolorowej przeźroczystej folii (czerwonej i zielonej) wytłoczyłem sobie "łezki" będące osłonami lampek. Folię rozgrzałem sobie nad ogniem, następnie położyłem ją na gumce do gumowania i przy pomocy małej dentystycznej metalowej kuleczki wytłoczyłem pożądany kształt. Potem pozostało już tylko wyciąć i nakleić osłony lampek w odpowiednich miejscach. | On the other hand, something that a keen eye will not miss is that the author twisted pages and he placed wrongly position lights. On the left "cigar" there is a green lamp and a red lamp on the right. It should be otherwise. I corrected this error by cutting out the appropriate shape overlays from the colour stock (obtained again from the connecting strips) and covering the printed lamps with them. Then, I pressed "tears" from the coloured transparent foil (red and green) which are the covers of the lamps. I heated the foil over a fire, then put it on a rubber band and, using a small metal dental ball, pressing the desired shape. Then the only thing left to do is to cut out and stick the lamp covers in the right places. |
%20(2200x1525).jpg)
%20(2200x1524).jpg)
%20(2200x1524).jpg)
%20(2200x1524).jpg)
| Dokleiłem jeszcze w międzyczasie lotki i tym samym doszedłem do miejsca, w którym można powiedzieć, że do końca budowy pozostały już tylko prace wykończeniowe: muszę cofnąć się do kabiny i komór podwozia - tam pominąłem z premedytacją większość detali zostawiając je sobie na później. Poza tym brakuje jeszcze podwozia, osłony kabiny oraz detali na kadłubie. | In the meantime, I glued the ailerons and thus I came to the place where it can be said that only finishing works remained until the end of the build: I have to go back to the cockpit and the landing gear chambers - there I deliberately omitted most of the details, leaving them for later. In addition, the undercarriage, canopy and details on the fuselage are still missing. |
%20(2200x1523).jpg)
%20(2200x1526).jpg)
%20(2200x1527).jpg)
%20(2200x1527).jpg)
%20(2200x1522).jpg)
%20(2200x1524).jpg)
%20(2200x1526).jpg)
Brak komentarzy:
Prześlij komentarz