
| Opis budowy zakłada, że po sklejeniu centralnej części kadłuba przychodzi kolej na skrzydła. Pominąłem ten etap by zająć się częścią ogonową. Zrobiłem tak dlatego, że przed czterema laty również na tym etapie popełniłem krytyczne błędy i chciałem mieć ten etap już za sobą. W pewnym sensie napędzała mnie też ciekawość, a mianowicie czy tym razem uda mi się sprostać temu wyzwaniu. | The assembly description assumes that after completing the central part of the fuselage, it is the wings turn. I skipped this stage to deal with the tail part. I did so because four years ago I also made critical mistakes at this stage and I wanted to be over with this part. In a sense, I was also driven by curiosity, namely whether this time I would be able to meet this challenge. |

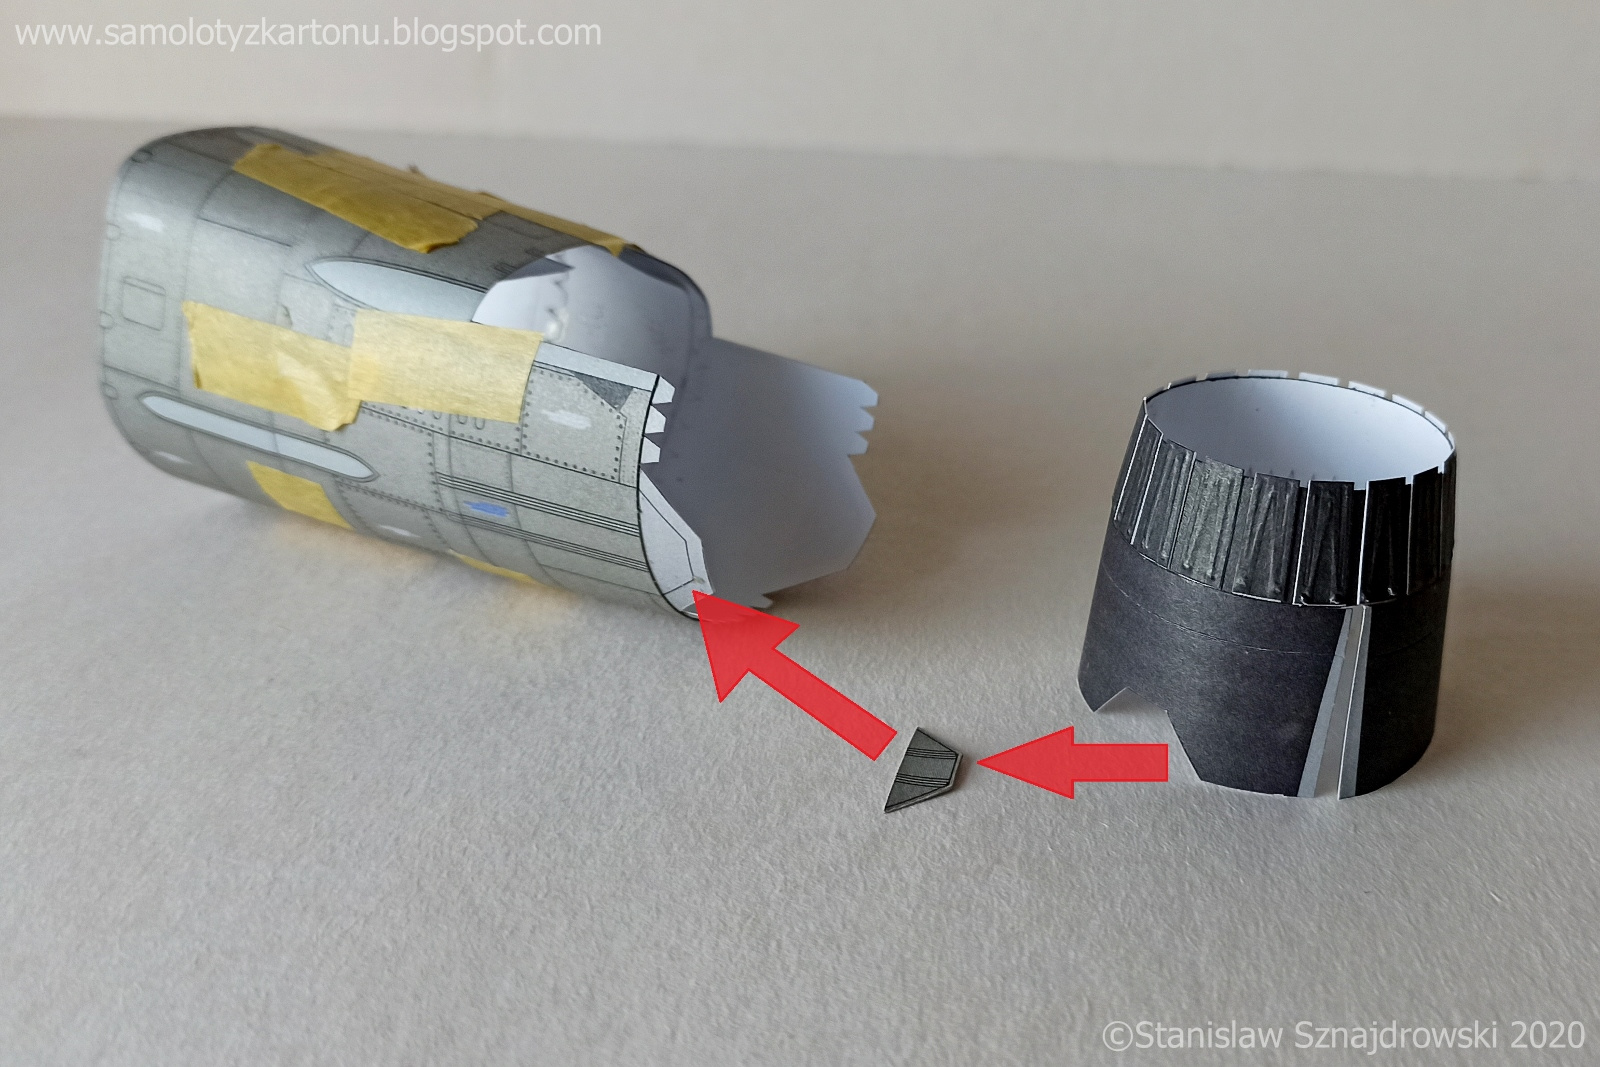
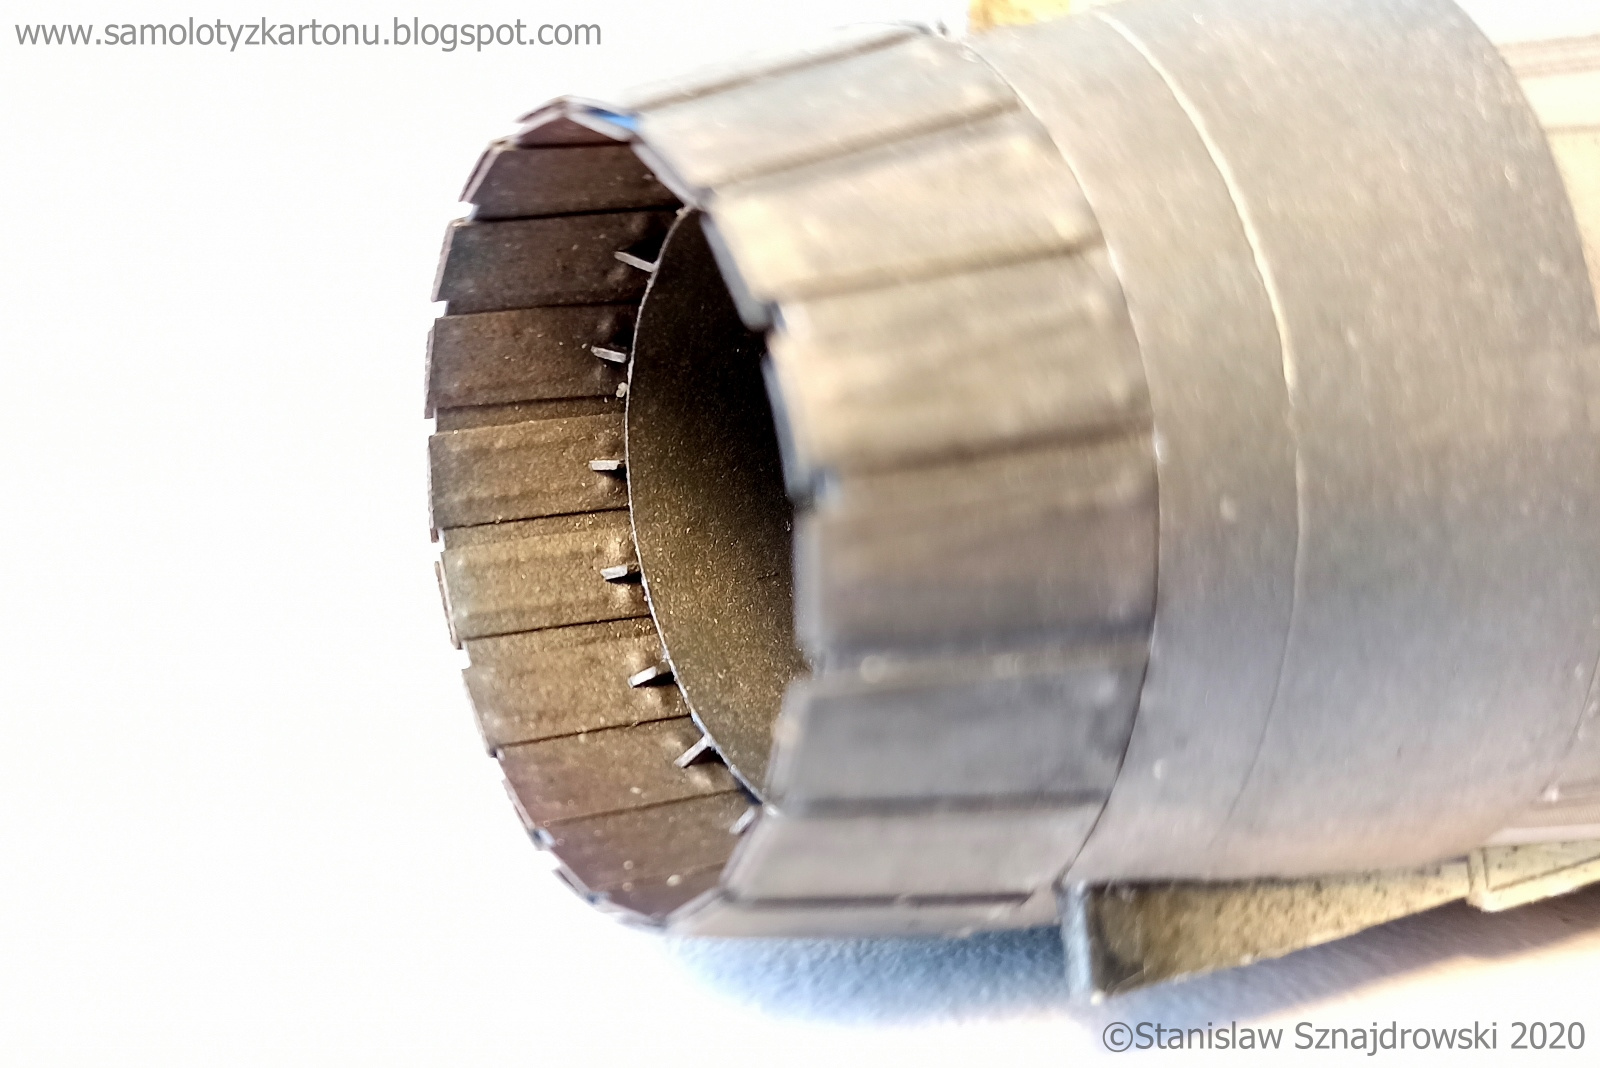
Zacząłem od sklejenia wewnętrznej części dyszy
wylotowej. Będzie później potrzebny przy budowie szkieletu. W środku stożkowaty
element, trzy pierścienie i sześć elementów, na których się owe pierścienie
trzymają. Łopatek wentylatora nie ma więc poszło szybko. Następnie zabrałem się za szkielet. Dość
delikatna konstrukcja, dlatego dobrze mieć wcześniej sklejoną dyszę - włożenie
jej do środka na etapie sklejania ze sobą wręg usztywnia wiotką konstrukcję. Widoczne
na zdjęciu ostrze noża do papieru utrzymywało oś symetrii do momentu
zaschnięcia kleju. Istotnym było dokładne wyszlifowanie szkieletu, zwłaszcza elementów
w45 i w 46 (L/P). Wiem, że przy budowie poprzedniego MiG-a na skutek
niedokładnego wyszlifowania tych elementów powstały mi w tych miejscach tzw.
"krowie żebra". | I started by assembling the inside of the outlet nozzle together. It will be needed later to build the framework. In the center there is a conical element, three rings and six elements on which the rings hang. There is no fan blades, so it went quickly. Then I started on the framework. Quite a delicate structure, so it is good to have the nozzle glued in advance - inserting it inside at the stage of gluing the frames together stiffens the flaccid structure. The paper-knife blade visible in the photo held the axis of symmetry until the glue dried. It was important to thoroughly polish the framework, especially elements w45 and w46 (L / P). I know that during the construction of the previous MiG, as a result of inaccurate sanding of these elements, so-called "cow ribs" appeared on the skin. |


| Niestety konstrukcja szkieletu uniemożliwia wykonanie poszycia moją ulubioną metodą, na skarpetę. Jest to możliwe tylko do pewnego momentu, ponieważ wystające z boku części szkieletu przeznaczone do zamontowania stateczników poziomych blokują sklejone pierścienie poszycia. Zrobiłem to tak - uformowałem element poszycia 64, wkleiłem uformowany pasek łączący i podposzycie. Spasowałem go z centralną częścią kadłuba i wręgą w38. Następnie tak przygotowany element połączyłem z częścią 63, w którą również wkleiłem pasek łączący i podposzycie. Nie dokleiłem jednak tej części do samego końca, górę zostawiłem otwartą, żeby móc nasunąć całość na szkielet. Następnie w dolnej części dokleiłem kolejny segment poszycia tj. 62+58. Tak powstałą uformowaną skorupę dokleiłem później do oszlifowanego szkieletu. Po jej połączeniu na górę przykleiłem części 61+59. Przed ich przyklejeniem dodałem jeszcze w górnej części cztery podłużne wzmocnienia z tektury 1 mm. Całość udało się ładnie zamknąć. | Unfortunately, the construction of the framework makes it impossible to put a skin on it as a "sock" or "shell". This is only possible up to a point since the side-projecting parts of the framework intended for the installation of the horizontal fins block the glued skin shell. I did it like this - I formed the skin element 64, pasted the formed connecting strip and the undercoat. I folded it with the central part of the fuselage and the frame w38. Then I connected so prepared element with the part 63, into which I also glued the connecting strip and the undercoat. However, I did not stick this part to the end, I left the top open so that I could slide the whole thing over the framework. Then, in the lower part, I glued another shell segment, i.e. 62 + 58. I glued the shell formed in this way to the sanded framework. After connecting it, I glued the parts 61 + 59 to the top. Before sticking them, I added four longitudinal 1 mm cardboard reinforcements in the upper part. The whole thing was closed nicely. |


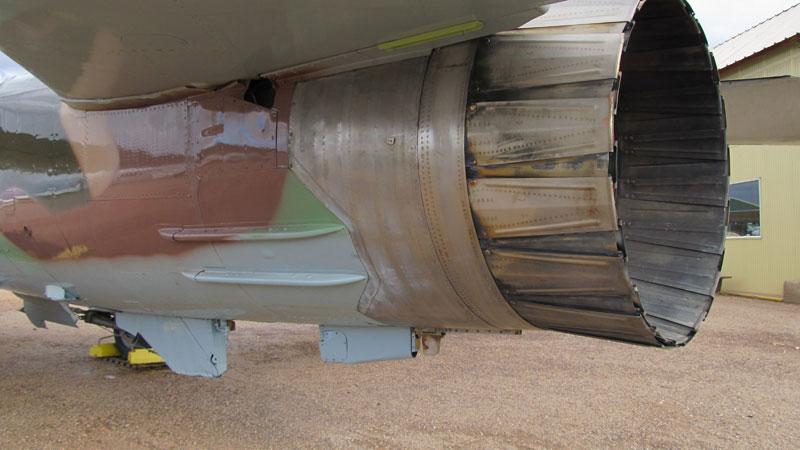
| Charakterystycznym miejscem każdego odrzutowca jest dysza wylotowa. Niestety w tym modelu jest ona czarna, jakby się dokładniej przyjrzeć, widać różne odcienie, jakieś cieniowanie, takie pręgi. Niestety w druku wyszła raczej czarno-brunatna plama, która nie wygląda zbyt atrakcyjnie. Powinno to wyglądać na przykład tak: | A characteristic place of every jet is the exhaust nozzle. Unfortunately, in this model it is black, if you look closely, you can see different shades, some shading, such stripes. Unfortunately, the print has a rather black and brown stain that does not look very attractive. It should look like this: |
Skoro już zacząłem się bawić w waloryzowanie (komory
podwozia) to postanowiłem pójść kolejny krok dalej. Po obejrzeniu kilku
poradników na YouTube i obejrzeniu zdjęć wielu różnych dysz wylotowych zabrałem
się do pracy. Najpierw skleiłem dyszę w standardzie, bez retuszu. Odciąłem od
niej elementy będące fragmentami pokryw hamulców aerodynamicznych i dokleiłem
je do części 58/62. | Since I started to play with adding something extra to the model (wheel bays), I decided to go another step further. After watching a few tutorials on YouTube and seeing photos of many different exhaust nozzles, I started to work with my exhaust nozzle. First, I glued it as standard, without retouching. I cut off the parts that are fragments of the air brake covers and glued them to part 58/62. |


Wszystkie listki, tak wewnętrzne jak i zewnętrzne
przetłoczyłem przy pomocy prostych narzędzi widocznych na zdjęciu. Odrysowałem
na wewnętrznej stronie linie i punkty, po których później igłą pod dużym
kątem na kawałku piwnej (miękkiej)
tektury wygniotłem żłobienia i nity. Patent podpatrzony i nauczony od ZbiG-a. | All these leaves both internal and external, I pressed from the other side with the simple tools shown in the photo. On the inside, I drew lines and points, on which later I kneaded grooves and rivets with a needle at a high angle on a piece of soft cardboard. The patent was observed and learned from my master. |


| Tak przygotowaną dyszę zabezpieczyłem taśmą
maskującą przed nałożeniem pierwszej warstwy farby. Jak widać na zdjęciu -
maskowanie odpowiada pręgom nadrukowanym na elemencie. Pomalowałem całość
bardzo ciemnym szarym, prawie czarnym. | I secured the prepared nozzle with masking tape before applying the first layer of paint. As you can see in the photo - the masking corresponds to the stripes printed on the element. I painted the whole thing very dark grey, almost black. |


Następnie ściągnąłem maski i nałożyłem na dyszę
kolejną warstwę farby - tym razem kolor stalowy (Vallejo 71.065). | Then I took off the masks and put another layer of paint on the exhaust nozzle - this time it was steel (Vallejo 71.065). Then I put the masks on the outer leaves and covered the spaces between them once more with dark grey. |


Po wyschnięciu przyszła kolej na pomarańczowy
(mieszanka Vallejo 71.002 i 71.003). W kilku miejscach dałem nieco więcej
czerwieni (Vallejo 71.003). Kolejnym kolorem był niebieski w miejscach gdzie
dysza jest najbardziej wypalona, głównie wewnątrz (Vallejo 71.004). | After drying, it was the turn of the orange (Vallejo 71.002 and 71.003 mix). In a few places, I gave a bit more red (Vallejo 71.003). The next colour was blue where the nozzle is burned most, mostly inside (Vallejo 71.004). |


Następnie nad całością rozpyliłem delikatnie mgiełkę stalowego koloru. Ostatnim krokiem było nałożenie czarnego i rdzawego washa, głównie w okolicach zewnętrznych listków. Zdjęcia nie oddają pełnego efektu, w zależności od oświetlenia i kąta patrzenia powierzchnia wygląda inaczej, czasem jest bardziej metaliczna, a czasem mocniej przebijają się kolorowe warstwy. Wstawiam te zdjęcia, które moim zdaniem pokazują efekt najlepiej oraz kilka w innym oświetleniu z mocniejszym kontrastem i nasyceniem - tam widać wyraźniej różnicę kolorów. Kiedy już wszystko wyschło dokleiłem dyszę do reszty tylnej części kadłuba. Właściwie to pierwszy raz malowałem coś takiego i jestem nawet całkiem zadowolony z efektu. Ta ostatnia srebrna warstwa trochę może za mocno przyćmiła poprzednie, wyciągnę z tego wnioski na przyszłość. | Then I sprayed the whole thing with a gentle mist of steel colour. The last step was to apply a black and rusty wash, mainly around the outer leaves. The photos do not reflect the full effect, depending on the lighting and viewing angle, the surface looks different, sometimes it is more metallic, and sometimes the coloured layers show through more. I put in the photos that in my opinion show the effect best and a few in another lighting with stronger contrast and saturation - there you can see the colour difference more clearly. When everything was dry, I glued the nozzle to the rest of the rear part of the fuselage. Actually, this is the first time I painted something like this and I'm even quite happy with the result. This last silver layer may overshadow the previous ones a bit too much, I will draw conclusions from this for the future. |


Zanim dokleiłem tylną część kadłuba do reszty
dokonałem jeszcze jednej kosmetycznej zmiany. Jest coś, co mi się nie podobało,
na elemencie nr 63 nadrukowane jest takie coś (zaznaczone w kółku). Na kilku
zdjęciach MiG-ów 23 wypatrzyłem, że w tym miejscu jest wypukła osłona. Widać ją na przykład TUTAJ. Znalazłem ją także na zdjęciu w moich zbiorach, jak głosi napis eksploatacyjny, kryje sie pod nią "urządzenie elektryczne automatyki silnika." Cokolwiek to znaczy. Swoją drogą nie mam pojęcia czym jest nadruk zaznaczony strzałką, nie znalazłem
tego na żadnym zdjęciu prawdziwej maszyny.
Jako, że nie zdecydowałem się na wykonanie otwartych hamulców
aerodynamicznych miałem nieco zapasu koloru, z którego wykonałem ten element. | Before I glued the rear part of the fuselage to the rest, I made one more cosmetic change. There is something I did not like, there is something printed on the part 63 (marked in a circle). In several photos of the MiG 23, I noticed that there was a convex cover in this place. You can see it, for example, HERE. I also found it in a photo in my collection, as the inscription on the fuselage says, underneath it is "an electrical device for engine automation." Whatever that means.By the way, I have no idea what the imprint marked with the arrow is, I did not find it in any picture of a real machine. As I did not decide to make opened airbrakes, I had some spare of colour from which I made this element. |


| Na zakończenie dzisiejszej relacji kilka zdjęć
połączonej ze sobą tylnej i centralnej części kadłuba. Przód założony jeszcze
bez kleju. Na tę chwilę jedyne 43 centymetry, duża bestia. P.S.
Zrezygnowałem z robienia otwartych hamulców aerodynamicznych. Nie z lenistwa,
po prostu nie lubię jak wygląda samolot kiedy są otwarte, zaburzają
niepotrzebnie sylwetkę. Poza tym tak na prawdę otwierają się tylko na chwilę
podczas lądowania, albo podczas przeglądów/napraw. Nie robię modelu ani
lądującego ani będącego w trakcie przeglądu więc pokrywy jak najbardziej
powinny być zamknięte. | At the end of today's report, a few photos of the rear and central parts of the fuselage connected together. The front section is mounted without glue yet. Only 43 centimeters at the moment, a big beast. P.S. I gave up making open airbrakes. Not out of laziness, I just don't like what the plane looks like when they are open, they unnecessarily disturb the shilouette. Besides, they only open for a moment during landing or during maintenance / repair. I'm not making a model that is either landing or under review, so the covers should be closed. That's my point of view. |

Relacja super w angielskim rewelka .Czym się posiłkowałeś w doborze słów ?
OdpowiedzUsuńDzięki. Tłumaczę sam, posiłkuje się trochę translatorem Google, ale on niedokładnie tłumaczy, śmieszne rzeczy czasem wychodzą. Wiele fachowych słów z dziedziny lotnictwa muszę wyszukiwać czy to w słowniku czy na anglojęzycznych forach modealrskich czy poprzez obrazki, filmy na YouTube. W ciągu ostatnich paru lat stworzyłem sobie "słowniczek" z potrzebnymi mi wyrazami z zakresu modelarstwa i lotnictwa. Na końcu tworzenia angielskiej wersji tekstu sprawdza go jeszcze pod kątem gramatycznej poprawności mój zaprzyjaźniony korektor-anglista. Ogólnie to z całego procesu tworzenia posta, wersja angielska zajmuje mi najwięcej czasu. Pozdrawiam!
OdpowiedzUsuńBardzo ładny silniczek,MIG coś czuje będzie ,,kozak''.Dzieki za szybką i rzeczową odpowiedź w sprawie taśmy.Teź chyba wpadne do ,,hangaru''coś pokleic. Pozdrawiam Tomek
OdpowiedzUsuńCasino Roll - How to Make a Living From Around the World
OdpowiedzUsuńLearn 춘천 출장샵 all you need to know w88 about Casino Roll and 충청남도 출장샵 find out about Casino Roll for 김제 출장마사지 the USA. We're a great place to check 인천광역 출장마사지 out the