
| Jest mi niezmiernie miło powitać Was w dziewiątym już odcinku serialu pod tytułem Messerschmitt Bf-110 G-4/R8. Głównym tematem dzisiejszego posta będzie osłona kabiny oraz pozostałe elementy wyposażenia wnętrza. Jak przystało na ten model - nie było łatwo, ale zdążyłem się już przyzwyczaić, Wy z resztą pewnie też. | I am very pleased to welcome you in the ninth episode of the series titled Messerschmitt Bf-110 G-4 / R8. The main topic of today's post will be the canopy and other interior details. As befits this model - it was not easy, but I have already got used to it, you probably also. |

| Mimo, że głównym bohaterem tego odcinka jest osłona kabiny, zacznę od pozostałego wyposażenia wnętrza. Mając na uwadze to, że w środku znajduje się już tyle części, może wprawić w zdziwienie fakt, że jeszcze czegoś brakuje. Pewną grupę elementów zostawiłem sobie na później ze względu na to, że wystają one ponad krawędź kabiny i manewrowanie kadłubem mogłoby doprowadzić do ich uszkodzenia, odpadnięcia od reszty i pogubienia. Oto i one przed złożeniem: | Although the main character of this episode is the canopy, I will start with the rest of the interior equipment. Bearing in mind that there are already so many parts inside, it can be astonishing that something is still missing. I left a group of elements for later due to the fact that they protrude above the edge of the cockpit and maneuvering the fuselage could lead to their damage, falling off the rest and getting lost. Here they are before submitting: |

| Przystępujemy więc do "rozbrojenia" tego pudełka z częściami. Na początek kozioł (bądź pałąk) przeciwkapotażowy. Pod tą piękną nazwą kryje się metalowa rama chroniąca osłonę kabiny (oraz głowę pilota) przed zmiażdżeniem w wyniku kapotażu, czyli fikołku przy lądowaniu. Podobne pałąki mają w dzisiejszych czasach samochody z nadwoziem typu cabrio. Ów pałąk składa się w modelu z drutu wykonanego wg. szablonu oraz papierowych owijek. Rozwarstwiłem je, gdyż uznałem, że łatwiej będzie je w ten sposób okleić drut. Pewne trudności miałem z górną oklejką ze względu na jej kształt - jest spłaszczona i wygięta na bokach. Trochę to męczyłem, efekt jaki jest - widać na zdjęciach. Do modelu zamieszczony jest kształtownik do wykonania górnej części kozła, niestety, w mojej opinii nie jest on pomocny. | So we proceed to "disarm" this box with parts. First, the anti-roll over bar. Correct me if it's wrong. It's a metal frame that protects the cabin cover (and the head of the pilot) from crushing as a result of a roll over landing. Nowadays, convertible cars have similar bars. This roll bar consists of a wire made according to template and paper wrappers. I made the paper thinner because I decided that it would be easier to wrap them in this way. I had some difficulties with the top cover because of its shape - it is flattened and bent on the sides. I'm not proud of it, but it's not so bad. The effect you can see in the pictures. The model has a template to make the upper part of the roll bar, unfortunately, in my opinion it is not helpful. |


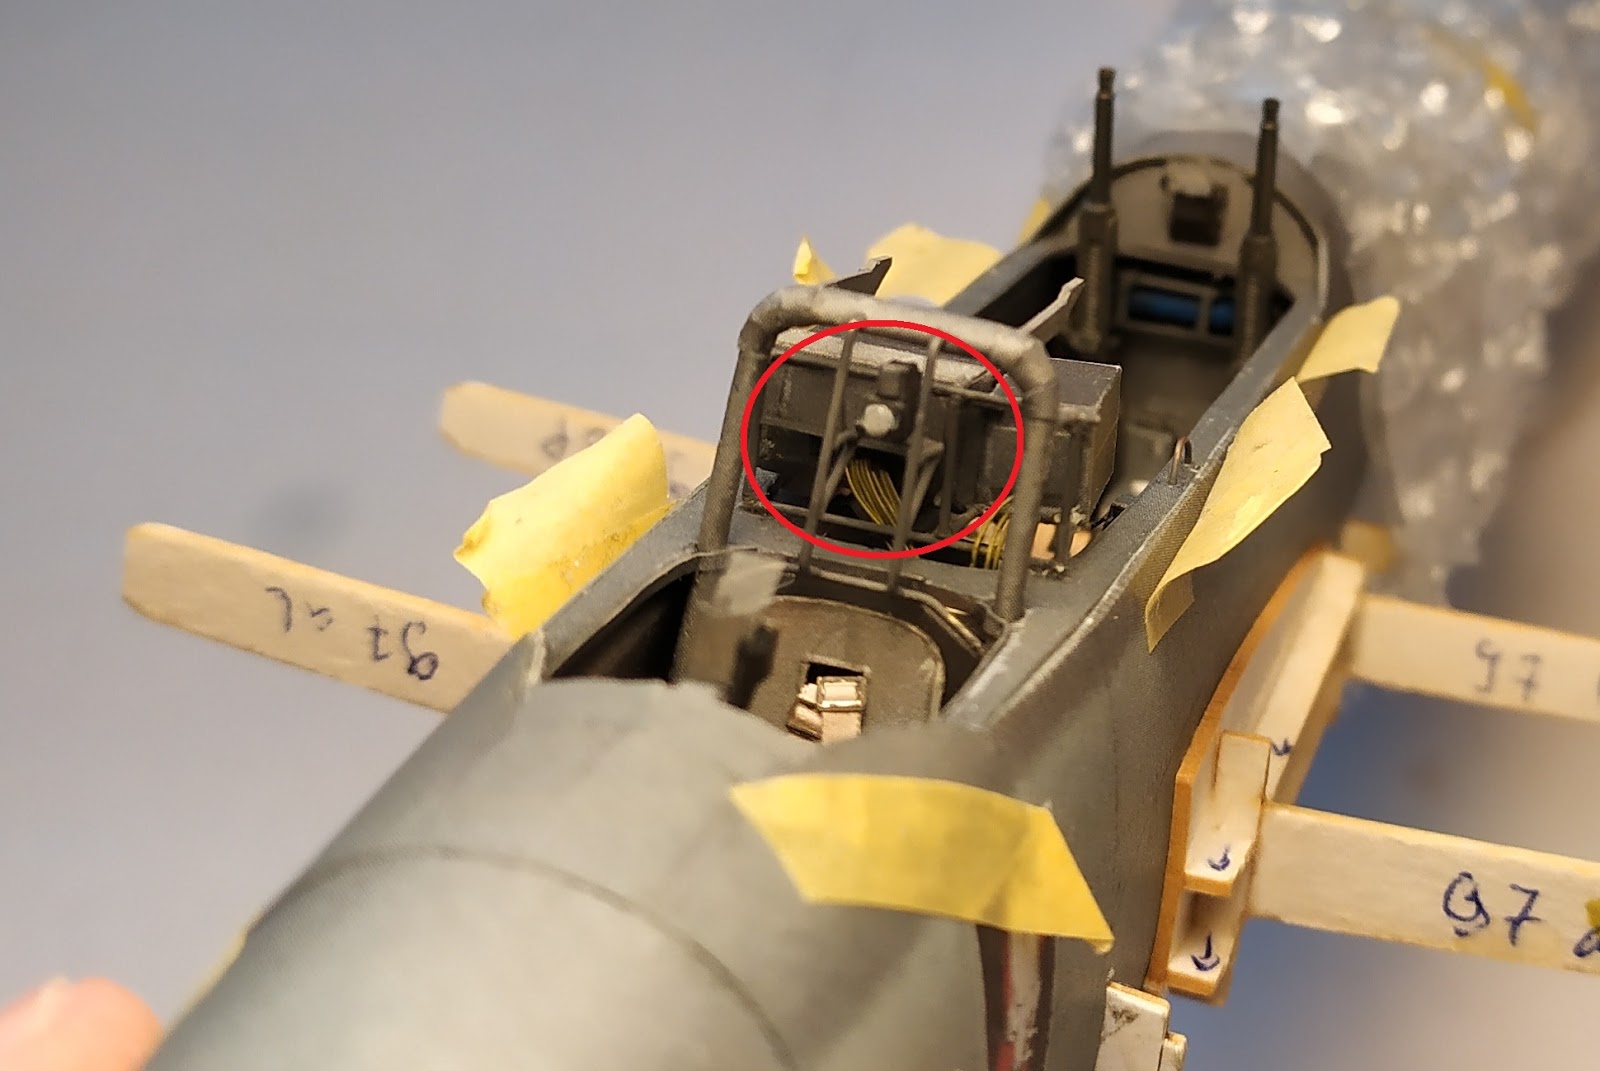
| Sam kozioł pełni funkcje nie tylko ochronną. Jest także miejscem mocowania wyposażenia radarowego znajdującego się za głową pilota. Musiałem zbudować druciany stelaż, na którym chwilę później zamontowałem dwa "pudełka" będące wspomnianym wyposażeniem. Jako że wyposażenie to znajduje się dość mocno na widoku, także tylne części "pudełek" są dobrze widoczne, postanowiłem dodać imitację okablowania. Jest to trochę modelarskie science-fiction, bo nie dotarłem do żadnych schematów podłączenia tych urządzeń, ale wychodzę z założenia, że jakieś przewody musiały tam być. W końcu w 1944 roku technologia Wi-fi ani Bluetooth nie istniała. Na tym etapie budowy zająłem się także sklejeniem celowników oraz kilku innych detali, ale wrócę do tego w dalszej części posta. | The roll-over bar itself has not only a safety function. It is also a place to attach radar equipment behind the pilot's head. I had to build a wire frame on which a moment later I installed two "boxes" which were the radar equipment. As this equipment is quite good in view, also the rear parts of the "boxes" are clearly visible, I decided to add an imitation of wiring. This is a bit of science-fiction modeling, because I did not reach any connection schemes for these eqipment, but I assume that some cables must have been there. After all, in 1944 Wi-fi and Bluetooth did not exist. At this stage of build, I also glued sights and a few other details, but I'll come back to that later in this post. |


Pozostałym do wykonania
wyposażeniem kabiny jest również uzbrojenie tylnego strzelca - MG-81Z. Był
to lotniczy karabin maszynowy (Flugzeugmaschinengewehr)
kalibru 7,92 mm produkowany przez zakłady Mausera. Broń ta znalazła
zastosowanie w wielu niemieckich samolotach z okresu II wojny światowej, min. w
Bf-110. Maszyna, której model buduję
była wyposażona w MG-81 Z, literka na końcu pochodzi od słowa Zwilling, czyli bliźniak lub jak podaje
inne źródło zweiläufig, czyli
podwójny. Mamy więc do czynienia z dwiema lufami. Podobnie jak przy działkach
MG-FF wykorzystałem metalowe lufy z
Model Master w skali 1:32. Zastosowanie toczonych dodatków nie jest jednak
jedyną zmianą jaką wprowadziłem w stosunku do oryginalnego projektu. Prawie od
podstaw wykonałem bowiem mocowanie karabinu do kokpitu. Wycinanka oferuje uchwyt,
który jest już od dawna w kabinie, oraz dwie złączone rurki w które wchodzą
lufy karabinu. Wszystko jest jak najbardziej poprawne, ale dotarłem do kilku
zdjęć oraz opisu elementu, który nosił oznaczenie Lagerung LG-81Z/3 i był łożem przewidzianym dla karabinu MG-81Z.
Mając takie dane, nie mogłem się oprzeć...Cały zespół karabinu i łoża jeszcze
nie jest gotowy, celowniki dokleję na sam koniec, cały czas nie wiem jak
wykonam taśmy amunicyjne. To może jednak poczekać do końcowego montażu. Dla
zainteresowanych podaję link do strony na temat MG-81 w portalu
www.deutscheluftwaffe.com Ostrzegam, tekst tylko po niemiecku.
| The remaining equipment of the cockpit is also armament of the rear gunner - MG-81Z. It was a 7.92 mm air machine gun (Flugzeugmaschinengewehr) manufactured by Mauser. This weapon has been used in many German aircraft from World War II, among others in Bf-110. The machine whose model I am building was equipped with MG-81Z, the letter "Z" at the end comes from the word Zwilling, meaning a twin or, as another source says zweiläufig, i.e. a double. So we are dealing with two barrels. Like the MG-FF cannons, I used 1:32 scale metal barrels from Model Master. The use of this barrels is not the only change I have made compared to the original design. Almost from scratch I made the attachment of the machine gun to the cockpit. The project offers a handle that has been in the cockpit for a long time, and two connected tubes into which the barrels of the machine gun fall. Everything is most correct, but I got several photos and a description of the element, which was designated as Lagerung LG-81Z / 3 and was the bearing intended for the MG-81Z machine gun. With such data, I couldn't resist... The whole machine gun and bearing is not ready yet, I will attach the sights to the very end, I still don't know how to make ammunition tapes. This, however, can wait for final assembly. For those interested, I provide a link to the page about MG-81 on the portal www.deutscheluftwaffe.com. Warning, text only in German. |


| Przejdźmy zatem do gwoździa programu, jakim jest osłona kabiny. Nie czuję się pewnie w kwestii oszklenia i twierdze, że nie jest to moją mocną stroną. Bf-110 ma piękną, długą i elegancka osłonę kabiny, która ewidentnie kojarzy mi się ze szklarnią w ogrodzie moich dziadków. Z tą różnicą, że oni mają tam pomidory, a tu pod spodem kryje się latająca artyleria. Samo wycięcie ramek, zajęło mi kilka wieczorów. Zanim jednak kartonu dotknęło ostrze skalpela, pokryłem niezadrukowaną stronę odpowiednim kolorem farby. Robię tak, bo uważam, że nie ma nic gorszego niż szczerzące się od wewnątrz białe niedomalowane powierzchnie ramek. A wystarczy delikatne przesunięcie wewnętrznej ramki względem zewnętrznej żeby rzucało się to w oczy. Po wycięciu ramek polakierowałem je tak, jak będę lakierował gotowy model. Dzięki temu uniknę maskowania tych okienek na gotowym modelu. To byłoby bardzo mozolne zajęcie, a tak po polakierowaniu gotowego modelu dokleję przygotowaną osłonę. Bez ryzyka, że matowy lakier zostawi na niej ślady. Jako że nie potrafię tłoczyć osłon skorzystałem z osłony oferowanej przez Wydawnictwo Kartonowy Arsenał. I tutaj muszę pochwalić, jakość osłony jest bardzo dobra. Porównałem sobie z osłoną kupioną do poprzedniego Bf-110 i wypada ona dużo lepiej, zwłaszcza jej przejrzystość jest bardzo zadowalająca. | Let's move to the highlight, which is the canopy. I do not feel confident about canopies and claim that this is not my strength. Bf-110 has a beautiful, long and elegant canopy, which evidently reminds me of a greenhouse in my grandparents' garden. The only difference is that they have tomatoes there, and there is "flying artillery" underneath. Just cutting the frames took me several evenings. However, before the cardboard touched the scalpel blade, I covered the unprinted side with the right colour of the paint. I do it because I think there is nothing worse than the white, unpainted surfaces of the frames smiling from the inside. And just slightly shift the inner frame relative to the outer one to make it visible. After cutting out the frames, I varnished them as I would varnish the finished model. Thanks to this, I will avoid masking these windows on the finished model before varnishing. It would be a very arduous to do. So after varnishing the finished model I will stick the prepared canopy. No risk that matte varnish will leave marks on it. I can't make the canopy from plastic, so I used the shield offered by the Kartonowy Arsenał Publishing House. And here I have to praise, the quality of the canopy is very good. I compared myself with the bought cover to the previous Bf-110 and it looks much better, especially its transparency is very satisfactory. |


| Klejenie tego było niczym stąpanie po kruchym lodzie. Do mocowania ramek użyłem głównie butaprenu, jest do tego moim zdaniem najlepszy, ale trzeba uważać, żeby nie pobrudzić. Najlepiej delikatnie nakładać go w bardzo małej ilości igiełką na ramkę. Należy pamiętać, że po dociśnięciu do osłonki, klej może wyjść spod ramki dlatego należy nakładać go jak najmniej. W niektórych miejscach wspomagałem się klejem introligatorskim, zaskakujące ale całkiem nieźle łączy PCV z papierem. Pytanie tylko na jak długo. W jeszcze innych miejscach, takich jak krawędzie użyłem punktowo cyjanoakrylu. Najpierw okleiłem wszystkie górne ramki z wytłoczką ustawioną na szkielecie zamieszczonym w wycinance. Okazał się on bardzo pomocny przy montażu. Następnie wykroiłem sobie z osłonki otwarte, ruchome elementy. Zdecydowałem się na otworzenie tylnego włazu oraz górnej i lewej pokrywy kabiny pilota. Kolejnym krokiem było wklejanie wewnętrznych ramek. Te rozdzielałem sobie na jeszcze mniejsze, żeby ułatwić montaż. Wszystkie krawędzie powstałe w wyniku rozcinania trzeba było wyszlifować, wzmocnić klejem cyjanoakrylowym i wyretuszować. W ten sposób udało mi się dobrnąć do końca oklejania osłony kabiny. | Building it was like walking on thin ice. For gluing the frames I used mainly butaprene, which is in my opinion the best, but be careful not to get the canopy dirty. It is best to gently apply it in a very small amount with a needle or toothpick on the frame. It should be remembered that after pressing into the casing, the glue can come out from under the frame, therefore it should be applied as little as possible. In some places I helped with bookbinding glue, surprising but quite well combines PVC with paper. The only question is for how long. In other places, such as edges, I used cyanoacrylate. First, I glued all the upper frames using the framework attached to the model. The framework was very helpful during assembly. Then I made open, moving parts from the canopy. I decided to open the rear hatch and the upper and left cover of the pilot's cockpit. The next step was to paste the inner frames. I separated these into smaller ones to make assembly easier. All edges resulting from cutting had to be sanded, reinforced with cyanoacrylate glue and retouched. In this way, I managed to finish the build of the canopy. |


| Pozostało jeszcze wyposażenie osłony w maszt antenowy, a właściwie tylko jego mocowanie, mocowanie anteny ramowej (ten pierścień, antena radionamiernika?), zegary przyrządów radiooperatora znajdujące się pod centralną częścią osłony oraz kilka uchwytów. Tutaj też zabawiłem się w improwizację okablowania. Jest jedno zdjęcie wnętrza Bf-110, co prawda wersji C lub D, na którym się wzorowałem, jednak zaznaczam, że jest to jedynie imitacja okablowania - mogło tak wyglądać. Jak widać, kable jeszcze nie są podłączone, z tym czekam do ostatecznego montażu. | What remains is the inner equipment of the canopy with an antenna mast, or rather only its mounting, mounting of the frame antenna (this ring, i'm not really sure what it was), clocks of the radio operator's instruments located under the central part of the canopy and several handles. Here I also improvised on the wiring. There is one picture of the interior, admittedly the C or D version of Bf-110, on which I modeled, but I note that this is only an imitation of the wiring - it could look like this. As you can see, the wires are not connected yet, so I'm waiting for final assembly. |


| Na koniec przyszła pora czyszczenia zabrudzeń powstałych w wyniku prac nad osłoną. Tu przydały się waciki, papierowe ręczniki, płyn do czyszczenia szyb oraz wykałaczka z lekko podschniętym butaprenem (do wyciągania kleju, który wyszedł spod ramki). | Finally, it was time to clean the dirt resulting from work on the canopy. Here, swabs, paper towels, glass cleaner and a toothpick with slightly dried butaprene (for removing the glue that came out from under the frame) came in handy. |


| Na zdjęciu poniżej umieściłem prowizoryczny schemat montażu masztu antenowego. Wygiąłem go nieco u podstawy, tak by po naprężeniu anteną nie wygiął się do tyłu. Mocowanie tylko na wtyk do osłony wydawało się mi zbyt słabe. | In the photo below I have placed a makeshift antenna mast assembly diagram. I bent it slightly at the base so that it does not bend back after straining the antenna. Attaching without it to the canopy seemed too weak to me. |


| Wrócę tutaj na chwilę do wspomnianych wyżej celowników. Jak wiecie, samolot był wyposażony w dwa działka strzelające ukośnie do góry. Zastanawiało mnie w jaki sposób pilot celował we wrogi obiekt tą bronią. Za plecami pilota na kratownicy kozła przeciwkapotażowego znajduje się jeszcze jeden celownik. Podobnie jak celownik głównego uzbrojenia, jest to celownik refleksyjny, który wyświetla krąg celowniczy na szybce przy pomocy światła żarówki. Jego szkiełko znajduje się jednak nad głową pilota, na górnej pokrywie osłony kabiny. Umożliwiało to celowanie z działek instalacji "Schräge Musik". Sprytnie. | I will come back to the sights mentioned above for a moment. As you know, the plane was equipped with two cannons shooting obliquely upwards. I was wondering how the pilot aimed the enemy object with this weapon. There is another sight behind the pilot on the truss of the trestle. Like the main armament sight, it is a reflective sight that displays the reticle on the glass with the help of a light bulb. His slide is, however, above the pilot's head, on the top cover of the canopy. This made it possible to aim from the "Schräge Musik" installation cannons. Clever. |


| Wspomniane wcześniej celowniki i zegary przed i po montażu w kabinie: | The aforementioned sights and clocks before and after installation in the cab: |


| Jak widać na zdjęciach,
osłona kabiny trzyma się jedynie na taśmy montażowe. Jest dopasowana i gotowa
do wklejenia, ale to, tak jak wspomniałem, na samym końcu. Nie widzę sensu
montowania wcześniej czołowej szyby pancernej - zostaje na koniec. Ostatnią rzeczą, którą dziś pokażę są dodatkowe zbiorniki paliwa. Przy nich trochę się poddenerwowałem, bo zazwyczaj są to elementy łatwe i liczyłem na przyjemne "odpoczynkowe" klejenie. Nie w tym modelu. Te zbiorniki mają specyficzny kształt. Oprócz "ożebrowania" charakterystycznego dla niemieckich zbiorników, nie mają na całej długości okrągłego przekroju. W tylnej dolnej części spłaszczają się a przez środek przebiega coś co roboczo nazwijmy "rowem". Tu przepraszam za skojarzenie, ale to wygląda po prostu jak dwa pośladki. Uformowanie tego "rowa" to była jakaś paranoja, przy pierwszym zbiorniku nie wiedziałem jak się za to zabrać i mocno go wymęczyłem. Drugi poszedł już nieco lepiej, bo wymyśliłem sobie patent z pęsetą (patrz zdjęcie - kolaż). | As you can see in the pictures, the canopy only sticks to the mounting tapes. It is matched and ready to paste, but this, as I said, at the very end. I do not also see the point of mounting the armored windscreen now - it stays at the end. The last thing I will show you today are additional fuel drop tanks. I was a bit nervous with them, because they are usually easy and I counted on pleasant "relaxing" gluing. Not in this model. These tanks have a specific shape. In addition to the "ribs" characteristic of German fuel tanks, they do not have a round cross-section along the entire length. In the rear bottom part they flatten and through the middle of what runs what we call a "ditch". Here, I'm sorry for the association, but it just looks like two buttocks. The formation of this "ditch" was some kind of paranoia, at the first tank I did not know how to go about it and I tired of it a lot. The second one went a little better because I came up with a patent with tweezers (see photo - collage). |


| Gdybym miał jeszcze dwa zbiorniki, wyszłyby zapewne tak, że bym się ich nie wstydził. Podsumowując - jeżeli ktoś będzie miał ten model w stanie "na części" to chętnie przyjmę zbiorniki. Jeszcze jedno, część szwów przebiega na górze (tylna połowa), a część na dole (przednia połowa). To wprawiło mnie w błąd przy pierwszym zbiorniku, gdzie intuicyjnie wszystkie szwy zrobiłem na początku na dole i musiałem później rozklejać. Mam jeszcze jedną ciekawostkę - na zbiornikach jest błąd w napisie informującym, że znalazca zbiornika powinien się zgłosić na najbliższym posterunku policji lub lotnisku wojskowym. Zamiast "sofort bei nüchster Polizei Dienststelle oder Fliegerhorst Lage melden" powinno być "sofort bei nächster Polizei Dienstselle oder Fliegerhorst Lage melden ". Nie ma takiego słowa jak nüchster, literówki każdemu się zdażają. Pozostałe napisy informują, że to nie jest bomba, lecz zbiornik z paliwem. | If I had two more fuel tanks, they would probably come out so as not to be ashamed of them. One more thing, some of the places of joining run at the top (back half) and some at the bottom (front half). This confused me at the first fuel tank, where intuitively all the joining places were made at the beginning at the bottom and I had to undo later. I have another curiosity - there is a mistake on the inscriptions on the fuel tanks saying that the tank finder should report at the nearest police station or military airport. Instead of "sofort bei nüchster Polizei Dienststelle oder Fliegerhorst Lage melden" it should be "sofort bei nächster Polizei Dienstselle oder Fliegerhorst Lage melden". There is no word like nüchster, such mistakes happen to everyone. Other inscriptions indicate that this is not a bomb, but a fuel tank. |

| Tyle na dzisiaj. Kolejny odcinek powinien nosić miano ostatniego - zostało mi tylko podwozie, anteny oraz końcowy montaż. Jednakże patrząc na elementy i rysunki złożeniowe podwozia zdaje się, że wyrażenie "tylko podwozie" jest mocno nie na miejscu... Poniżej kilka linków do zdjęć, którymi wspomagałem się na tym etapie budowy. | That's all for today. The next episode should be called the last - I have only the landing gears, antennas and final assembly left. However, looking at the parts and assembly drawings of the landing gears, it seems that the phrase "only landing gears" is strongly out of place... Below are some links to the pictures that I used at this stage of construction. |
Jesteś kapitalny. Twoja technika, precyzja, umiejętności posługiwania się narzędziami, klejami, farbkami itp. jest fenomenalna. Do tego ogolna wiedza o samolotach, broniach...no po prostu palce lizać.
OdpowiedzUsuńProszę Cię tylko o jedno. Nie przestawaj tworzyć tej strony, pisz, redaguj, twórz,wrzucaj zdjecia, bo jesteś inspiracją dla wielu modelarzy.
Dziękuję! Jest mi bardzo miło! Takie opinie motywują mnie do dalszej pracy i napędzają do działania. Będę tworzył dalej, jest jeszcze parę modeli do sklejenia :)
Usuń